Allison: (01:04)
So we're going to talk about duct design for low-static air handlers. A lot of people are scared of low-static air handlers. But before we get into that, anybody who is here tonight and doesn't know me and saw my name, maybe Googled "Allison" and was wondering what I look like. This is what you get if you Google the name Allison. But I'm not any of those people, although I am in Who's Who of American Women. One time somebody asked me if it was because I used to be woman and no, it's not. Not that there's anything wrong with that, but no.
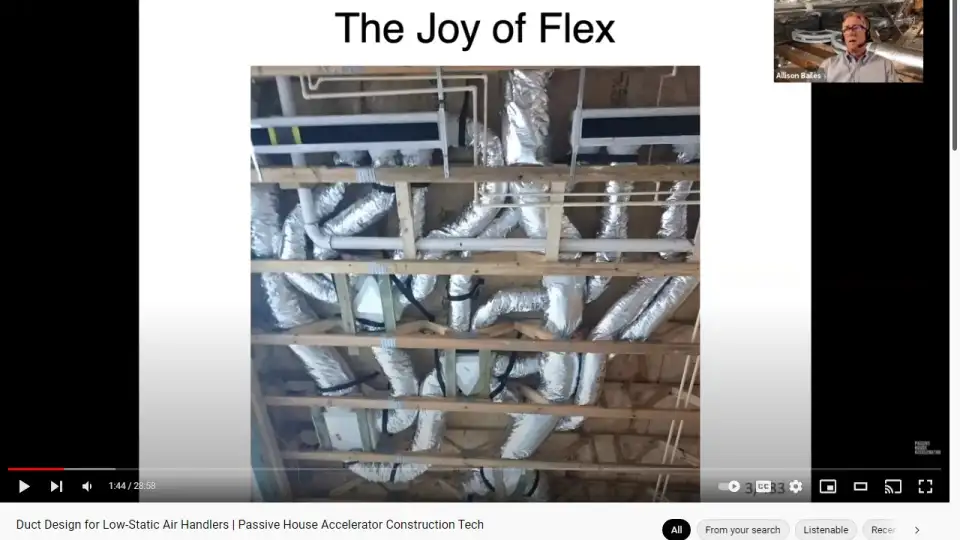
So anyway, let's talk about duct work first. Before we get into low-static air handlers, let's talk about duct work. Why even talk about duct design and low-static air handlers? Because, we know how to do ducts, right? Look at this system. Flex duct does everything we need it to do, so why should we bother with anything else? That's just a beautiful system right there. It won't work worth crap, but it looks nice, right? Flex duct, you can turn the air on a dime. And if you don't have a dime, you can turn it on a nickel.
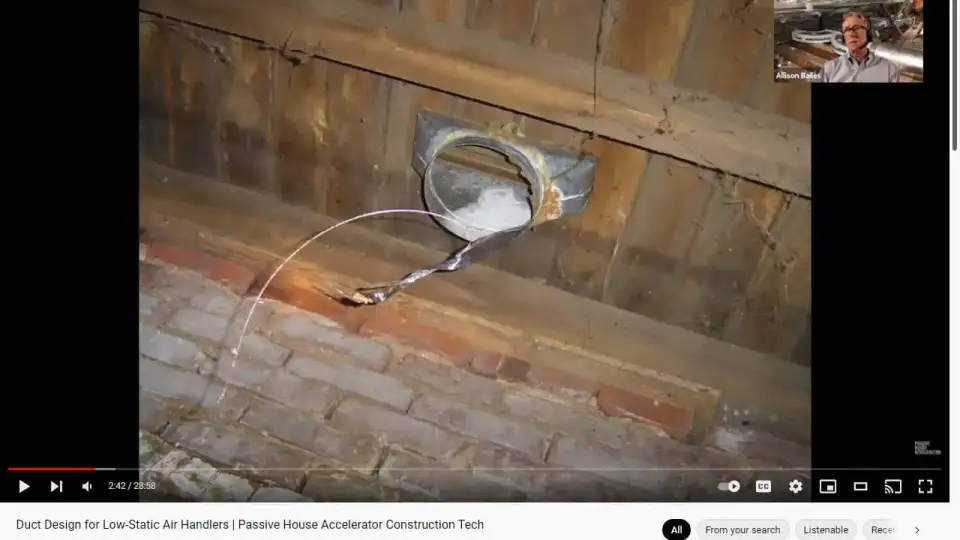
It's really good at doing stuff that hard pipe can't do, like squeezing in tight places. Hard pipe can't do that. But sometimes there are problems with flex duct. First, let me show you the advantage of a flex duct, even in a situation like this. Yeah, it's been torn down by some critters in the crawl space, but you see that wire? That's the helical wire that keeps the shape of the flex duct. It's still attached to the boot, and that's guiding the air to the boot. That's the path of least resistance right there. That's how the air gets to the boot. Another advantage of flex duct is you can make the air really quiet by cutting the airflow down to next to nothing by putting in extra light. You don't have to take extra duct back with you on the truck when you're done installing.
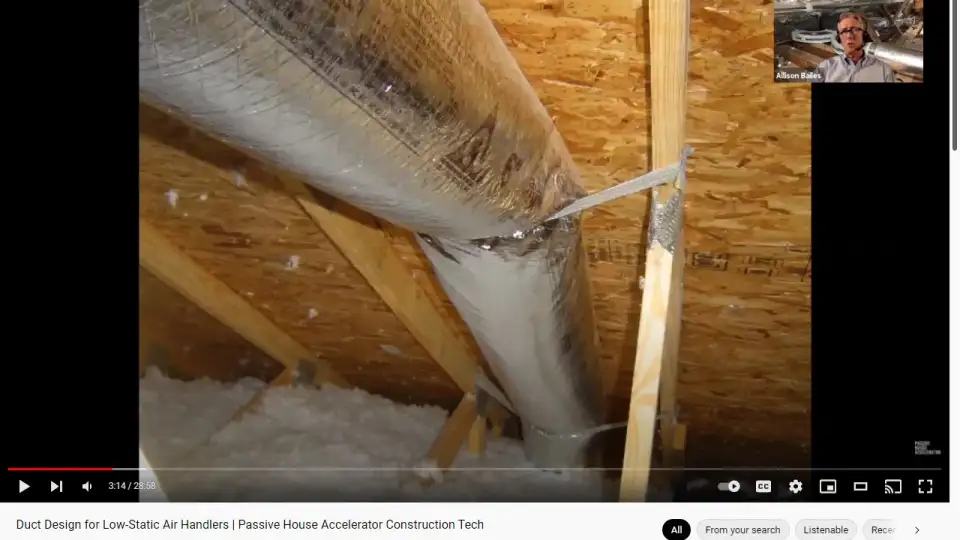
In the south, dehumidification is a big thing. And one way to do dehumidification is to cool the air down, make it really, really cold, and then reheat it: The reheat system. This is a reheat system in Charleston, South Carolina. There is a very inexpensive reheat right here. You just staple the flex duct up right under the roof deck. Lots of reheat there.
Of course we want ducts inside the enclosure and everybody thinks you have to use hard pipe for that, but you can do it with flex duct, too. Plumbers love flex duct, as does everybody. You know what plumbers call flex duct? Knee pads. I heard you all laughing...in my head.
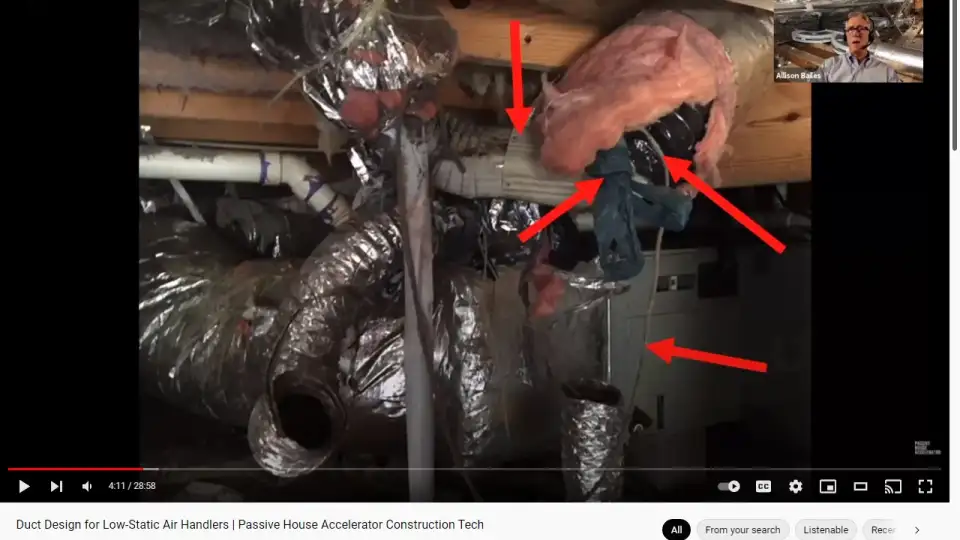
When you design a duct system, it has to be absolutely clear which way the air is going—where it's coming from, where it's going to—and if anybody can figure this out, please let me know. But it's always easy to retro-fit the system if it doesn't work. You can just chop it off and tape it up with duct tape. And you can use things like downspout from your gutter system. You can use a piece of cord lying around. You can use trash bags. Boots and suspenders here with a double tie on it.
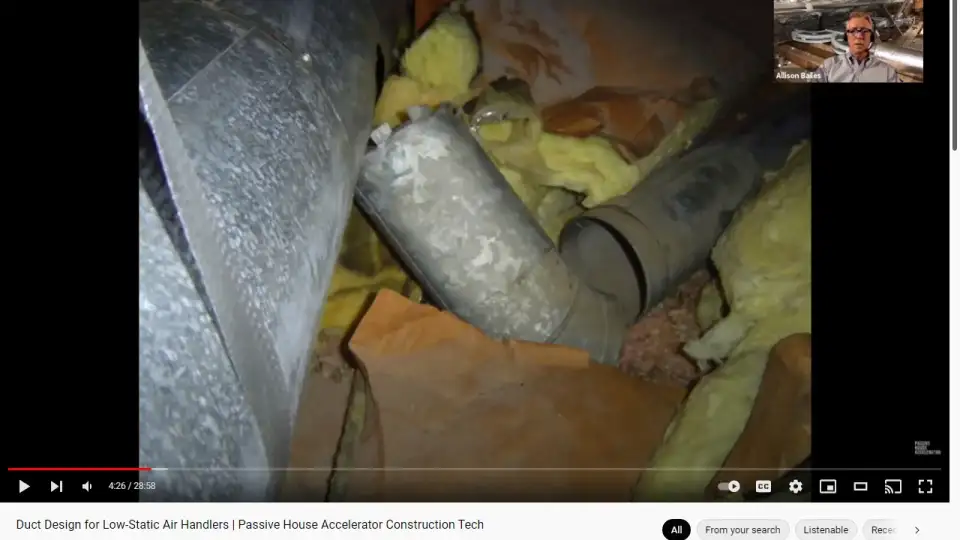
Hard pipe, of course, some people think is the answer. This was a hard pipe system I took apart. Well, I didn't take it apart; I took the insulation off. It fell apart by itself. The insulation was what was holding it together.
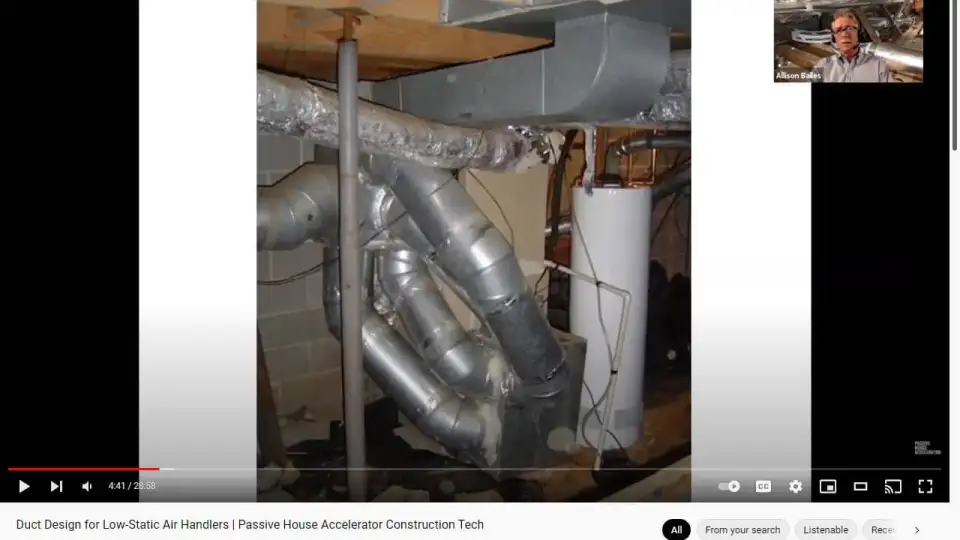
Here's a hard pipe system. Again, very confusing. I think the reason for this is somebody didn't want to take the stuff back to the shop with them, or they wanted to use up a bunch of fittings. I'm not sure, but this makes no sense at all. If your brain is hurting, mine is too. And looking at that brain kind of reminds me of flex duct, actually, but let's get into some of the real stuff here.
So one of the things about low-static air handlers that a lot of people believe is that you can't put too much duct work on a low-static air handler because it just doesn't have the oomph to push that air through a long duct system. And that's not true.
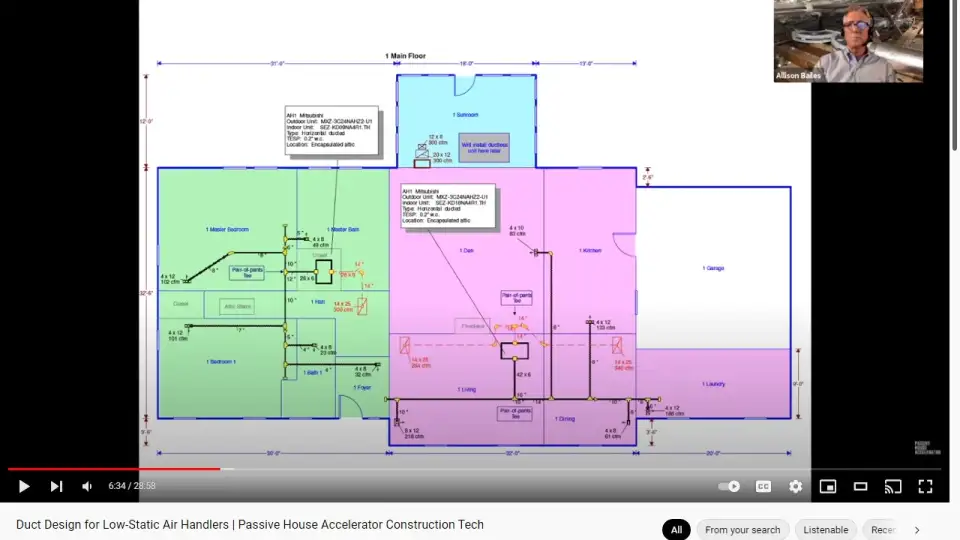
Here's the duct plan from my house. There are two low-static duct systems in the attic. Here's one for the bedroom side of the house. That's a fair amount of duct work over there; one return and then a bunch of supplies with a trunk line. The main part of the house has a bigger air handler. It's rated for same static pressure. It's a Mitsubishi SEZ unit. It's rated for 0.2" of water column, static pressure, which is pretty low. Standard air handlers are rated for 0.5" or 0.6". 0.2" is really low, which means you have to have a really good duct system to make it work. Some people would look at this and say, "Oh, there's no way all that duct work on a low-static air handler is ever going to work." They're wrong, because it does work. This is in my house. I know it works because I've lived with it for two years now. And it's great. So why does it work? That's the question, we want to know.
The reason it works is that I am a juggler and duct design is really nothing but juggling. You've got some different things to juggle to make it work. The first thing is pressure. Pressure is only one factor in the equation. And when people say you can't put too much duct work on a low-static air handler, they're thinking that pressure is the only thing that matters. But pressure is not the only thing that matters. Pressure comes from the blower and HVAC guys are used to working with big blowers that have a lot of pressure, a lot of force, and can move the air with higher pressure.
But in a Passive House and high-performance homes, there are these things called variable capacity mini-split heat pumps. Yes, you can get them with higher static pressure, and we do a fair number of our designs with the higher static versions of these because we don't always have control over what the contractors and installers are going to do with the duct system. So, we often will go with the higher static units. However, the low static units are great. They use less energy. You just have to make sure the ducts are going to work with them. This is the opposite of commercial systems. In commercial systems, you design your duct system, and then you figure out what blower you need to go with it. In residential systems, you pick the blower first, and then design the duct system. So the juggling happens by looking at the other factors.
One of those factors is the air flow rate. The blower has a pressure rating, and for each pressure there will be an airflow, and that airflow and the pressure go together. So the CFM and the static pressure go together. They're determined by the air handler. But you also put a duct system on there, unless it's a ductless unit, and there's a couple of things that affect your ability to move the amount of air that you want to the places where you want it. One is the resistance of the air against the surface on the inside of the duct work.
This depends on the material you're using. You can put it through sheet metal, which is nice and smooth. You can put it through rigid duct board, with the fiberglass on the inside, and that's not very smooth; there'll be a lot of resistance there. You can also put it through flex duct. That may be nice and smooth or it may be rough, depending on how it's installed. With flex duct, the inner liner needs to be pulled really tight to make it nice and smooth on the inside. When you do that, it works almost as well as hard pipe, but that doesn't often happen. The other factor that matters for resistance in the duct system is turbulence. When you turn the air, when you split the air, when you put things into the airstream, like dampers, you build up turbulence in the air flow, and that also slows down the air. Those are pressure drops; things that change the pressure. A third factor that we juggle in the duct design process is the velocity. Duct size and the velocity go together.
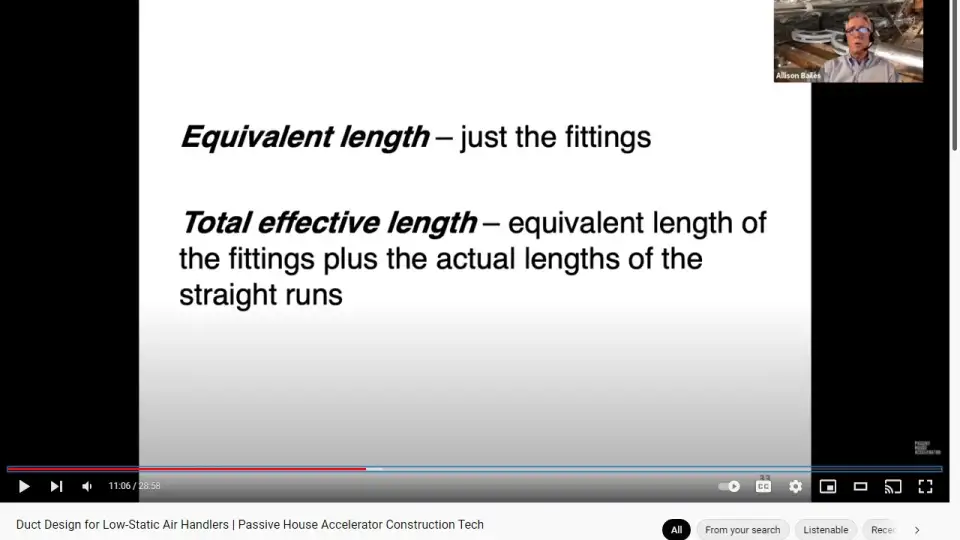
A bigger duct is going to have a lower velocity. If you don't change anything else, a smaller duct will have a higher velocity. A higher velocity will be noisier, so noise is definitely a consideration sometimes. And so we've got to factor that in. So, of those three factors now, the resistance is the big one. So in Manual D, which is the air conditioning contractors of America protocol for designing duct system, the way we characterize the resistance center duct system is this thing called total effective length, which has two components, the equivalent length, and the total effective length. Notice there's two different words there, equivalent length and effective length, but they're used differently. Equivalent length is just for the fittings. That's the resistance in a fitting, and it's the pressure drop in the fitting that's equivalent to the pressure drop in a certain straight length of duct work.
If you have a fitting and it says the equivalent length is 30 feet, that means the pressure drop of the air going through that fitting is equivalent to the pressure drop in 30 feet of straight duct. When you add up all of the equivalent links of the fittings to the lengths of the straight ducts, then you get the total effective length. And that number gets calculated into something called the friction rate, but we're not going to go into those details. You've got to get the available static pressure, the total effective length, then you calculate the friction rate, and that tells you whether you have a good duct system or not. So, fittings are where the action is at. Going back to the myth that you can't put too long of a duct system on a low-static air handler, it's not the actual length that matters. It's the total effective length.
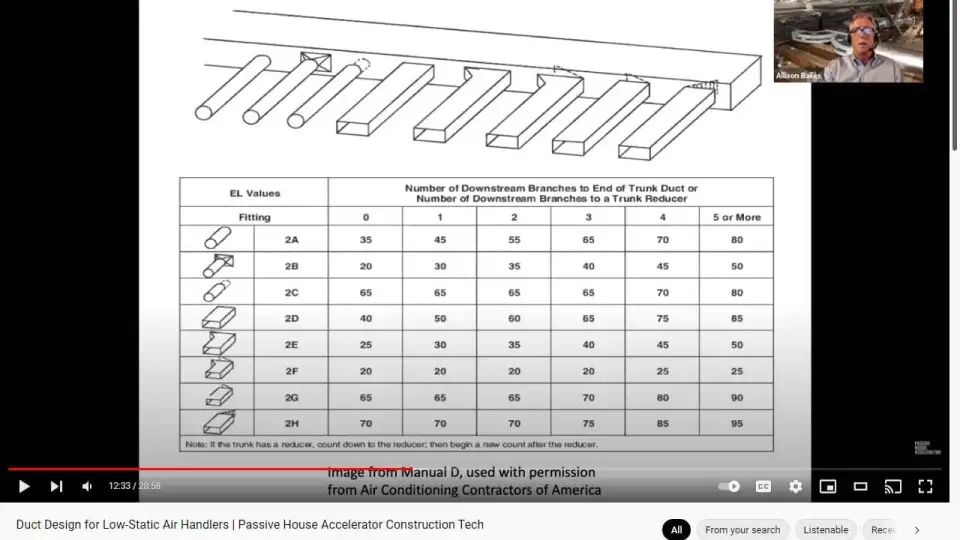
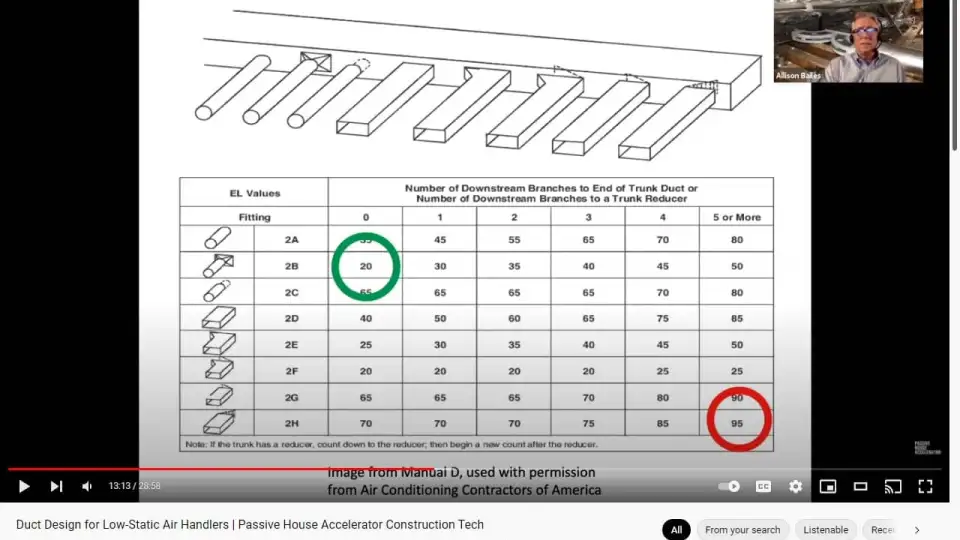
The fittings determine that way more than the actual length of the duct system. So here's an example of takeoffs from a trunk line. So if you're doing these different kind of takeoffs, you can see that there's a table here. And we don't need to go into all the details of it, but there's different kinds of takeoffs, and where they're positioned on the trunk line has an effect. So if you look through here, you can see the low end of this is 20 feet. So that one fitting, that one takeoff on the trunk line, is 20 feet. You could also choose a really bad one that's 90 or 95 feet, meaning that one fitting is equivalent to 90 or 95 feet of straight duct. That's horrible. That's horrible.
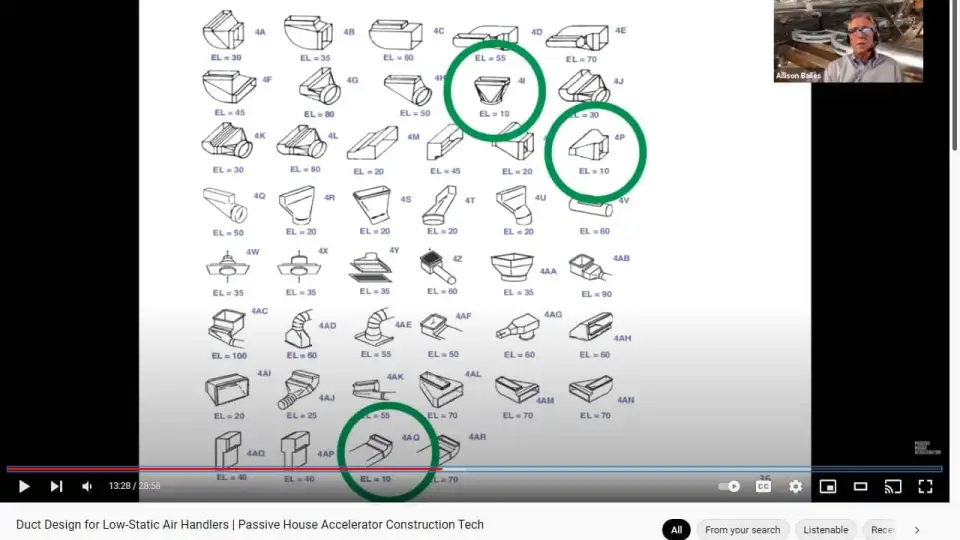
And here are boots. Boots are the transition piece between a duct run and where the vent is in the room. And again, we've got some that are really low. We've got some 10 foot equivalent lengths here, and we've got a 90 foot. So if you want to do a low-static air handler, you've got to pay attention to these numbers, and you want to go for the good fittings.
Here's some elbows. Again, it depends on what kind of elbow it is and what the ratio is, the radius of curvature to the diameter of the duct.
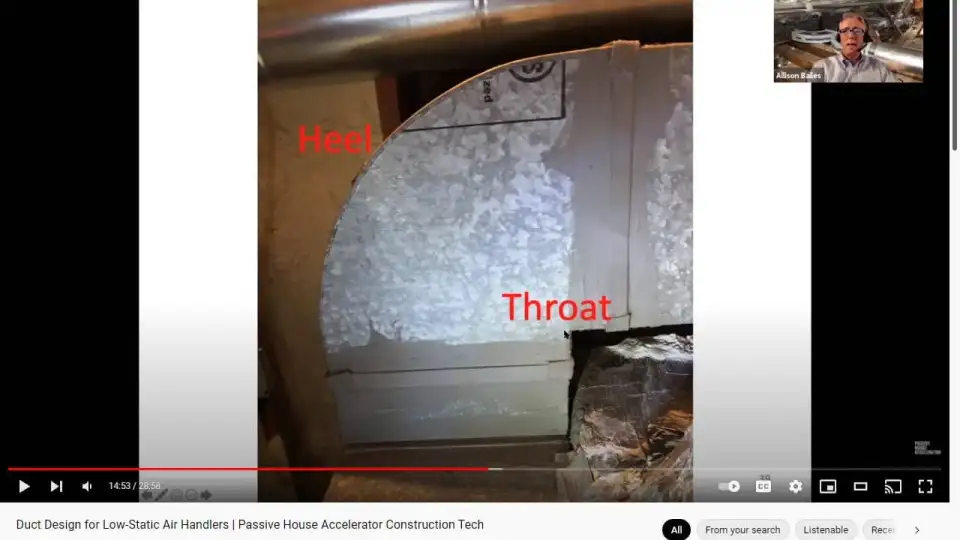
Let's talk about elbows, because this is where you have a big opportunity to make an improvement. Now, some people looking at this might think, "Hey, look at that nice radius turn!" Here's some HVAC duct installer terminology for you: The outer part of an elbow is called the heel; the inner part is called the throat. One of those parts is more important than the other, and it's not the one that looks nice here.
A lot of people are looking at this nice curve, but this is really what determines whether it's a good fitting or not. Here's how you can think about that. Have you ever seen a racetrack, NASCAR, Indy...whatever, where they have sharp 90 degree turns? No. Because what would happen? Think about the air as race cars going through here. The air is coming through this way, and it's got to make this turn. Is it going to just make a sharp 90 degree turn? No, it's going to shoot out this way and then turn, which means there's going to be a bunch of turbulence in here. This air is going to crash into the air coming down here. It's a mess. You don't want a sharp throat. You want a nice radius on the throat. It's good to have the radius on the heel too, but when you're looking at elbows, always look at the throat first. That's more important than the heel.
So, fittings dominate pressure drops, and that's why this myth is not true. Most of the resistance is coming in the fittings, not in the straight ducts. So, put in good fittings and do your duct design right, and you can have a low-static unit that works perfectly.
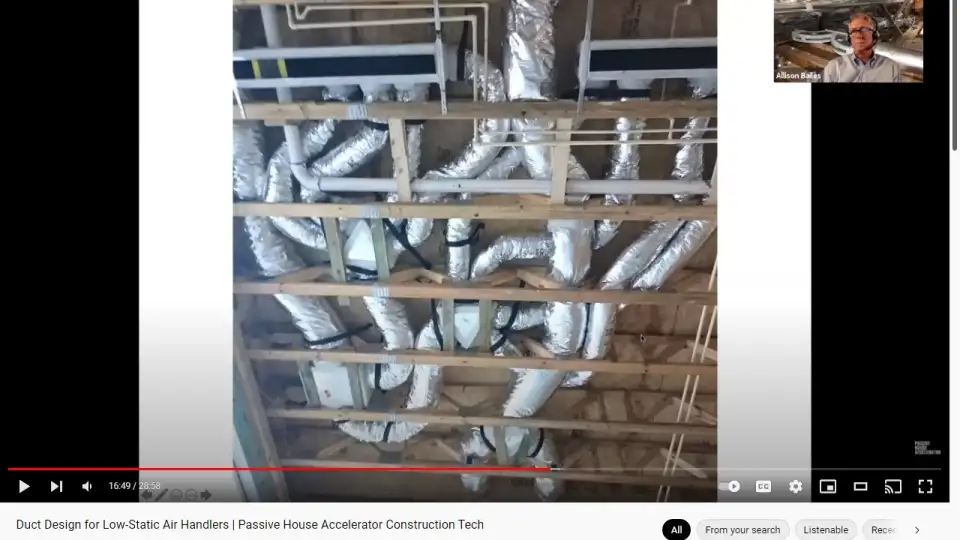
When we're talking about fittings, usually we're thinking of hard pipe, but sometimes people do everything with flex duct, then they turn it and split it with flex duct and everything, but it's hard to know what the equivalent lengths are for some of the stuff they do with flex duct. What's the total effective length of this mess right here? Now that's hard to know.
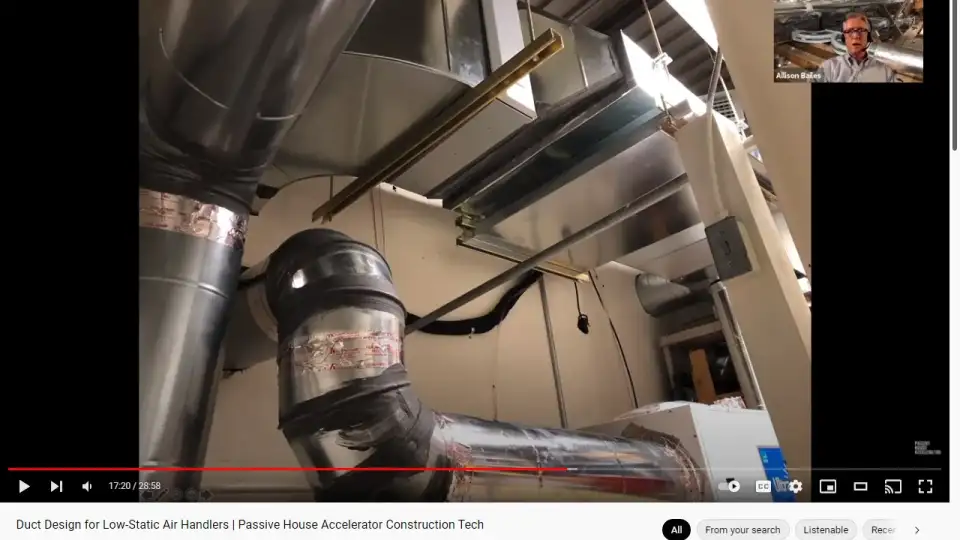
This is the system in our office. This is a 12K, one-ton Mitsubishi SEZ unit. The air handlers are up there. We've got a transition piece here going to a filter right here, and then we've got a big radius turn. Again, there's the throat, a nice radius throat with a good radius of curvature relative to the diameter of the duct. That's a low equivalent length, low pressure drop radius turn there. I measured the total external static pressure that tells you how good it is, and the system is ready for 0.2, but it's running at 0.09.
So we're only halfway to the pressure that we could have used. We've got a really good duct system on this. Now, this one is pretty short, and I don't have the schematic for this duct system in the presentation, but it is a fairly short duct system compared to the ones at my house. That 0.09 inch of water column static pressure was with an airflow of 363 CFM (cubic feet per minute of total airflow), which is about what it's rated for, so we were getting full air flow. The pressure drop across the filter was 0.06, so that was really good.
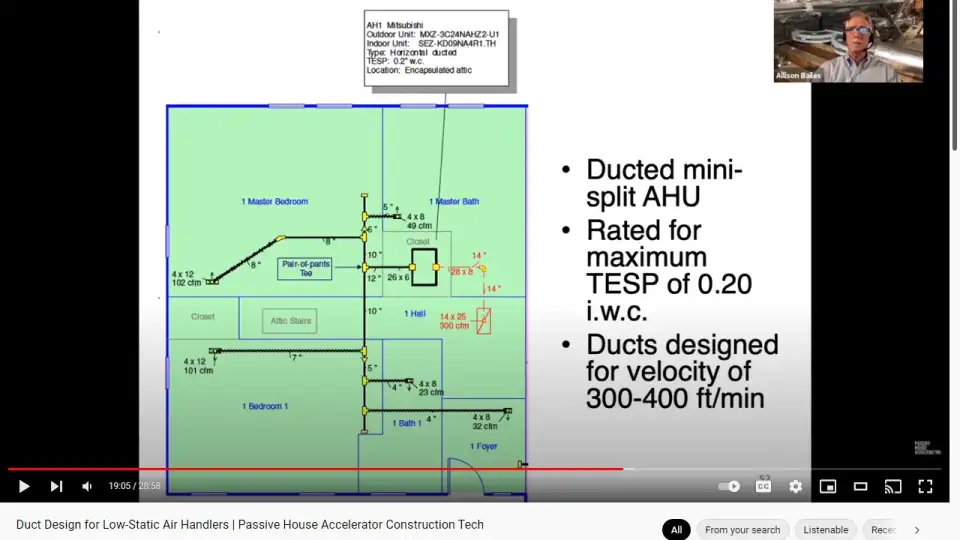
Here's the main supply trunk in my house coming out, and it splits. I've got a picture of that, so you can see the nice radius turns there; what I call the pair of pants T. Well...I didn't make up that name. It's been in the industry for a while. But this is a ducted mini-split, rated for 0.2" of water column. We usually design for lower velocities. The ACCA Manual D protocol says, designed for up to 900 feet per minute, but if design for lower velocity, the pressure drops are lower at lower velocity. That helps with your duct system. That means bigger ducts designed for lower velocity. It also means if you're designing for this low velocity, you should make sure that your ducts are in conditioned space, or semi-conditioned space. Mine are in an encapsulated attic.
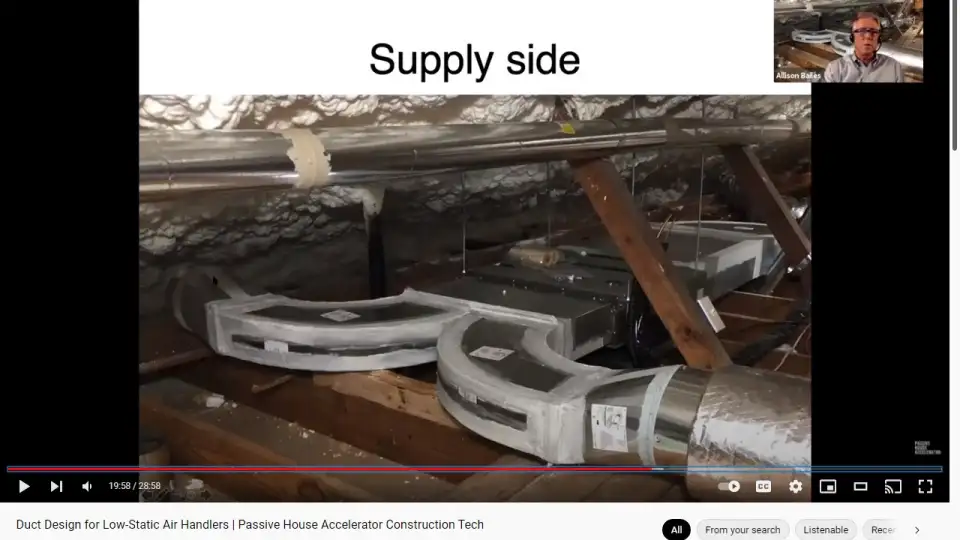
Here's what that looks like. Here's the air handler, the plenum, and one part comes out. This was during installation, so it's not finished yet. This one's not attached to anything over here, and it's not insulated at this point, but there's a nice radius throat on both of them and we get good even split of the air there and low static pressure. It works really well. The total external static pressure on this is 0.13, which is a little bit higher than the one at the office, but there's more duct work here and more fittings. Still, it's rated for 0.2 and we're running it at 0.13. Hey, I'll take it.
What I haven't told you yet is that I'm not running with the thin little filters that Mitsubishi sends you. I throw those away with the ducted systems, and I use real MERV-13 high efficiency filters, which gets us to myth number two: You can't use high-MERV filters on low-static air handlers. Some HVAC people think you can't use high-MERV filters on anything, but that's not true. The system at our office with 0.09 inches of water column static pressure, that's with a MERV-13 filter. When I take the filter out, you can see it's at about 0.05. So about 0.04 of the pressure drop was for the filter—0.04 across the MERV-13 filter. That's pretty darn good. At my house we've got ceiling grilles. They're two inches deep. The ones at the office are four inches deep. And works great.
When I first installed this, I was getting a pressure drop across the filters of 0.08 inches of water column, which is pretty good. ACCA says to put in 0.1 inch of water column for pressure drops across filters. They're talking about, like, the MERV-2 filters that are usually installed. I'm getting 0.08 with a MERV-13 filter. But I was not happy with that, and here's the problem. Actually, I'll get to the problem in a minute and I'll show you how I improved it. But first, how I got to this low a pressure was the simple rule. In our design we use two square feet of filter area for each 400 CFM of air flow. That's two square feet per ton, basically. The 400 CFM is nominally a ton of airflow. It's the airflow for one ton of capacity. So the two square feet is just the length times the width of the filter. That does not include all the pleats. It doesn't include the stretched out area of the filter fabric. That's just length times width for the frame of the filter.
That gets us a low pressure drop across the filter. If you're wondering about face velocity, some of you more technical people out there, two square feet per ton is about 200 feet per minute of face velocity, and filters are usually tested at about 500 feet of face velocity. Lower velocity through the filter usually means better filtration as well, so that's another thing.
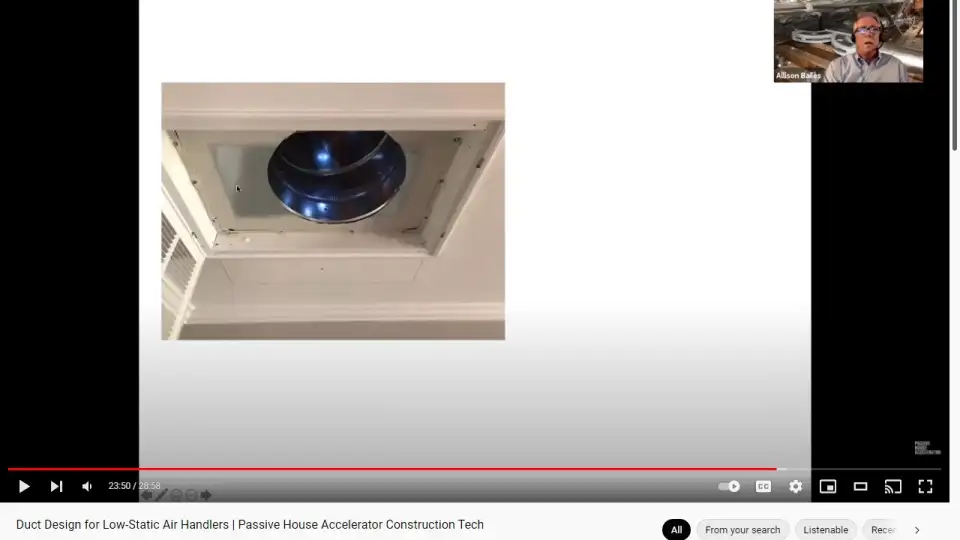
Moving on, when they first installed the system, I didn't pay attention to this part, but my two inch filter goes in this gap up here, which meant this piece of sheet metal is right on the backside of my filter. The duct goes in, and a lot of the air was going straight through the middle of the filter and not as much through this part. Although the filter did look uniformly dirty, some of it was going through the edges. But if I'd left it longer, I probably would've had a nice round circle of dirt in the filter.
You need space behind the filter. Ideally, you want about six inches of space. So, I had this retrofitted and I had this piece of sheet metal taken off, and I had a big box put on the backside. This was way more than six inches. I got about 20 inches, I think, so my pressure drop across the filter went from about 0.08 to about 0.06, meaning I got about a 30% drop or 30% decrease in my pressure drop, just by putting this big box on the back of the filter and giving it more space. Remember earlier when I talked about turbulence being one of the factors that hurts your air flow? When you put a lot of space back there, it reduces the amount of turbulence that's happening in the airflow back there.
So some other information about filter grilles versus cabinet filters. At our office, we have a cabinet filter. At my house, I have filter grilles and cabinet filters usually close to the air handler. Sometimes it may be harder to change cabinet filters, especially if the installer does something stupid, like run the condensate line right in front of the access panel so you can't pull the filter out. I've seen plenty of pictures like that. Or worse than the condensate line, because PVC is easy to change, or easier to change than copper, I've also seen copper lines or a gas line running right in front of the filter access.
Still, one advantage of the cabinet filters is that it's easier to get a thicker filter. You can do four-inch filters on filtered grilles, but two-inch filters usually are easier to do for filter grilles. Filter grilles are in the living space, not in an attic or a crawl space, so they're often easier to get to and check. They also keep the return ducts clean because if you put the filter near the air handler, all the duct work before that filter is running dirty air through it and dirt will build up in that duct system, in that part of the duct. Is it a big deal? Not really as long as you get it filtered out before it goes in and gets redistributed to the house. But it does build up eventually, and it's better to not let it build up. You should get that on the filter and just get it all out of the house.
One thing that you have to do with filter grilles, though, is you have to make sure the return duct is super tight, because any leaks in that return duct between the filter and the air handler is going to be sucking in air that doesn't get filtered. The whole return duct has to be really sealed absolutely tight, so you don't suck in dirt there, because that's under negative pressure.
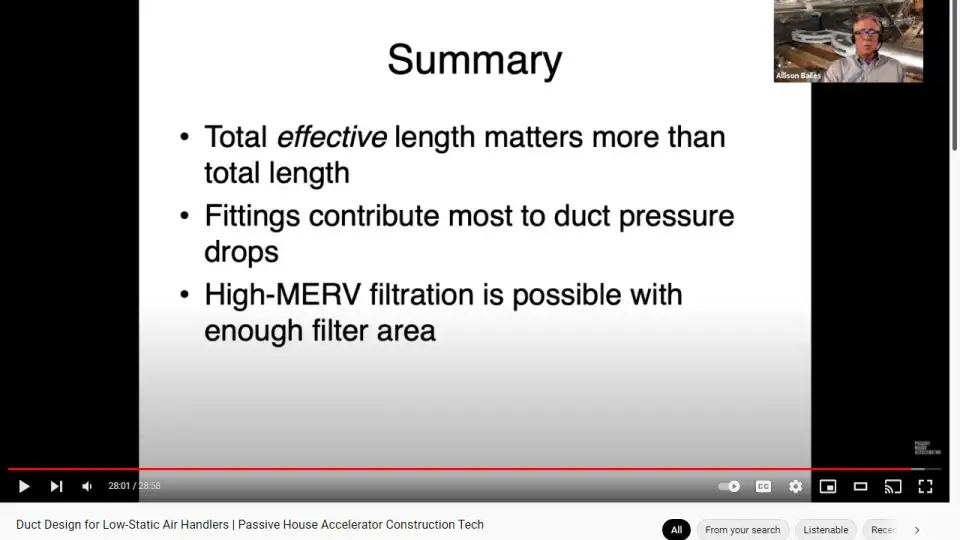
So let's do a little summary here. Total effective length matters more than the total length. Myth number one is just not true. You can put long duct systems and a lot of duct work on low-static air handlers. You just have to pay really close attention to the fittings, because that's where most of the resistance is coming from. The available static pressure that you get is the rated static pressure, which is that 0.2, minus the pressure drops of the non-duct items like the filter and dampers and things like that. So you subtract those off first, and the filter is usually the biggest one of those and fittings provide the most resistance on the duct components. So pay attention to those, and you can get a good performance with a low-static air handler. The fittings contribute the most and high-MERV filtration is possible with enough filter area. So these are the three main takeaways. You can check out my blog, energyvanguard.com. I write new articles every week. I have a newsletter. You can sign up for the newsletter and get that once a week.
