Abby Meuser-Herr, from Precipitate Architecture and Planning, and Passive House homeowner Katie Jones joined the Construction Tech crew on January 18, 2022, to dive into strawbale construction and Passive House within the video. Adapting the traditional strawbale methods, Abby and her team were able to incorporate Passive House principles like reducing thermal bridges and addressing airtightness using natural plasters to create a beautiful home built from a natural, carbon-sequestering material. You can read the full transcript below:
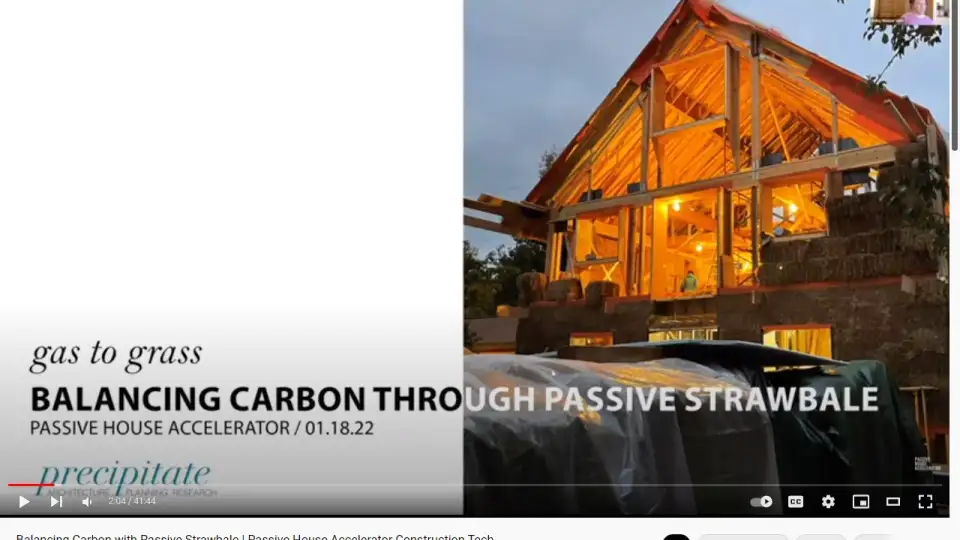
Abby Meuser-Herr:
Thanks everyone for joining us and for having us on. Looking forward to talking about the project, our process, sharing our experience, lesson learned, strategies and looking forward to a good discussion afterwards to answer what I'm sure would be lots of questions.
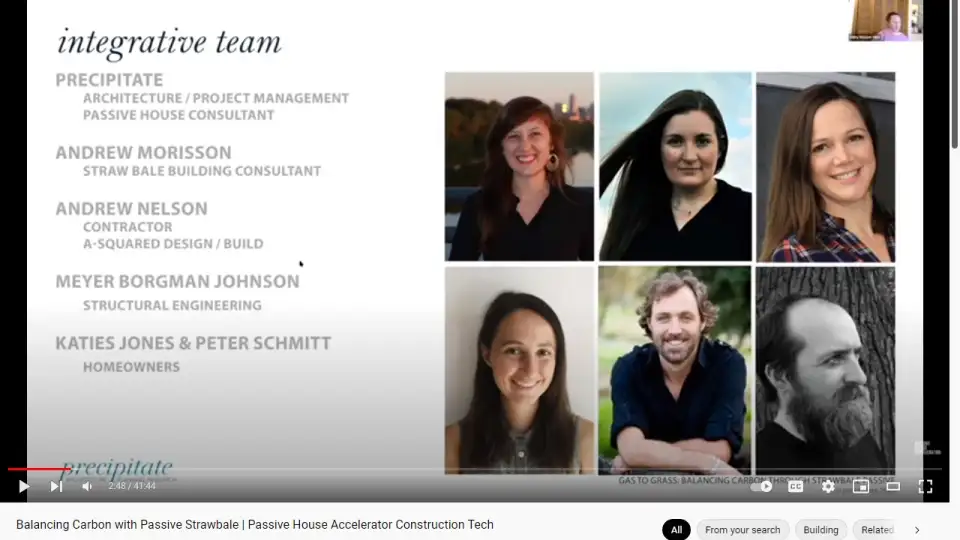
So just to start with, I'll introduce the project team. With Precipitate, we have myself, founder Elizabeth Turner, and Janneke Schaap, a project manager. Janneke is on the call and she'll be sticking around after to answer questions tonight. We did employ a strawbale expert, Andrew Morrison. Some of you familiar with strawbale construction may be familiar with his workshops. He's pretty busy all around the U.S. We are working with Andrew Nelson of A-Square Design Build out of Minneapolis, and then MBJ was the structural engineering partner. And of course Katie and Peter are the homeowners. Katie's co-presenting with me tonight.
Abby:
They've been doing a lot of the dirty work firsthand on the job, packing in to strawbale, so they are not only our client, but a core builder and collaborator on the project as well. So this project had a number of goals that the homeowners brought to bare, and I'll hand it over to Katie now to talk about where this came from and the initial process they went through.
Katie Jones:
Yeah. Thank you, Abby, and thanks to everyone for being here and for giving us the opportunity to talk about our Uptown Strawhouse. So my husband and I, Peter, we both work in sustainability. I work in energy, he works in community solar. And so we always knew that we wanted to, if we were going to build, we wanted to build as sustainably as possible. And so these were all the components that were going into this build. We live in an urban lot just a mile from downtown in Minneapolis. We have a small footprint. We currently live in a triplex and we're building behind it and so it's going to be an infill cluster development. We don't own a car and we walk, bike and take transit everywhere. So that's a major component of this build and incorporating that. We wanted to build passive, just knowing that we're energy geeks and try to get to net zero.
And then through our process, actually, we stumbled upon just how much foam and petroleum products are you used in building materials and then decided to go a different way and are going into low carbon materials. So we'll talk about that more. So, as I was talking about, we were designing this build with Precipitate and we got some bids. And when I got the bids for the wall components and had these sip panels, I was like, "Why am I getting so much foam and why so much petroleum products? There's got to be a better way to have low energy buildings that don't have high embedded carbon." And so went to the library and did some research and realized that strawbale is an option. And then did some more research, went to a workshop with Andrew Morrison actually out in Washington to see for myself, is this a legitimate building form and turns out it is.
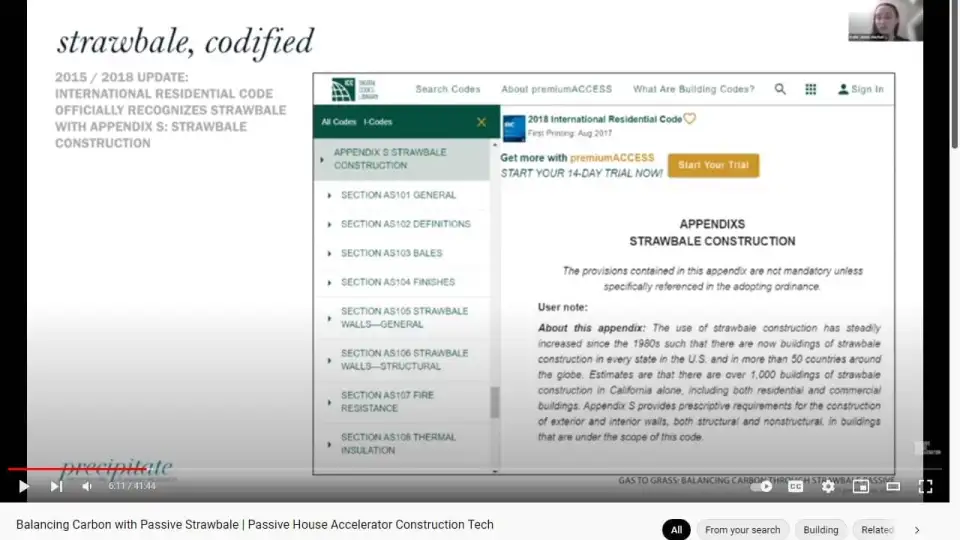
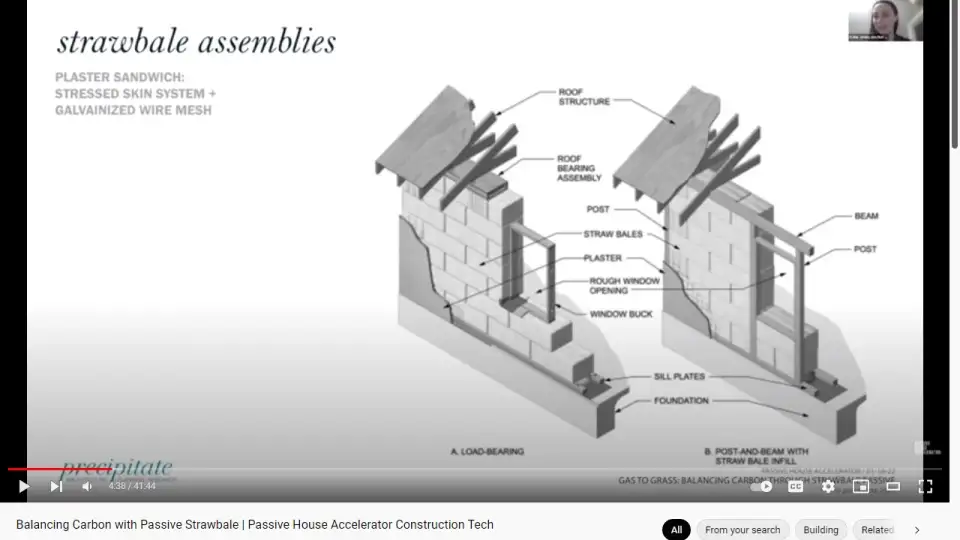
There's an international construction code, there's a chapter, the S chapter on that, and just a little bit about how strawbale assembly works. There's two different types. First is a load bearing, you can see in the left hand side, second is a non-load bearing. We went the second route. The first route, you can only build one story and being on an infill lot, we wanted to build up. So we did a post and beam structure that takes the load of the structure and the strawbales just act as the insulation of the wall. And so the bales are set as, if you want to go back one real quick, just as a running bond. And then there's wire mesh that's put on either side of the bales. And then plaster goes on top of that, so a three piece sandwich.
So as I mentioned, there is there's best practices codified in this international construction code strawbale or appendix S. So if you want more details, that's there. And that has been a very critical part for us actually getting this through the regulatory process. Andrew Morrison has designed or has built hundreds of throughout the United States and the world. And he said Minneapolis has been the toughest regulatory system to get through. So this was really critical. So if you're thinking about natural builds, having some type of thing built into code is really important.
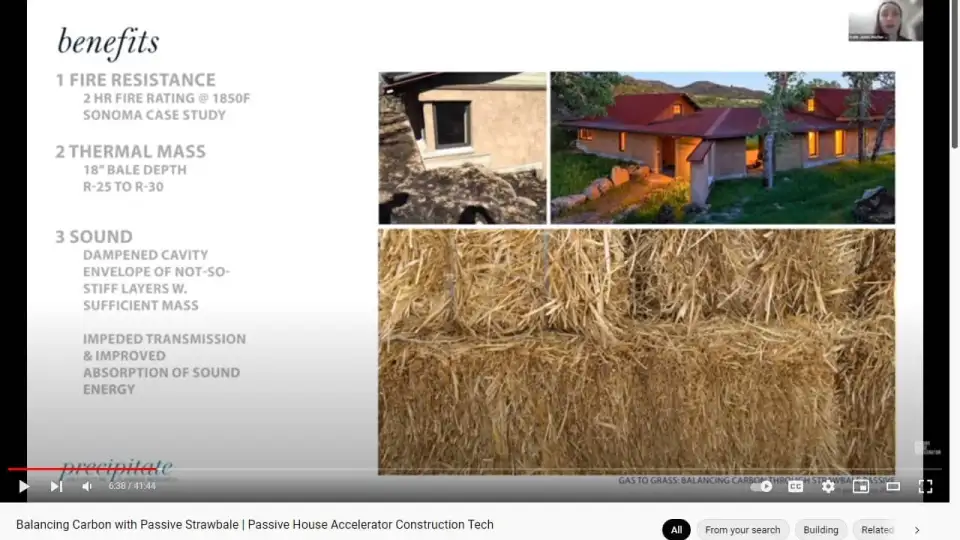
So one of the reasons we decided to go this route, there's seven reasons I'll go through here. The first is fire resistance. People keep thinking like, "Oh yeah, it's straw. It's really flammable." And that itself is true, but we're talking about a wall, a strawbale assembly, so with a strawbale sandwich in between two sides of plaster. And if you think about it that is really averts to thermal change. And the plaster itself is sands, lime and water, and that does not readily catch fire. And so it's got a two hour fire rating and there have been a number of cases in California where wildfires have come through and homes have actually survived, strawbale homes have survived those fires. So you can see on the left hand side, it's that house that you see on the right hand side, but after a fire, and you can see it's basically unscathed. As I mentioned, it's got a really deep or large thermal mass. The bales themselves are 18 inches deep. So we've really thick walls that typically ends up with an R-25 to R-30 wall, depending upon how well the baling machine compresses it.
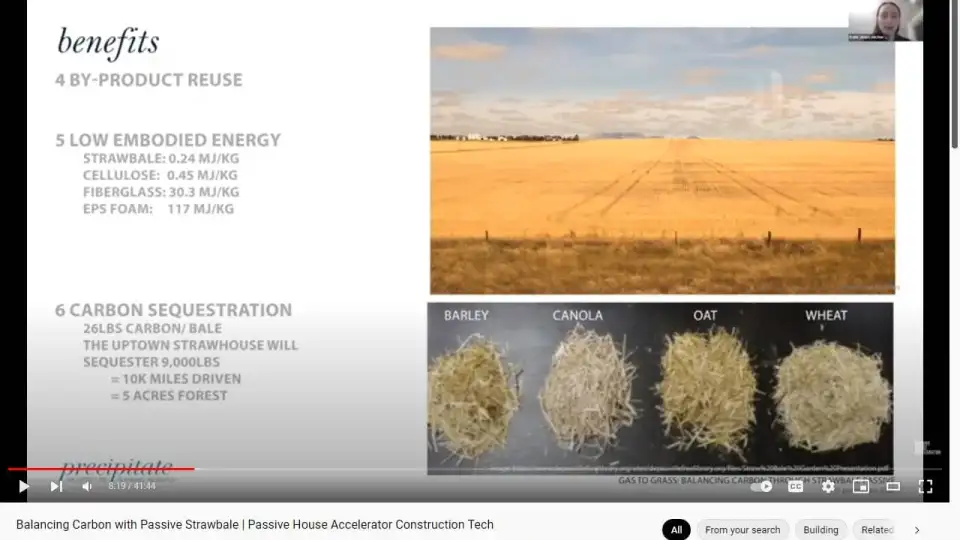
It's also got really good sound dampening capabilities. So it's very quiet on the inside, which is nice, especially in an urban area. And then getting to more of the environmental quality. So it's a waste product. There's a difference between hay and straw. So straw does not have the seed heads as part of it anymore, hay is the nutritional product, straw is the waste product after the grain has been removed. And so it's otherwise waste and we're putting it to use, and it's got low embodied energy. You can see here just compared to some of the other typical insulation types. It does have the lowest mega jewels per kilogram. And it's a sequesters carbon, it is carbon. And so you can see here how that breaks down. So our house should have about 9,000 pounds of carbon sequestered which equals about 10,000 miles driven or five acres of forest.
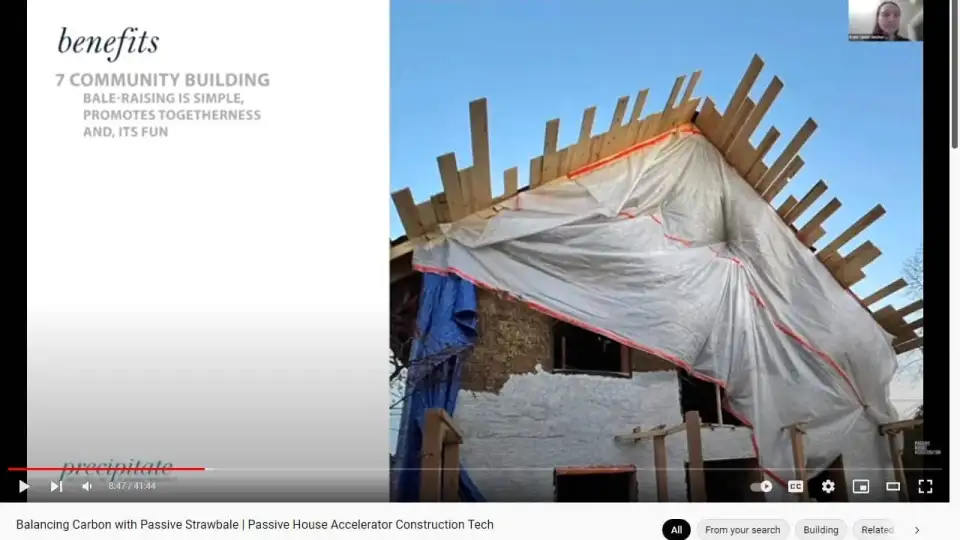
Oh, and I'll also mention you can use any type of strawbale to build. You can use rice, oat, wheat, any of those work. And last but not least. I'm really involved in my community, sort on the neighborhood board, all sorts of things. And so having this as an opportunity to build with neighbors, family, and friends was really intriguing to me. It's essentially a barn raising. And so we did that with... So in October we had at least 50 people at some time come through during the month to help us bale, mesh, sew and plaster. And it was an in between part while we're building, we have to protect the bales from rain. You can't let the bales get wet. So that's why that's covered with some haphazard plastic. So as was mentioned, the big bad wolf and other potential concerns.
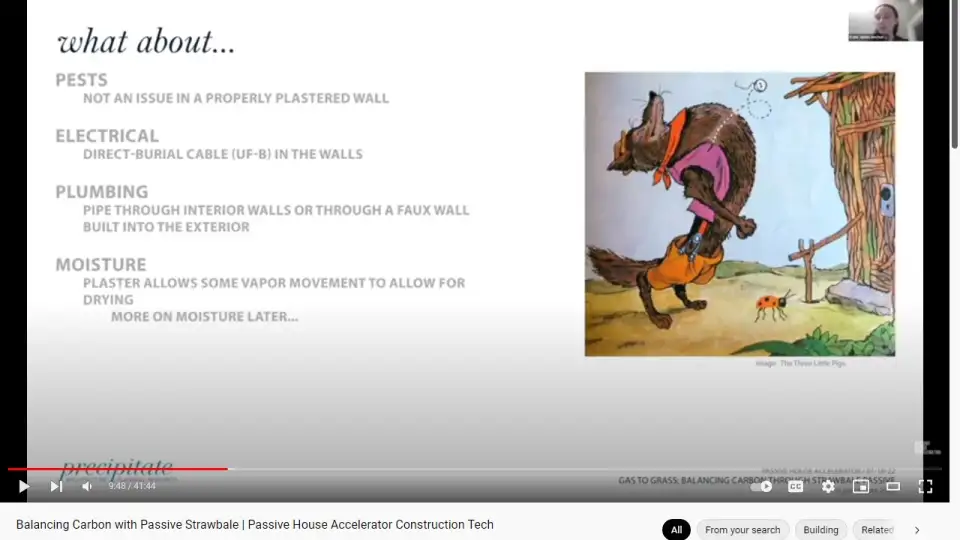
So pests are not an issue because if you plaster the wall thoroughly, there's no entry point into the walls. For electrical, we're burying those into the bales themselves where needed otherwise, we're putting them into interior walls. And so you can do that direct burial with no problems. You do want to keep plumbing outside of the walls. The real key is to keep bales dry. And so we are putting them into interior walls or deferred out walls out outside of the plaster walls. And like I mentioned, moisture is a major component. And so the plaster it's important to have lime based plaster and not concrete because they needs to be vapor open in case the bales do get wet, they need to be able to dry.
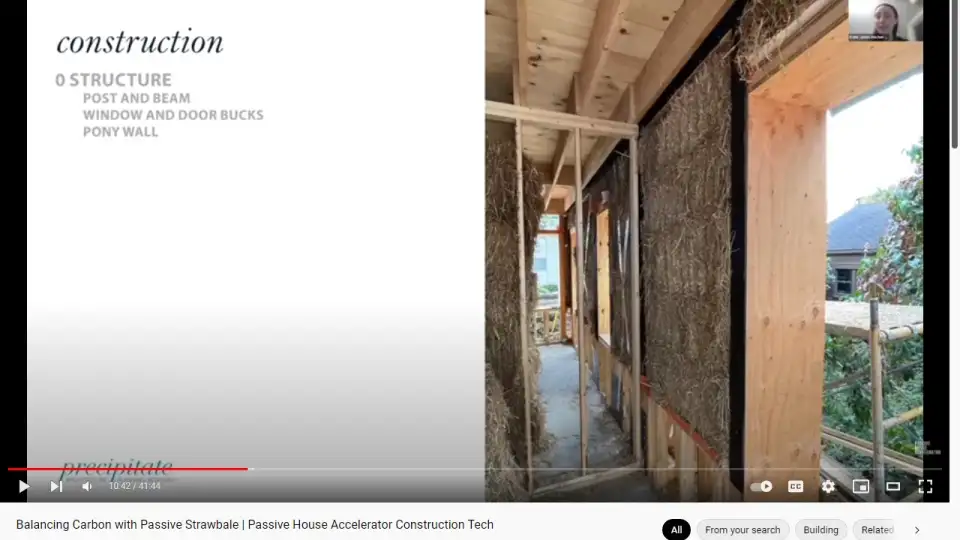
Next. And so for the construction part, the first part is putting together the post and beam structure. So you can see our window construction with these windows and door bucks. And on the bottom, we had to have a fairly sizable pony wall. We live in Minnesota, snow drifts get high. And although it's actually not necessary technically to have the pony wall that high, again, keeping the bales away from moisture. Our Minneapolis code officials are being abundantly cautious, and we wanted to make sure we could get the building passed and so we kept those up high enough to avoid any snow drifts. But really the major concern with snow drifts is that if the house loses heat, then that melts snow on the outside and that can cause leakage into the walls. But in this case, the walls are very thick and will not lose much heat. And so that isn't as much of a concern in this type of construction.
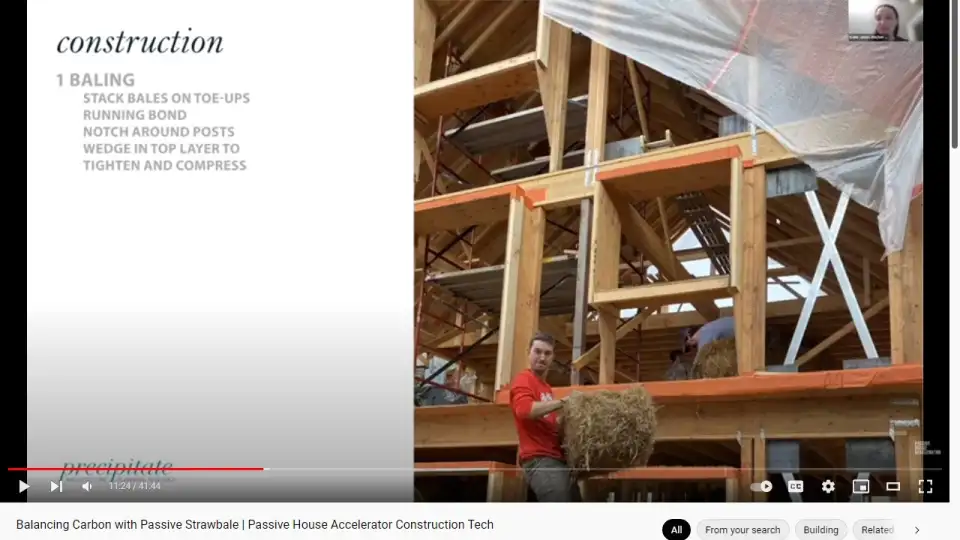
So the next part is stacking the bales into the building. Like I mentioned, they're put in as a running bond, similar to as you lay bricks. We put those up. You want to make sure that they're not on the concrete if you are in a more mild climate with no snow, you still want to keep it off of your foundation. And so stacking the bales on the tow ups is really important. Mentioned running bond, as you can see there are posts that you need to actually literally cut into the bales and notch around. And then the most fun part is slipping that final layer on a floor into the top. We had to literally use carjacks to Jack and compress the bales down in order to fit that final bale in there. And that's what really gives you a nice, solid thick wall.
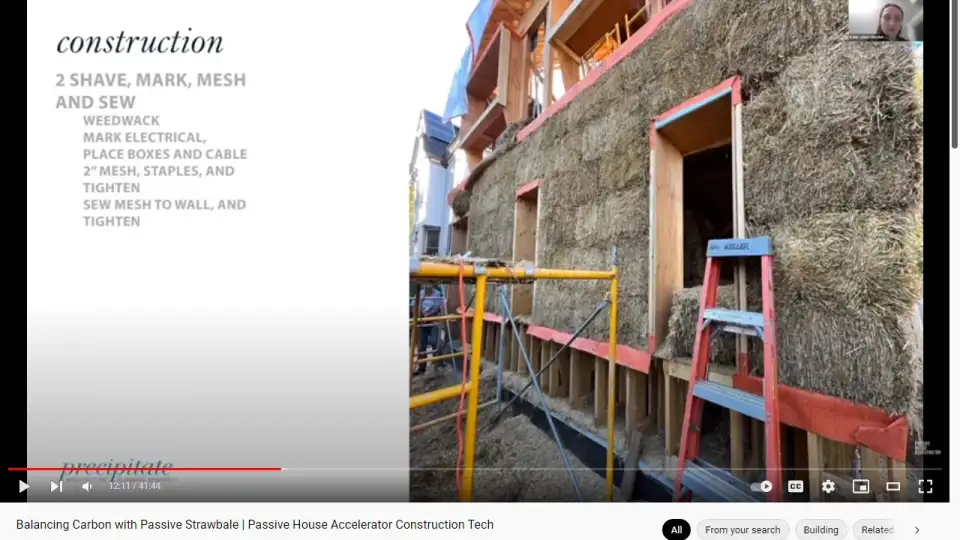
So the second part after putting the bales in is to shave, mark, mesh and sew. So you want to make the bales all the same and smooth on the outside and inside. And then you want to mark where your electrical is going to go. And then you put on the meshing and you sew. And so, to do all of that, you literally take a weed whacker to shave the walls, which is pretty funny, and then you just use spray paint to mark where the electrical is. And then we had two by two inch mesh that we stapled at the top, rolled down and stapled at the bottom. And you use these giant metal forks that we had hand fabricated to pull down and make it nice and tight. And then on either side of the wall, you literally take a giant needle. That's about two feet long to thread through the wall and back on the other side and you tie a knot so that, again, the mesh is really holding on either side, is really sticking to the strawbales.
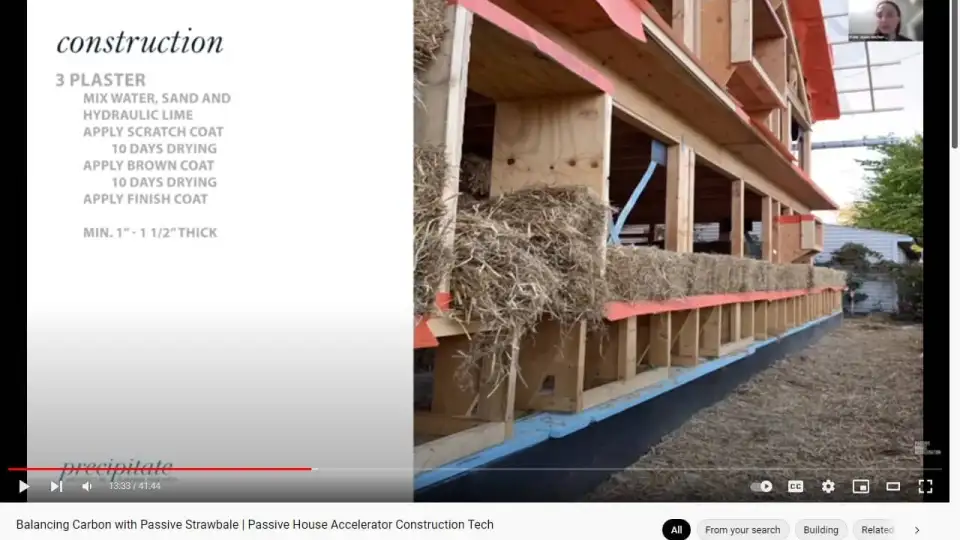
And that's what gives you a nice kind of textured wall to be able to plaster well onto. And in load bearing structures that two by two inch mesh is important for shearer strength. The last step is plastering. So we used a plaster that is a mix of water, sand, and hydraulic lime. If you talk to Andrew Morrison, there are options to use clay and some other natural materials, but this is what he really recommends. So there are three layers of plaster. The first one is a scratch coat, just very rough coat then you wait 10 days, you apply a brown coat, and then you apply a finish coat. So we used the same mixture for the first two coats, what is just called an eco-mortar, so without sand, for that final coat to make it nice and smooth. And by the end of it, the plaster itself will be about an inch to an inch and a half thick on either side of the wall.
And I think this is when I turn it over to you, Abby.
Abby:
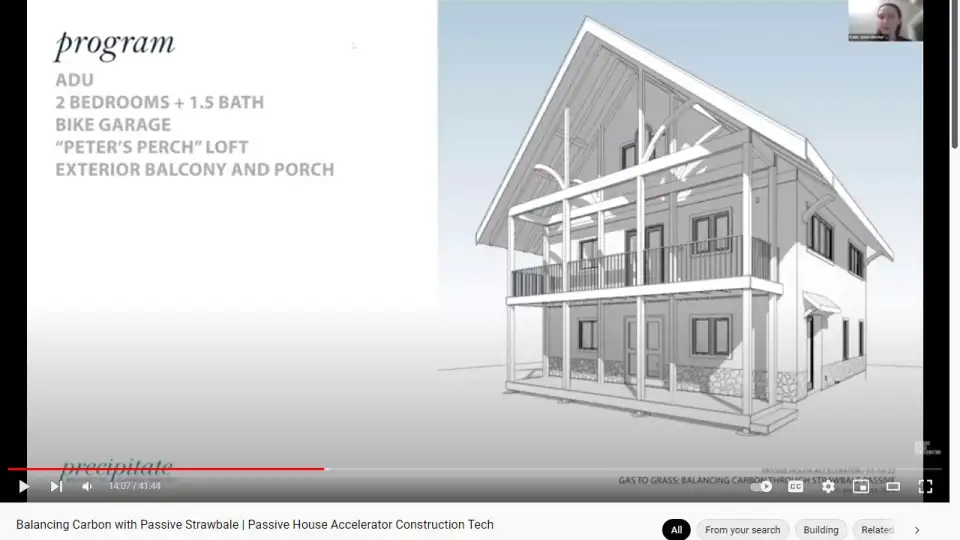
Yep. Thanks Katie. Just taking a step back now, Katie gave us a quick dive into strawbale construction, saw some cool photos and see the process, but I'm going to talk a little bit about, from the architect's perspective, coming up with the program and the design on the urban lot and those sorts of things, and then we'll jump again, back into the construction details. So this was conceived as an accessory dwelling unit like Katie mentioned, it's on the back of a city lot. We have two bedrooms, one and a half bathrooms, first floor bike garage in lieu of a car park or car garage, an upper story loft or mezzanine space, and then a large exterior balcony and porch off the west here. And throughout this project, there's this theme where we had a lot of, at times synergistic, but at times conflicting goals.
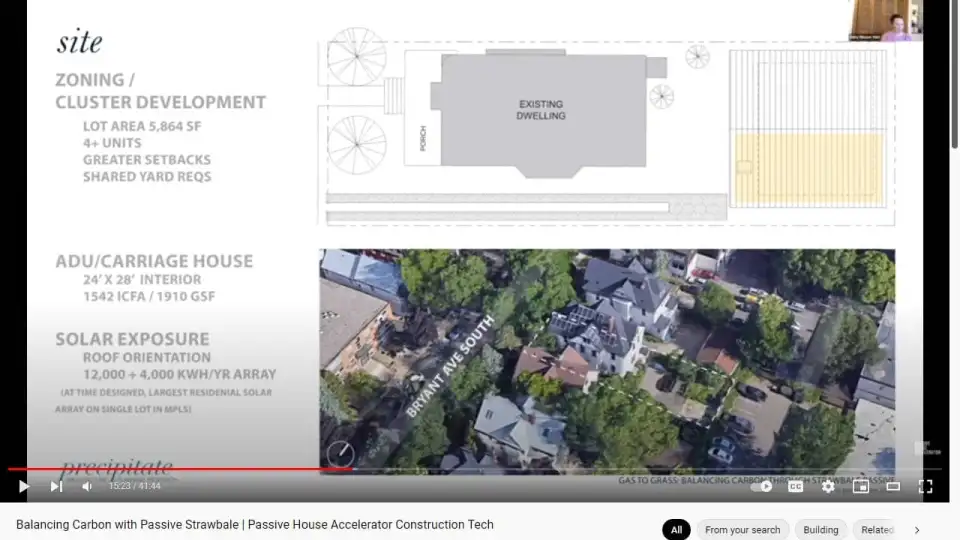
And so it's really about reconciling those and still trying to end up with a low carbon, urban net positive building. So back to the site. Here on the bottom right, you can see our lot. And the existing triplex is to the west side of the lot on, in this Bryant Avenue. And then to the rear of the lot is up against this parking lot of this apartment building. And the footprint of the former garage is this lighter, concrete square. So the new building takes up this whole back portion of the lot.
So we kind of getting through the city's approvals process. It was applied as a cluster developed because there are four plus units on the lot when you had the triplex and this ADU. So that resulted in some greater setbacks and shared guard requirements. So we were working against a bigger masked wall with bigger setbacks. So trying to find the optimum foot print on the site and maximize the buildable area while still maintaining some yard space. So this carriage house has a 24 foot by 28 foot interior. So it's almost square and a gross footprint of almost 2,000 square feet, but that interior condition floor area of just over 1,500 square our feet. So you can really see how those mass walls take up a lot of the floor area. The solar exposure, we oriented the roof, the Gable east west so we could up get the most solar potential solar area.
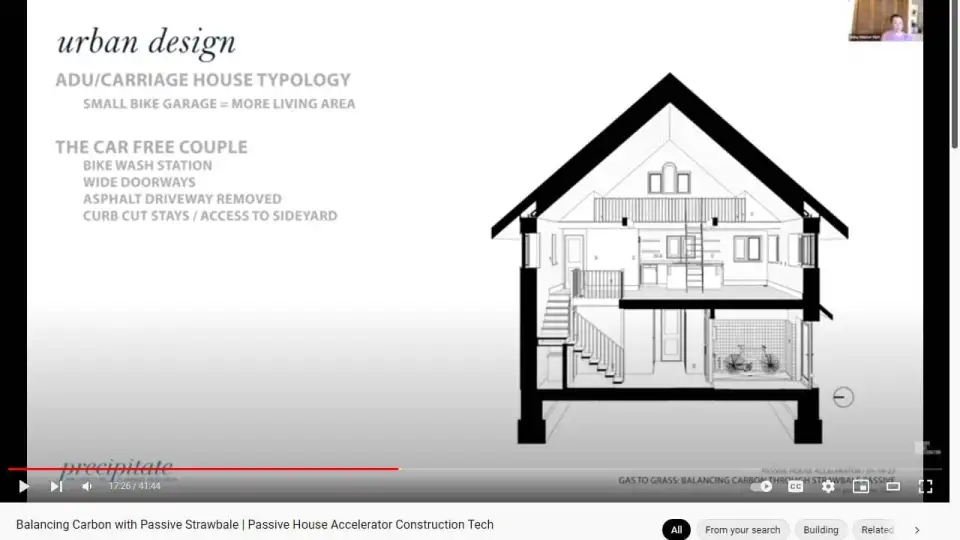
And then they do actually have this little peek-a-boo window in the porch roof. So you can see the bi-facial solar panels. So an interesting feature experiential when you're sitting up there. And so then the solar array will be 12,000 kilowatt hour per year array. And then there's an additional, I think, 4,000 kilowatt hours per year on the existing triplex. So that's quite a large urban array. So this accessory dwelling unit or carriage house typology, what you can see is on the bottom right of this perspective is the bike room. So you come in off the side door and you have a bike wash station with a drain and a shower stall, and then area that's cutoff you can't see is coats and whatnot. So by eliminating the need for a car parking and having this bike station, it gave a lot more space to this first floor for living area.
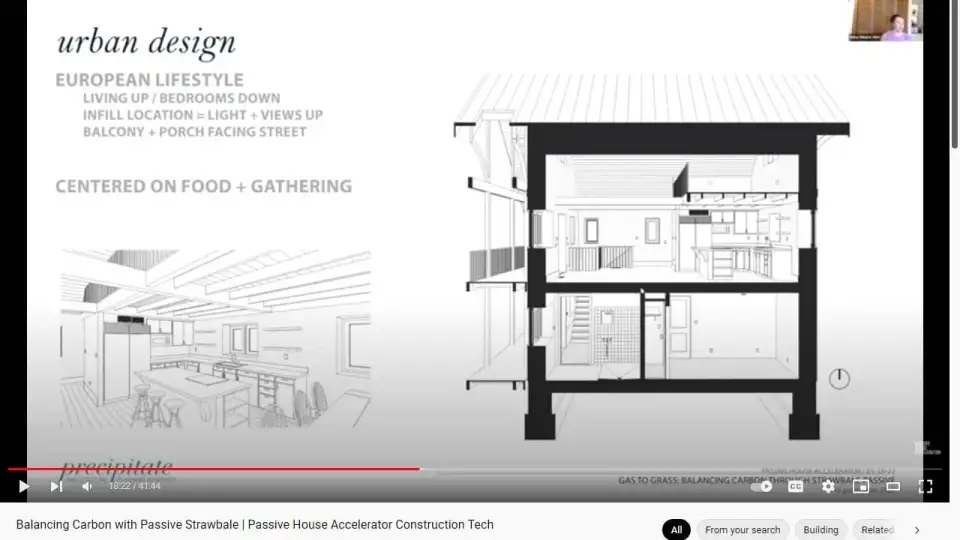
And some of the features of accommodating the bike door is the bike door, so a 42 inch wide side door. The full asphalt drive was removed, but we are leaving some previous paved tracks to still facilitate access with a bike and a trailer, but over all we'll give more removable surface to the lot. And then we're able to keep the curb cut from the car to use for the bike still in access to that side yard. And then another aspect of this, the floor plan and the concept was because they're in this back lot surrounded by fences and built in, moving the living space to the second floor. So you come in that front foyer and up into this open concept living room with a kitchen tucked in under this mezzanine, and then that spills out into the second floor covered porch.
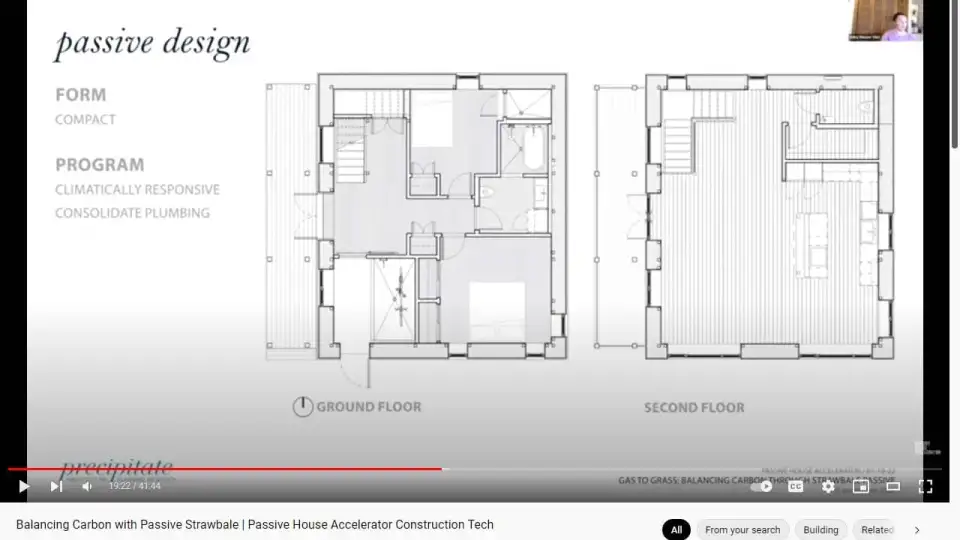
So that really provides more light and air and views than if the living area were on the first floor. And so this Eastern back half of the first floor are the bedrooms and a bathroom and laundry, et cetera, more private space on the first floor. So just a quick look at the floor plans. So passive design we stuck to the box, the cube compact form, efficient footprint and floor plan. One feature you'll notice here, this initially when it was designed wasn't a strawbale, that was something that we pivoted to after schematic design. So had we designed it as strawbale initially, we probably would've tried to keep all the plumbing off the exterior your walls, but in the instance that you do have plumbing on the exterior walls, you can fur out a service wall off the strawbales. So you can see that in this right hand wall along the bathroom areas, the wet rooms. And that just ensures that you're just that much space and separation from the plaster wall, from bulk water and end up having any pipes running through there either that's something to avoid.
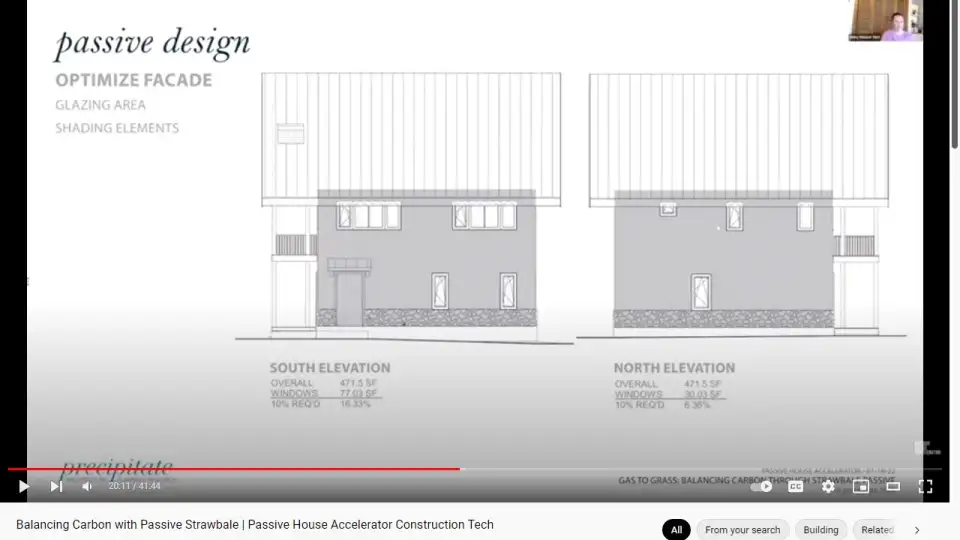
Something that we encountered in the facade design, so it was a little bit of friction between optimizing for passive design, which is a greater percentage of glazing on yourself and minimum glazing on the north, whereas per zoning, we had certain percent glazing requirements for each elevation, and fortunately the west had the highest percent, but that was the front of the building as well. And with the deep overhangs and high performance windows that wasn't too big of a hit in terms of performance, but you can see on the south facade, we have almost 20% glazing and on the north just 6%. And so I don't remember if we got a variance for that, or if that didn't end up having to apply, but regardless, we still went with what was optimal for the passive strategies.
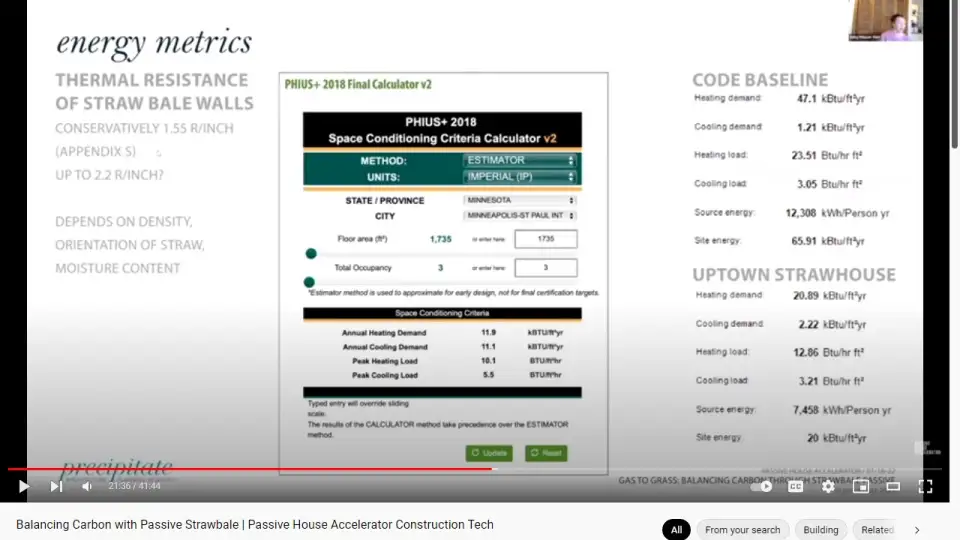
One other feature of the strawbale is having these deep eaves and overhangs. I think we have three foot overhangs to help keep snow and rain, driving rain off of the strawbale walls. And so that also worked in our advantage for shading, but actually on the south, it is almost overs shading. The south windows would like that to be a little bit less deep of an overhang, but part of our moisture mitigation strategy for the city was ensuring that we had those deep overhangs. So now I'll just look at the energy metrics a little bit for passive house. For the strawbales, we used a conservative 1.5-R per inch, and that's what's I think, provided in appendix as a reference. So that felt like the safe R value to use. I know just from other projects, and talking to people and reading, some people say that you can get up to 2.2-R per inch, and that depends on various factors, such as the density of the bale the orientation the straws lean, in the bale if the bales are stacked on end or on side, and then the moisture content of the bale. So with a natural material it's just not as exact as a manufactured product that you get the specs for. So using the conservative 1.5-R per inch, we actually haven't been able to hit our heating demand, annual heating demand of 11.9, we're at 20.89 last time we ran the WUFI model. Everywhere else we're doing just fine. Let's see, peak heating load is 10, and we had 12. So we're a little bit over on that heating load. So that was a compromise, going with the strawbale, we still felt like the value of the embedded carbon was much greater than actually hitting the targets for passive certification, because it's still a very low load building and they have adequate solar to offset and being that positive.
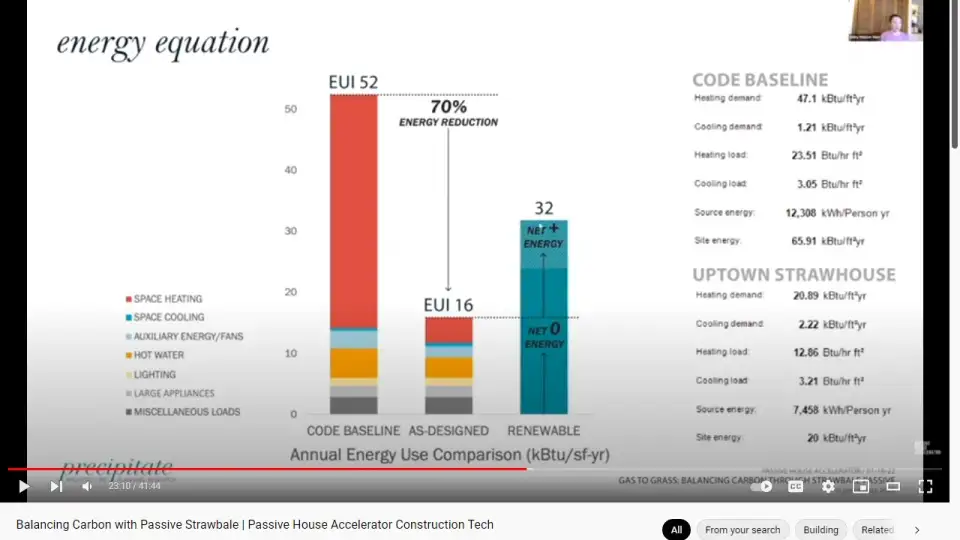
So here's our energy equation. Code baseline building of this design and size would be an EUI of 52. As designed, it's an EUI of 16 and this is gross floor area. And then with the solar array on the roof, it certainly will be net zero and quite likely net positive. And that intent is to offset the energy of the triplex also on the lot for the homeowners.
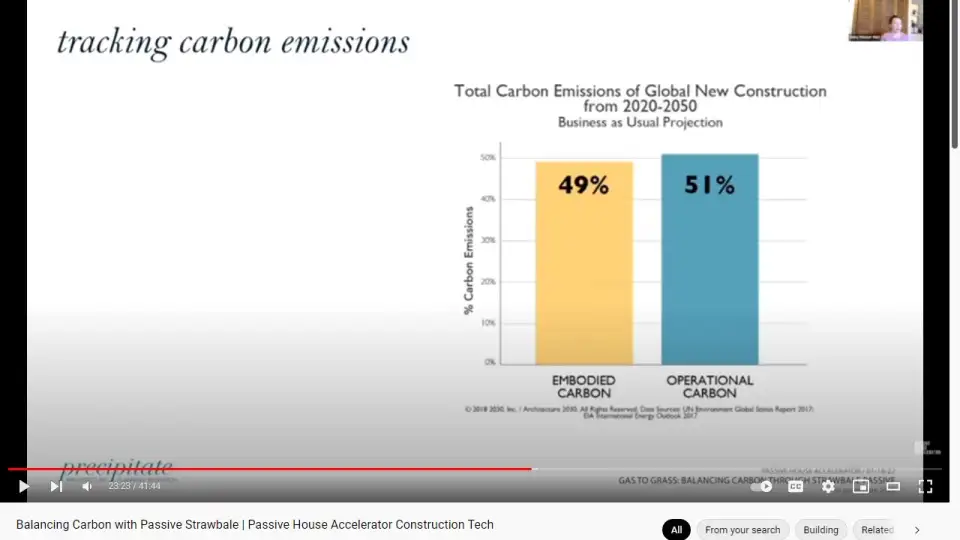
So beyond the energy, we're really at our firm and it was really catalyzed by working with Katie and Peter, looking at the embodied carbon emissions in the materials that were specifying. This graphic from architecture 2030 is looking at the total carbon emissions of global new construction from 2020 to 2050. And so this is the businesses usual projections. So as we've all done a great job of reducing the operational energy and associated emissions of our buildings, then the piece of the pie that is the embodied carbon emissions is going to make up half of those building emissions. So it starts to become kind of the next low hanging fruit.
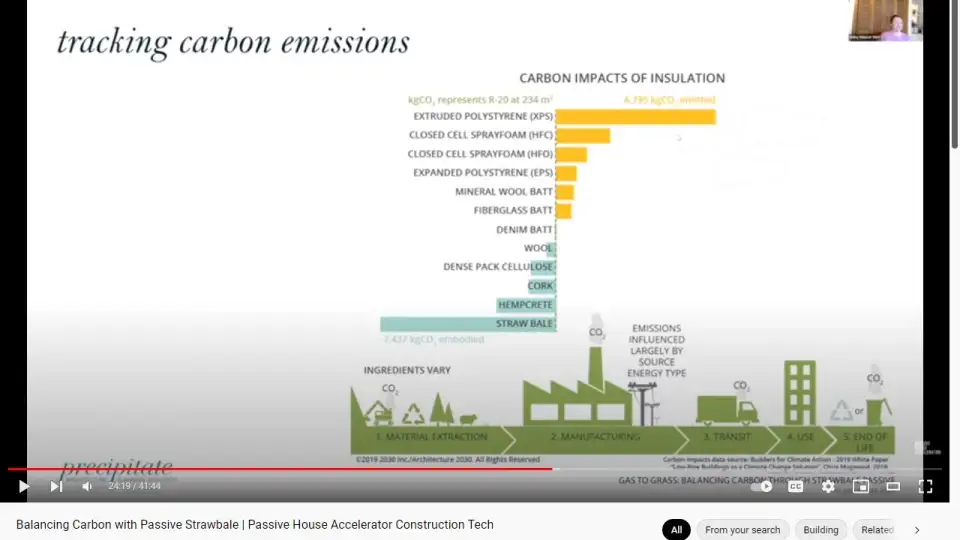
I grabbed this graphic also from architecture 2030, where it's comparing the carbon impacts of different insulation materials. And we know the foams, they're so efficient and good at it in a small space, but they have the greatest CO2 E equivalent, XPS is the worst, and then some of the spray foams and then EPS is a better alternative from the foams. But down here at strawbale, you can see that it not only is low carbon, it actually sequesters carbon, it's a biogenic material because of the carbon in the material itself. And if that's built into a house, it's going to there for a hundred years. So this graph, I think really exemplifies why Katie and Peter decided to pivot to this strawbale construction and just go for it. Dense pack cellulose, also a great option, but they really want to explore how to build with strawbale, and make it happen in a city.
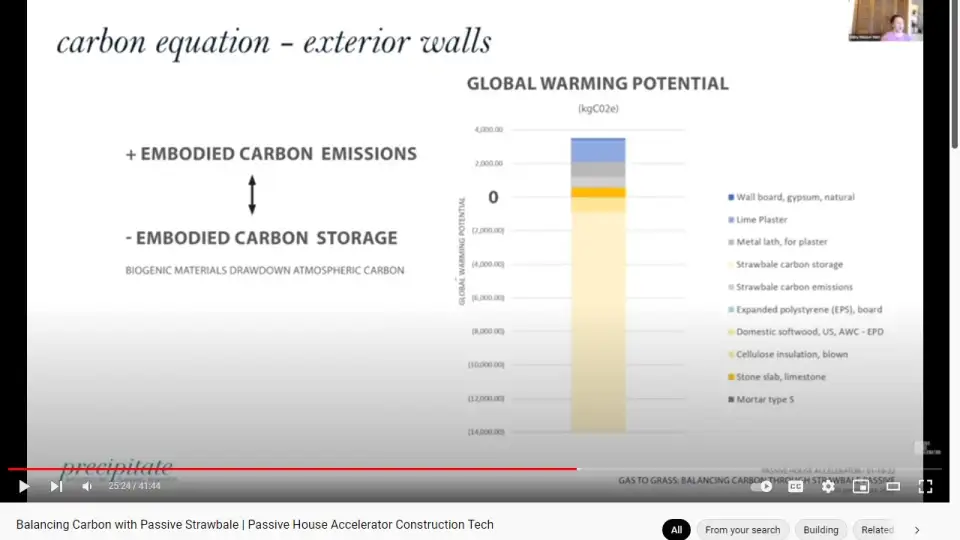
So, where we're at with our own LCA of the strawbale house is we've run it on the exterior walls. That was the biggest hill to climb because tally and the software we're using doesn't have strawbale, like very many natural building materials in it's database. And so I was able to mine, Chris Magwood's, one of his reports, where he depicts how he does the calculation for the biogenic carbon storage capacity or the draw down capacity that embodied carbon storage of the material. And so on just the exterior walls, we have the associated... So there's the pony wall, is that lower 30 inches. So it's not just all that strawbale wall with the post and beam construction, we do have some jet board and more conventional materials. But you can see that the embodied carbon emissions are about 3,500, whereas the embodied carbon storage capacity is about 14,000.
So our net is just over 10,000 CO2 E equivalent of carbon storage actually in the walls. Now, this doesn't include, you might have noticed in the construction photos some of that big metal X bracing and strapping for shear, that was an extra cross the t's dot the i's requirement of structural by the city. Even though the strawbales themselves with the plaster skin acting like a shear capacity, it was just another layer of assurance for this renewed type of construction. So that will impact our exterior wall formula and then of course, when we get to the foundation and EPS. So I am really curious to see how the whole building balances out, but you can see just how significant an impact of these biogenic materials have on the embodied carbon of the building equation.
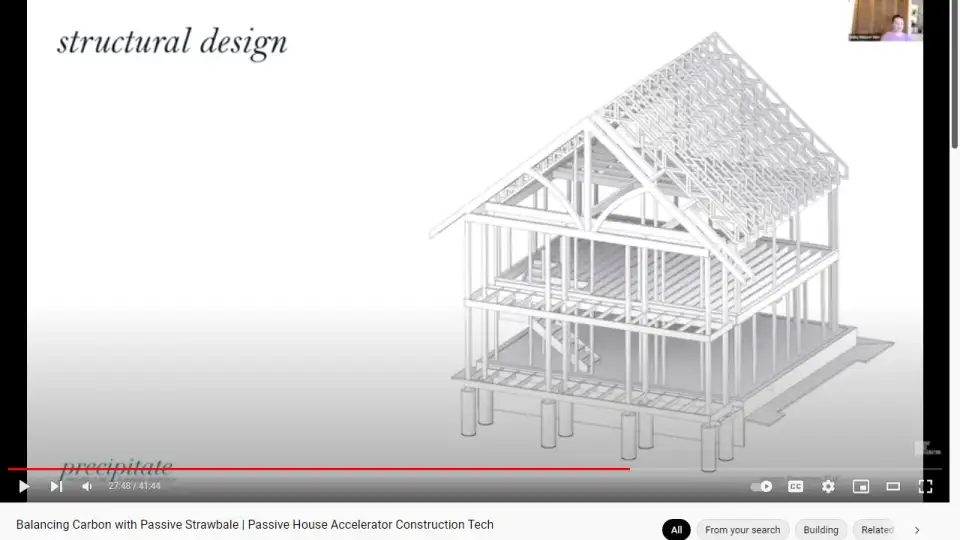
So now I'm going to jump into a section, just going through some of the details and just in terms of, from a passive host lens, how the strawbale walls are behaving, and talk a little bit too about how this relates to the regulatory process. So here's our structural design. Initially, we were looking at a shallow foundation, but now we actually did end up going just per the builder's preference with a traditional deeper foundation. But you can see just the posts and then platform frame, and then the parallel cord trusses, those are 18 inch trusses. And then this exterior deck and balcony is actually a standalone structure and it's tied back to the strawbale building at key points here at the second floor, and then also at the roof it's connected.
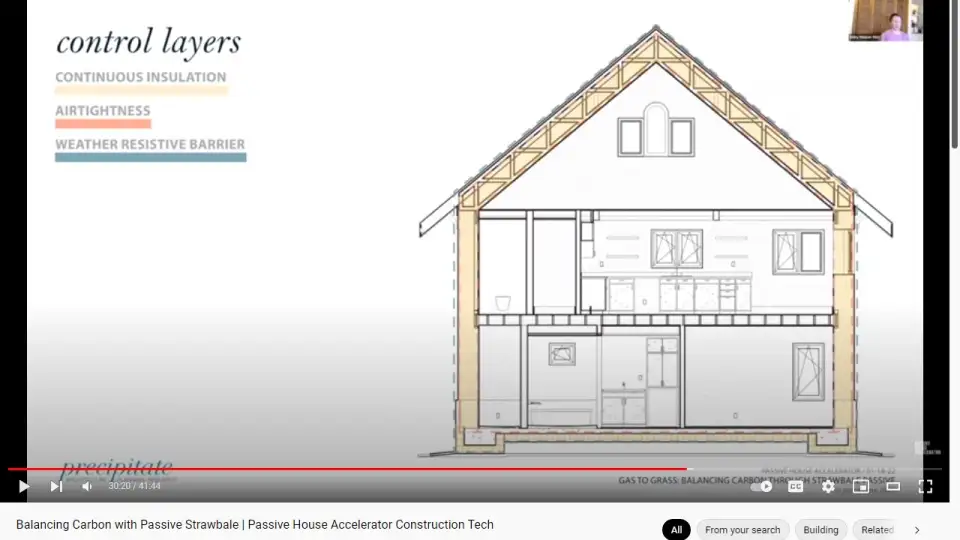
But otherwise, again, the idea was to limit the penetrations in terms of thermal bridging, but even with wood, that's not as significant as if we're looking at steel and concrete. But then it was really just to kind of retain the integrity of that plaster skin and not penetrate it where unnecessary with thermo bridging or potential opportunities for moisture movement. So looking at our control layers, we have dense pack cellulose in the 18 inch parallel cord vaulted truss ceiling, and then the 18 inches of strawbale wall thickness, and then this pony wall, which also has dense pack cellulose in the cavity, and then EPS foam under the slab and under the footings layering on for air tightness. So the one inch or give or take of the lime plaster skin over the strawbales on each side of the strawbale is our air barrier layer, and then tied into the roof sheathing up in the trusses, and then we do have typical vapor and air barrier under the slab as well.
And then whether resistive barrier. You don't layer any additional vapor or air barriers under the lime plaster, that's what's critical. There were a couple projects in the twin cities that had failed and were demolished in the nineties, and it's folklore, because there isn't a lot of evidence of it in any historical documentation, but it is this legend that haunts the city to this day. And I think what is said is that there was mold and issues related to improper detailing and I think adding additional layers to prevent water from coming into the bales, whereas it actually kept it in, right? The moisture-
Katie:
And they let the bales get rained on.
Abby:
And they let them get rained on, right? So part of this weather resistive barrier is our three foot eaves, right? Keeping driving rain, and then the pony wall to keep the strawbales up off of grade, a good distance from snow. And then the lime plaster that then does let the moisture, it can come in, but it also diffuses back out. Just again, revisiting, the strawbale really took priority in terms of it's detailing and the proper installation for durability. And so as we were weighing the different project goals throughout this process, that one really came to kind of drive to a certain extent. So one aspect where we changed a little bit from what would be a more conventional post and beam strawbale infill wall is we inset the posts to the inside of the strawbale.
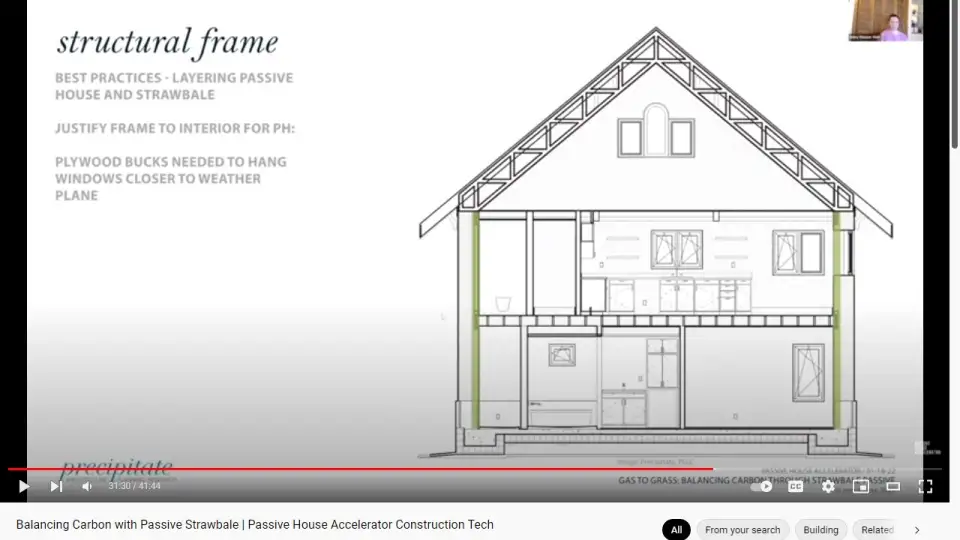
I think maybe in that diagram of this, from the appendix S code that Katie had at the front end, I think you could see the post to the exterior of the strawbale, but we wanted continuous exterior insulation. So we justified the post to the inside of the bale and notched from that angle. But then to compensate for that, you might have noticed in the construction photos and we'll see some more coming up here, we had to devise a system of plywood bucks that held the door and the windows out from the post to the face of the bales. So we solved one problem, but created another design challenge. But in the end, it seemed like quite an elegant solution, the way we're able to... And not uncommon in passive post construction with the thicker cellulose walls either.
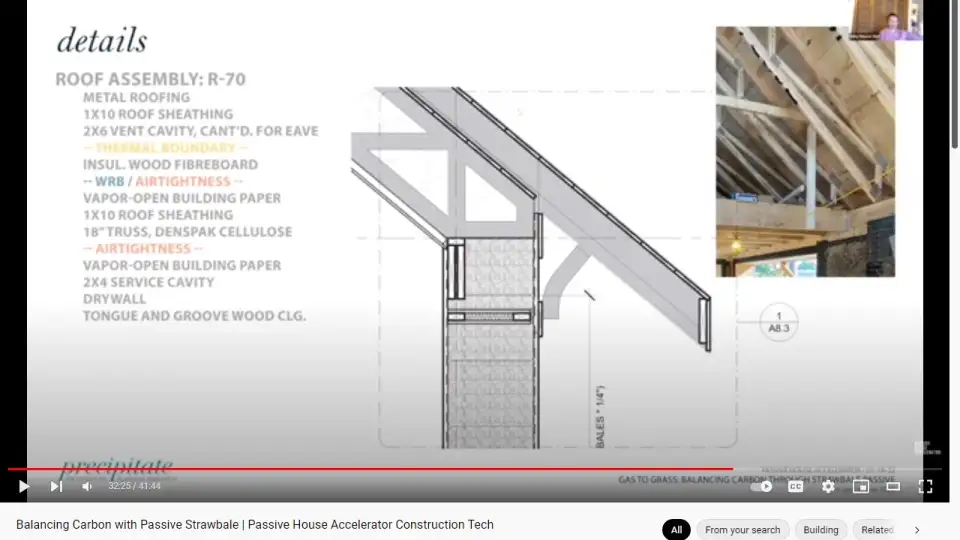
So we'll run through some of the key details here. So roof assembly is an R-70. We do have a metal roofing and it's meant to be reflective as there are the bi-facial solar panels on the roof. And so definitely want to maximize the solar energy potential there. And then part of the directive to avoid high embodied carbon emission materials was also to avoid sheet goods when possible. So we did use plywood for the structural bucks for the doors and windows, but in lieu of other sheet goods, we just used one vice. For the roof sheathing, a two by six vented cavity here. And then our thermal boundary, we have vapor open building paper, one by 10 roof sheathing and then 18 inch thick truss with dense pack cellulose, and then air tightness layer vapor open building paper, a two by four service cavity and then drywall and then tongue and groove wood ceiling.
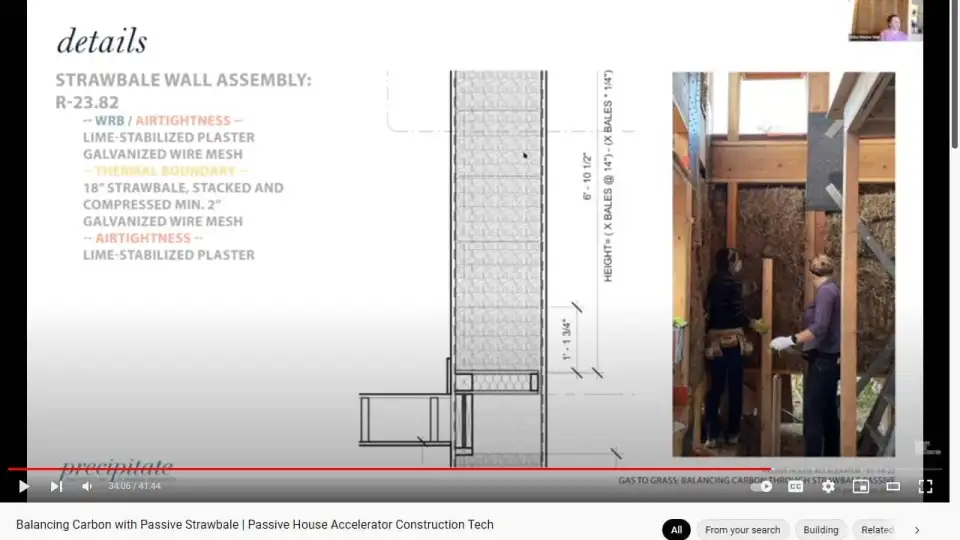
And we would've liked to just have the wood ceiling, but part of the city's requirements and code, we had to have that drywall layer there as well. So in some instances it feels like there may be some duplicate the materials, but again, balancing all the competing demands. Let's see here, I'll jump to the next detail. So strawbale wall assembly. So the overall wall assembly, we estimate to be around R-24. So we have a lime stable plaster on the exterior and that's applied in the three coats, a galvanized wire mesh, and then the 18 inch strawbales, they're stacked and compressed, a minimum of two inches. So we set our increments of building blocks per the height of the bales compressed. So the height between the pony wall and the top beam is the height of the bales less enough to equal the compression to get them all sandwiched in there.
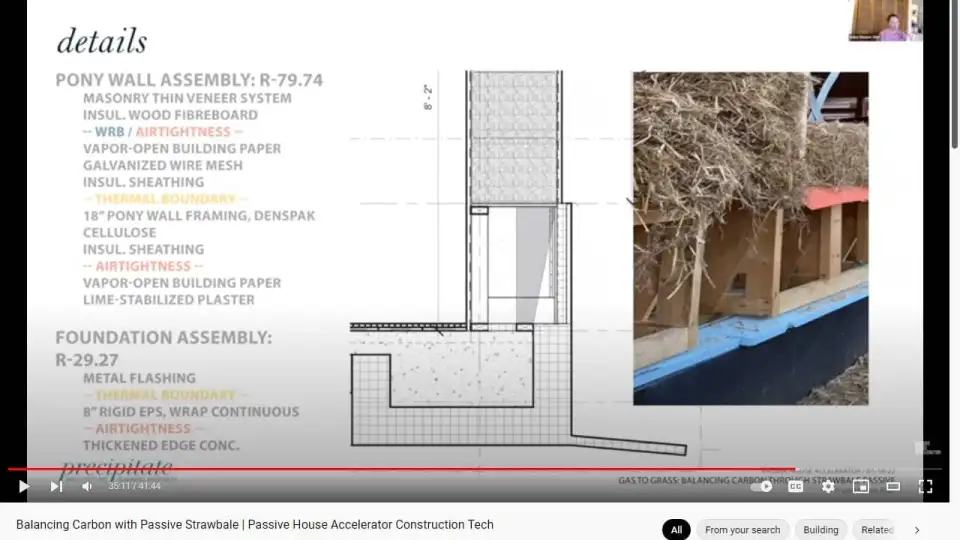
And then another interior coats of the lime stabilized plaster. And try to drag some construction photos over here to show. So this is the view from the inside at this second floor. You can see it because this is open for the stairwell there, but this is that separation between the first and second floor right here. And then the pony wall assembly. So we estimate it to be about an R-80. Honestly, it was just filling the void space. The reason it's so deep is because it is a kind of a structural cantilever support base to hold the bales off the ground, but also hold them out and create a line of continuous insulation that wraps the foundation and then up and connect with this strawbale.
So I'm not sure what the final material at this point, we're looking at a masonry thin veneer system, and depending on what the material is may or may not have this extra installation here. But then wood fiber board, and then vapor open building paper, the wire mesh just connecting that strawbale plaster layer to the pony wall, and then another layer of insulated sheathing. We have our 18 inch pony wall framing with dense pack cellulose it's another layer of insulated sheathing, and then building paper, and then the plaster and the metal mesh coming down to continue the same finished material from the strawbale down the pony wall.
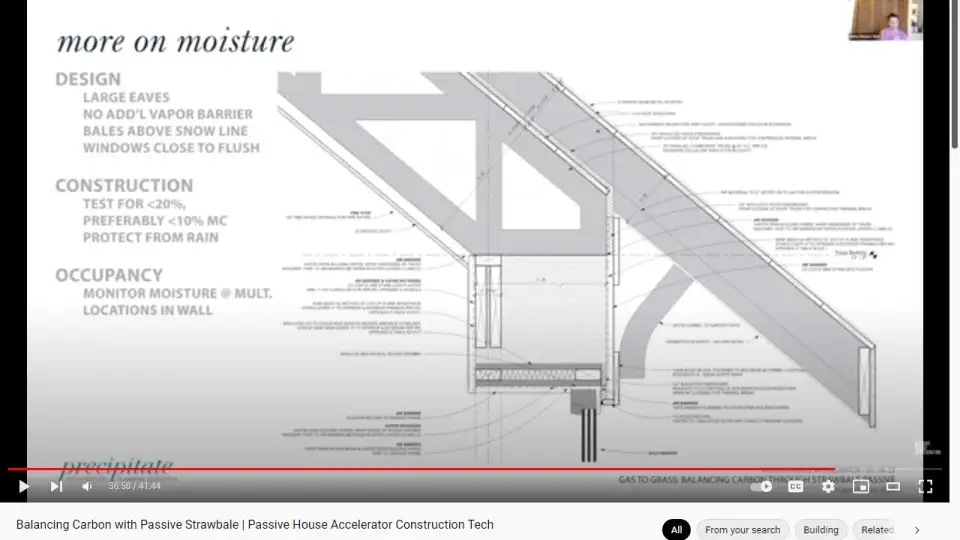
And then we have eight inches of rigid EPS wrapped around the foundation. So this, just to add some clarity, this shaded triangular shape in this pony wall is again, similar to the canted sheeting that we used for the structural box for the windows. It's also carrying the low back and down for the strawbale. We talked about moisture a lot in our conversations with the city and proof proving the science and then also using the belt and suspenders approach. So, to really protect against excess moisture intruding and staying in the bales, we have the large eaves, no additional vapor barrier. Bales are held above the snowline on a pony wall. And then part of the reason for the bucks is we wanted to hold the window and glazing playing closer to the front of the wall surface, as opposed to dealing with a seal and potential areas for snow to set and melt and water infiltration at a seal condition.
And then during construction, you moisture meter every bale and test for less than 20% moisture content, but Andrew Morrison and our team was targeting less than 10% moisture content, and then you have to keep the strawbales protected from rain. So in a container on site, and then under a tared or roof building as they're being installed. And then during occupancy, there are going to be some moisture monitors built into the walls that then can be logged and Katie and Peter are energy and science nerds. So they're going to monitor this and we're going to use it as research and ongoing learning opportunity in partners, well, not partnership, but in hopes that it will support future builds and help pave the way to demonstrate the feasibility and durability of this construction.
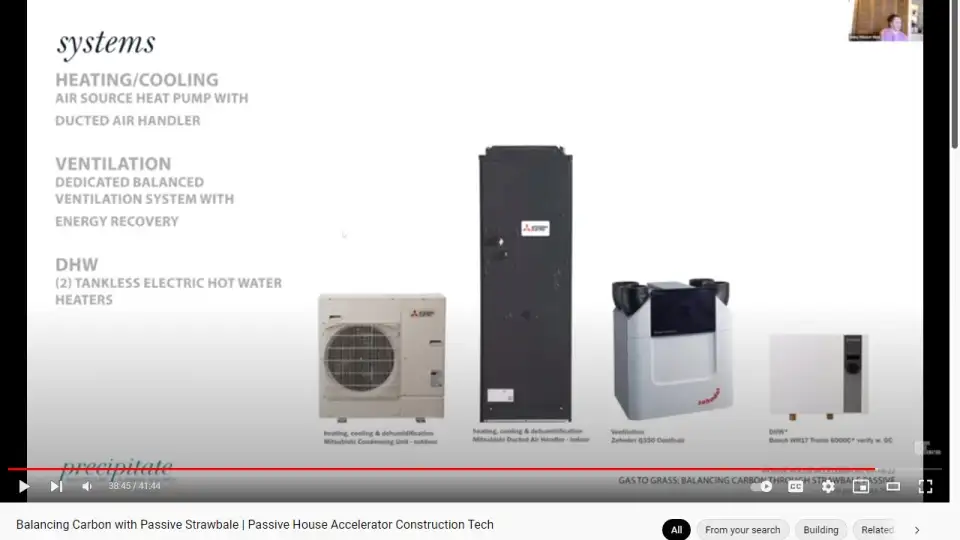
So just a quick overview of the mechanicals. So air source heat pump ducted air handler, looking at Mitsubishi units, and then a Zehnder ventilation unit with energy recovery, of course, and then two hot water tanks. One's down at the bike room and then one's over with the plumbing core tankless, hot water heaters.
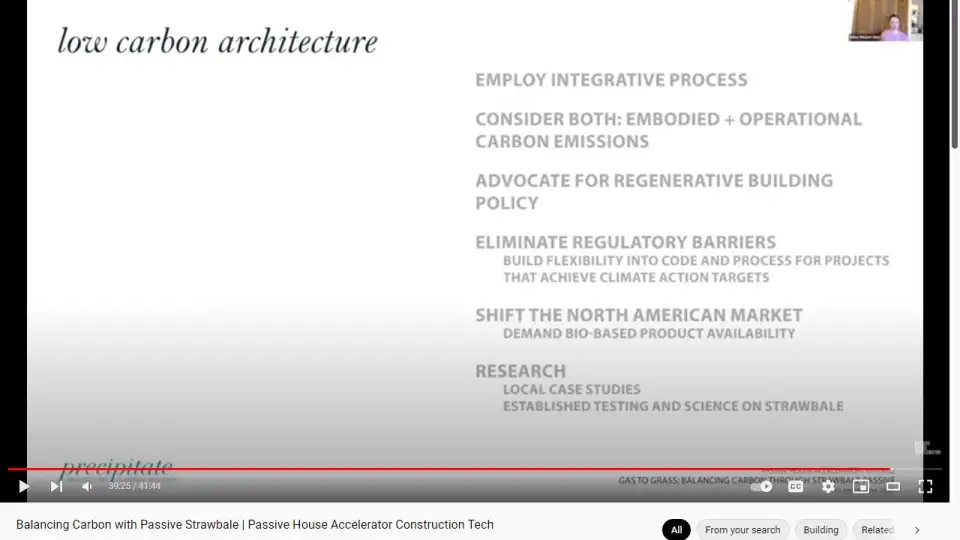
So generally, we just reaching the end here, just in summary. So this project really was about addressing climate change, right? It's low carbon architecture. So we're going for the passive house and the passive strategies to really lower our energy load, trying to consider the embodied carbon and really trying to resurrect the vernacular construction technology into contemporary practice. And then also facilitate and support a more urban life style that doesn't necessitate the long car ride, et cetera.
And so to achieve this, it was really critical to work as integrative as possible, and bring in the experts and consultants when needed, hence Andrew Morrison, hence structural engineering team in this context that was required. So we considered the embodied operational carbon. I think Janneke on the call here after can speak more to her observations and ideas about how to advocate for regenerative building policy. And part of that's about eliminating the regulatory barriers that are limiting our ability on projects that are really pushing for climate action. And then shifting the north American market, getting more bio-based products available.
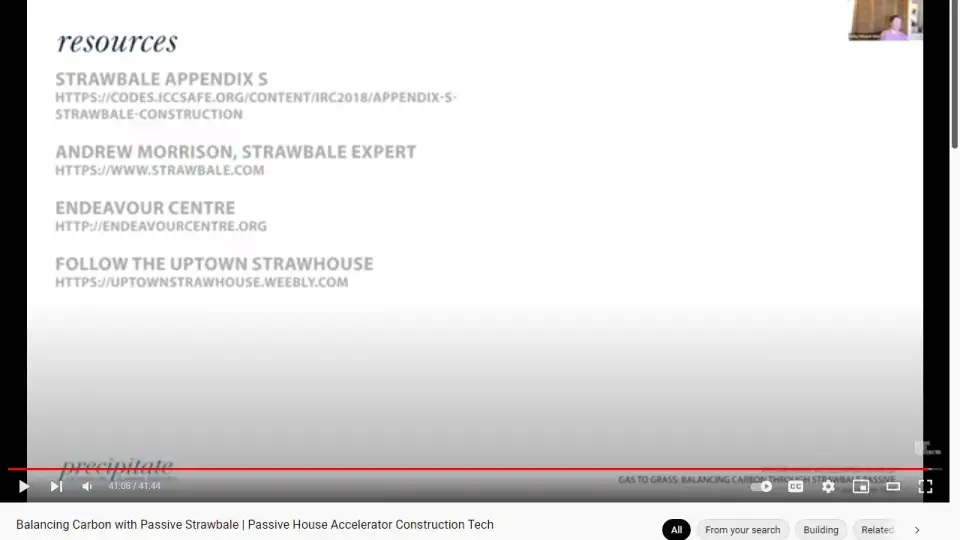
And since this project, we've been talking to other actually strawbale panel makers for future projects, like maybe it's not strawbale construction, but how can we get more biogenic materials into our standard assemblies. And then participating in research, creating the research, if it's not out there to support the projects. And then also included is the link to the strawbale appendix S, Andrew Morrison, the Endeavor Centre, we had good resources on embodied carbon missions there, and then you can follow the Uptown Strawhouse's progress on Katie and Peter's blog. And that's it.

