In this video, Ilka Cassidy and Steve Hessler return to dive into the SIMM™ (single integrated manufacturing model) method of prefabrication pioneered by Holzraum System. Ilka, guest cohost for the Passive House Podcast, is a principal and envelope consultant at Holzraum with experience in energy modeling and sustainable design. Steve, a principal and structural-thermal envelope designer at Holzraum, has experience in project management, construction, and residential design (check out Steve’s SIMM Part 1 presentation here).
In this second installment, Ilka and Steve talk through the difference between a BIM and SIMM, light-framed high performance wall panels, CLT floor and Roof elements, and how to conduct digital alignment and coordination work with real-time model walkthroughs. Expect special guests from the project team to stop by and join in on this technical talk with Ilka and Steve.
Ilka Cassidy:
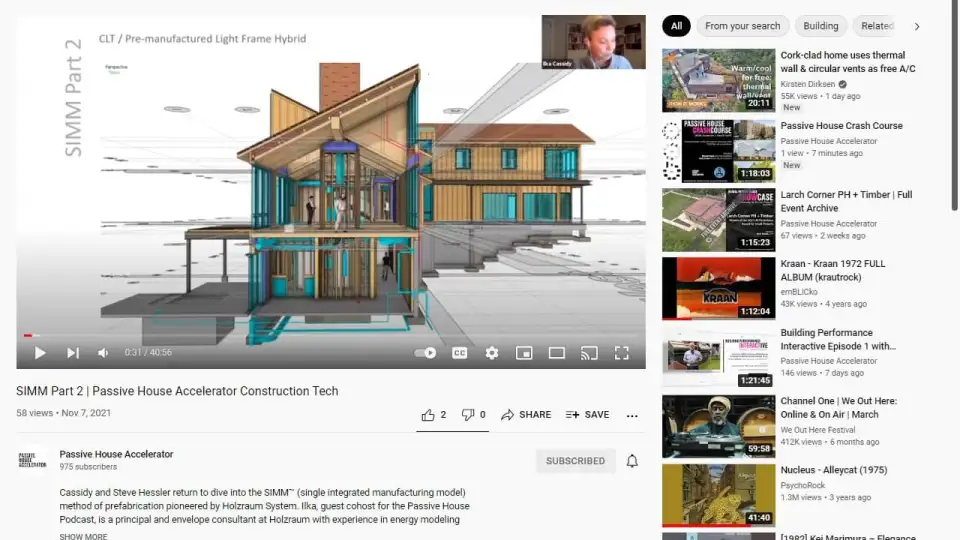
We will be talking about this project, which is a mass timber and pre-manufactured light frame hybrid approach. So this project is located in Big Sky, Montana and is a 7,700-square-foot home designed by Reid Smith Architects in Bozeman. Peter Bing of Blue Ribbon Builders in Big Sky is the general contractor, using Stoltze Timber and Hasslacher for CLT supply and Pat Clark from Stoltze Timber is actually here to night and we'll talk a little about CLT. He will be available for questions later, as well. Collective Carpentry is the manufacturer of the light framed panels and they are also going to install the mass timber, the light framed components, and wood low path members, as well as installation and membranes. The engineer of record is Madden & Baughman Engineering from Portland, Oregon, and Tom Baughman is also here tonight and will speak about coordination efforts. He was supported by Fire Tower Engineered Timber. Erik Renna of Central Plumbing Heating Excavation in Belgrade, Montana, is the extremely competent MEP engineer who unfortunately can't be here tonight. Then there is us, Holzraum System; we are making sense and coordinating all of the information through a single integrated manufacturing model. I'm going to explain briefly who we are and what we do and then Steve is going to walk you through a life SIMM model.
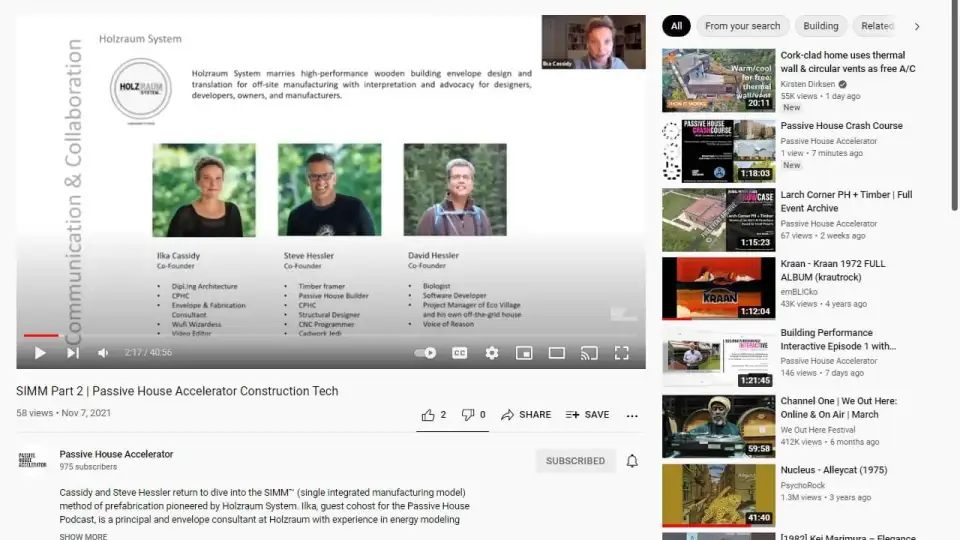
So this is us. I'm an architect CPHC and energy modeler; Steve is also a CPHC, a structural designer, CNC programmer, and high performance builder; and David is a biologist and software designer. I like to introduce us to show that we are coming with a pretty diverse list of backgrounds, which explains to some degree why we are doing what we're doing.
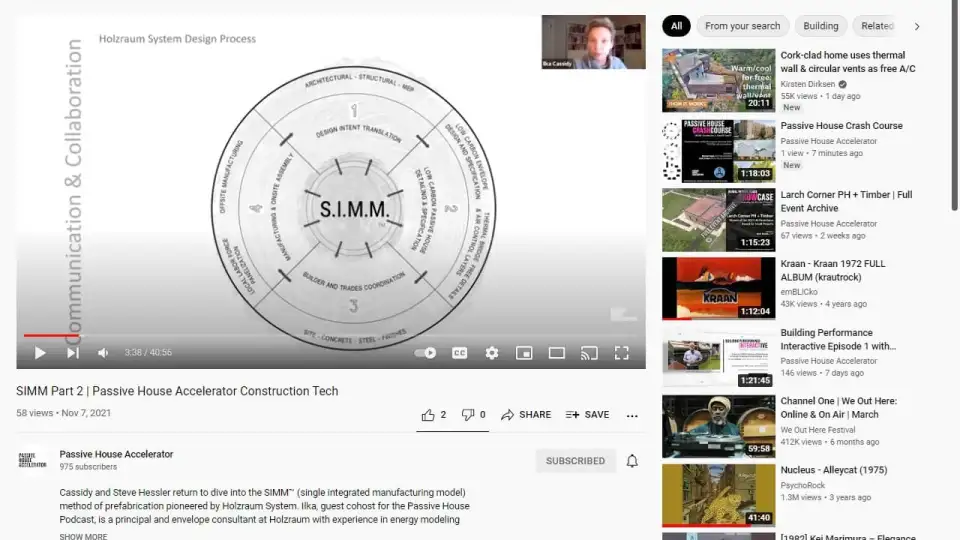
So Holzraum System works early on with the project team to align all perspectives with factory specific construction and preferences. The goal is to coordinate and translate design intent into what will be fabricated and assembled. We are independent and partner with several manufacturers. Because of that, we had to develop a communication strategy that is universal in terms of manufacturers' outputs, as well as a tool to communicate and collaborate with all stakeholders. We call this tool a single integrated manufacturing model or SIMM. The SIMM actually develops into a production fidelity SIMM model and generates panel shop drawings or machine file outputs as well as raising and installation instructions. The outputs can then be used by the local labor force to build panels by themselves or in highly automated factories. Either way, we are part of the team from design development to the installation of the panels.
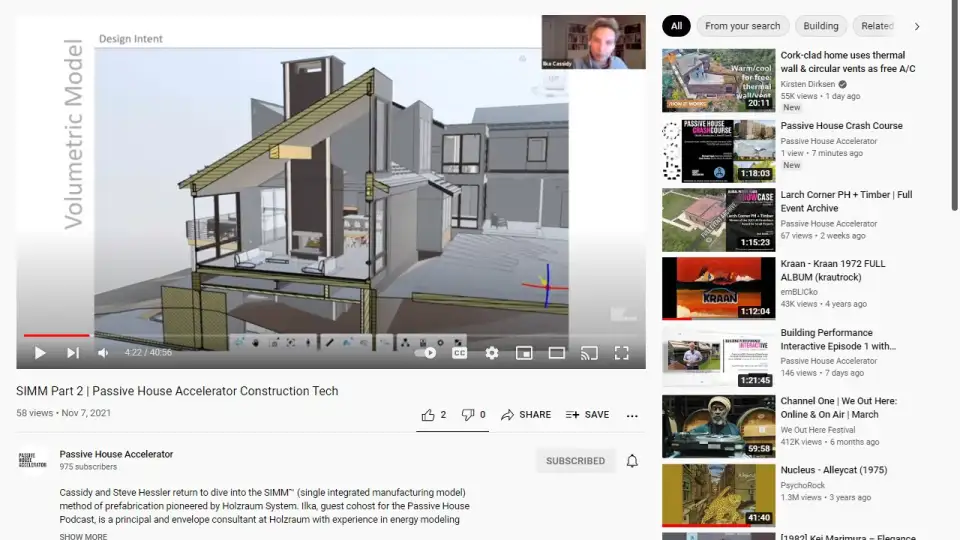
So, to explain this a little further here is the Revit model that we got from Reid Smith Architects. As you can see, it's great at showing design intent, conveying basic construction strategies and explaining spatial relationships. It is also a volumetric model.
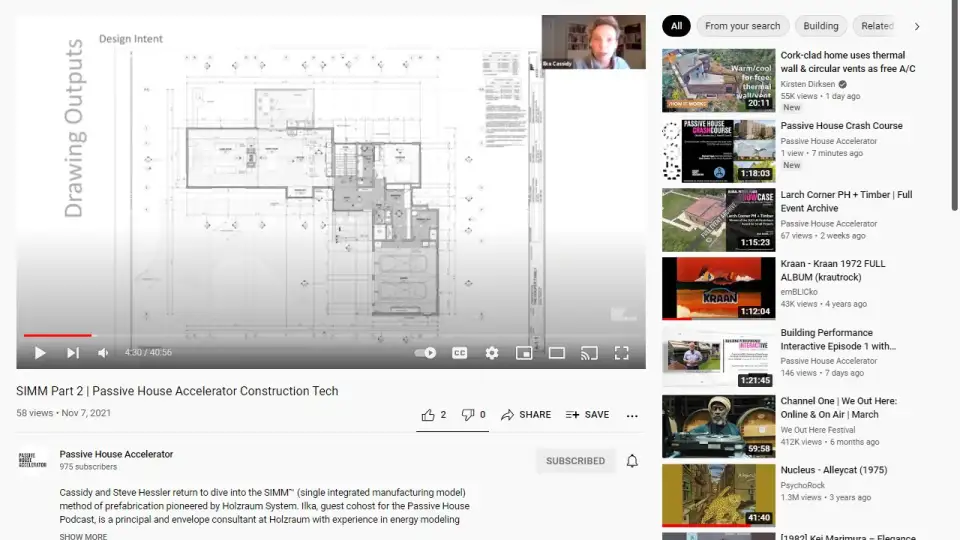
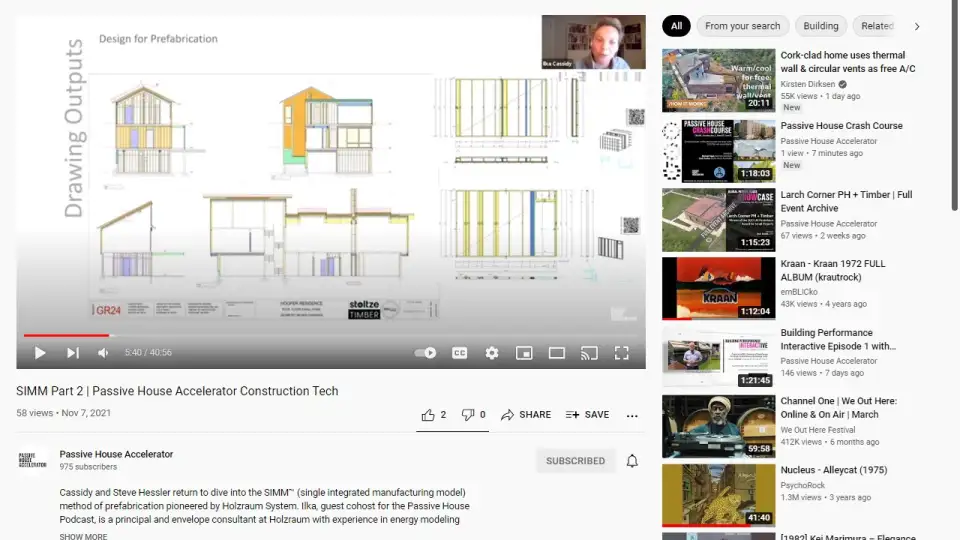
These are the outputs from a volumetric model and they are really great for documentation of plans, elevations, sections, window and finish schedules and lots of other things. So Revit is great for the architects and engineers as well.
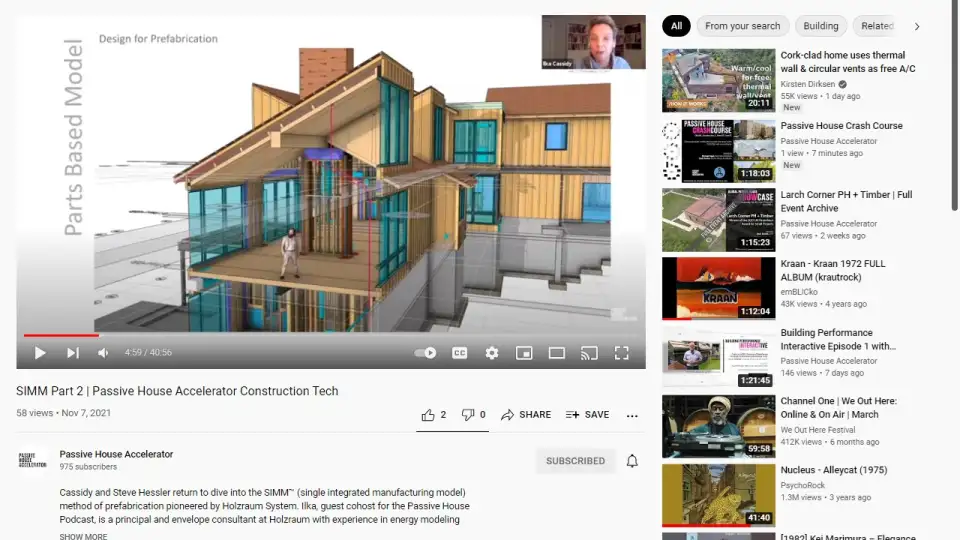
A SIMM on the other hand is an expansion of what you need to manufacture the panels, so it's a precise parts-based production model. In a production model, every element that makes up a panel needs to be identified, modeled and organized in order to generate these outputs like 2D geometry review sets, site prep coordination drawings, installation drawings, panel shop drawings and in many cases, machine files. So, we started thinking that there's so many lost opportunities in just using this parts-based model for production—because you have to build this model for production, otherwise it's not going to work.
This is what typically would be modeled by the manufacturer; in this case, the interior walls, the exterior walls, floor panels, and roof panels. But since we know that what is being built in the computer will be built exactly according to instructions in real life, we started to include other perspectives. This is the load path and the Revit model of this was actually provided by the engineer with correct sizing of the members, but it needed to be organized and integrated into the rest of the model. The same as for the foundation. The MEP model was also provided by the engineer and could be integrated and clash detected. By running through this with all the other elements, we can check against all of everything that's being built. We also add windows and doors—this actually came out of the architect's Revit model—and then we work with the architect builder to integrate them and really detail them out. This is what we call a holistic parts-based model. We were also asked to integrate the terrain model, which was provided by the excavation contractor.
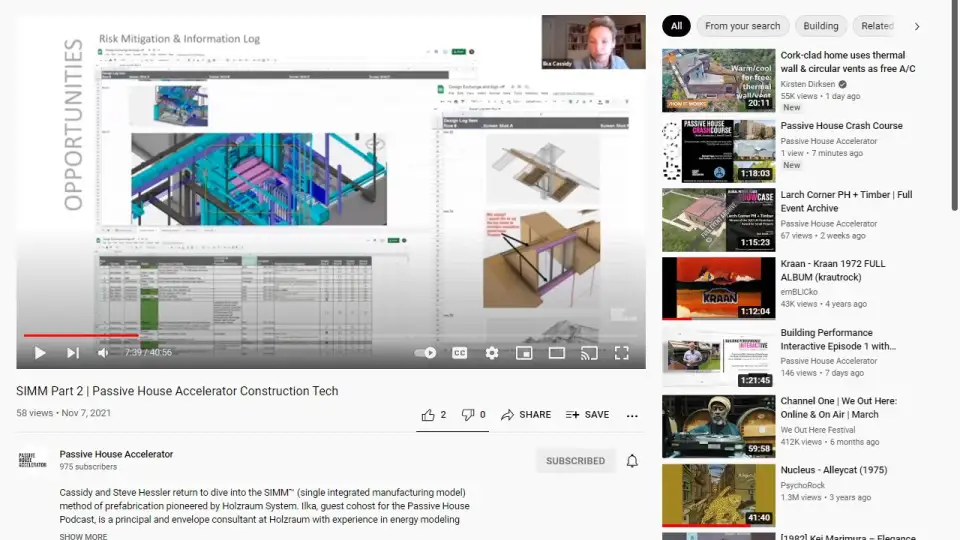
We started using the SIMM as a communication tool for field and trade coordination, and for high performance envelope detailing and instructions. The SIMM basically becomes a visual database that feeds an information log and it has endless possibilities to attach data to each part. It can then be exported into lists that become available to the builder. Steve is going to talk about that more in a little bit. So the SIMM becomes an accessible database even beyond the building's life cycle and could be integrated—that's our dream—that it actually could be integrated into the circular use and reuse of building materials, because everything is accounted for so everything is in a database. Eventually, when we really have to go back and the use of sustainable materials is not good enough anymore, and we have to use what's already there, there will already be a database available where we can see how much of what is there and where it is.
On this particular project, we were really excited that we could develop a true hybrid system—or hybrid of systems—that are coming from different manufacturers and that we could be the coordinator between all of it. Now I am happy to introduce Pat Clark, who actually built the first commercial CLT building in the United States and is actually a walking CLT encyclopedia. He will be talking about mass timber systems and why we ended up using this hybrid approach.
Patrick Clark:
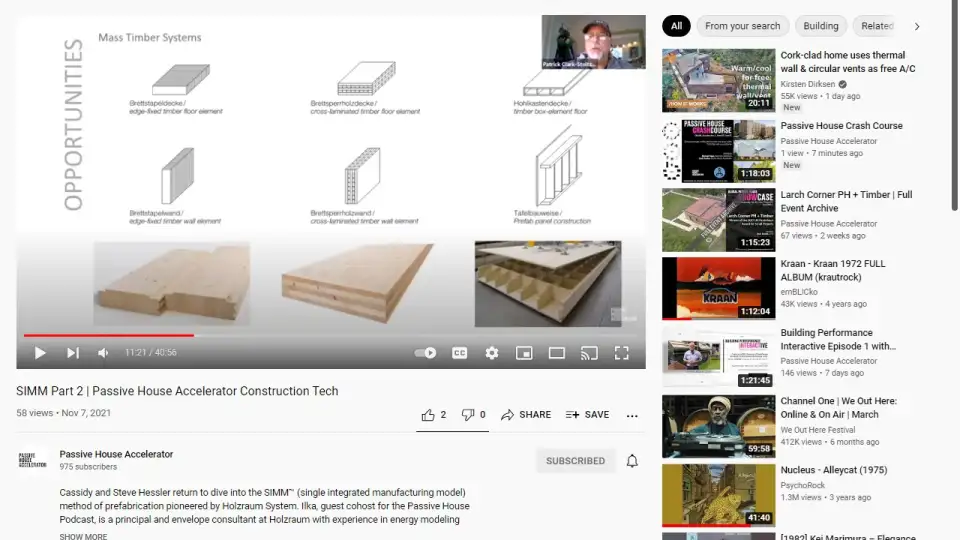
Thanks, Ilka. So, a brief introduction as to who Stoltze Timber Systems is. We're located in the Flathead Valley of Montana—Northwest Montana by Glacier National Park. My company, Wooden Haus Supply, has been importing European timber products since 2009 merged or formed a joint venture with a 109 year old sawmill here in Northwest Montana that owns 40,000 acres of its own timberland and has been sustainably managing them for over 100 years. We formed a joint venture to start to manufacture our own line of what we call CLT 2.0 products here in the Flathead Valley. Where this all started for me was I met a colleague through a German contact who actually worked at the first CLT business in the world, which is located in southern Germany, in Bavaria. The company's name is Merk Timber and they're still in business. Most people think that the Austrians invented CLT, but it was actually co-invented both in Bavaria and in a part of Switzerland—two separate companies taking two different approaches to this product.
What you see here on Ilka's slide is a combination of products, One or two of which are cross laminated timber. I think the important takeaway here is that mass timber isn't a group of products, but it's really a system approach to how you build buildings. That's really, really important to understand when you're delivering a mass timber building. It could be a group of products that are all solid timber. It could be a group of products that are based on solid timber. However, as you see on the right hand side, there are timber boxes that could be open or closed and filled with, say, wood fiber insulation or cellulose to find the optimization between mass timber and high insulation values. That led me down this path of interfacing with several European suppliers and finding for each project the optimal product mix to fit with the project. In this case, on this particular project in Big Sky Montana, we decided to head down the path of CLT floor and roof elements in combination with the high performance wall systems that are prefabricated stick framed. One of the reasons for that is that on many of these, say modern-style houses, oftentimes the façade area has a large amount of glazing or openings—windows, doors, et cetera—and it can be challenging to pull off those designs with a CLT wall system. On this particular project, we elected the UCLT where it's very strong, which is floors and roofs, and you go with the prefabricated light frame, high-performance wall systems. One of the other things that I wanted to mention is that for you folks in the Passive House community is that it's quite common for cross laminated timber as a system to be utilized in Passive Houses, primarily in Europe, at this point in time, but a colleague of mine in the UK actually constructed the tightest Passive House that was ever built in the United Kingdom, and the entire building was cross laminated timber. With that, I'll hand it off to Steve.
Steve Hessler:
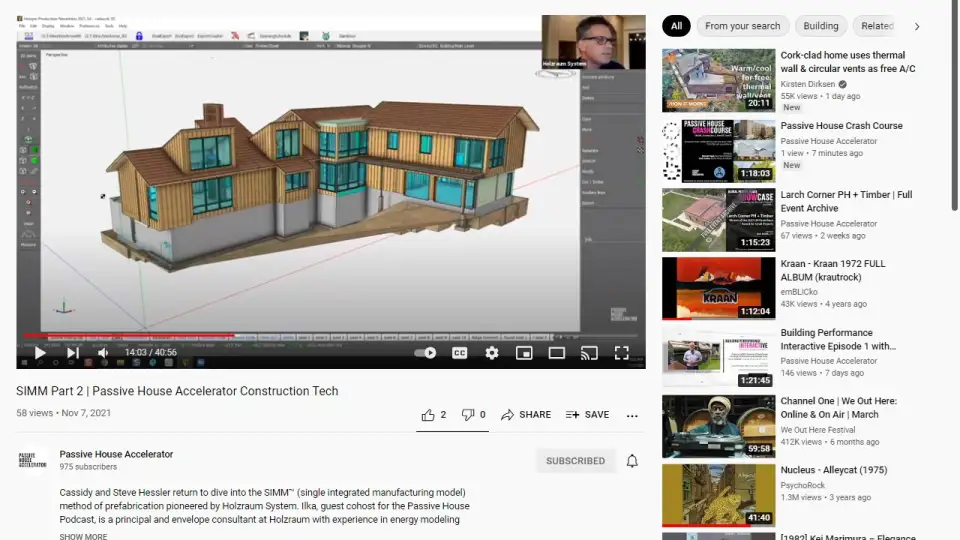
This is the Montana project Pat's talking about. Let's see. So, really quick, I'm just going to show you some of those components that Ilka talked about, that are brought in either created by Ultram or many times brought in so it's content that comes in and goes back and forth. Many times with the MEP information you're finding clashes pretty early at a coarse level, and then you're starting to evolve and the architect is still working on stuff, and the structural engineer is still working on stuff. So, for us, what we're actually trying to do is figure this out. This model is quite huge and luckily cadwork has this cool feature called team. So the MEP is referenced in, so right now this is actually not in the model. It was in the model for a while and it was better than it was in the model for a while because it's not snappable right now, but when it was in the model, it was just a beast. It was an absolute beast—like 800 Megs—but with this model what's really cool is with team you can start to break it out in different pieces, which we're going to be doing with Collective Carpentry.
I think Jan might be in the audience, but he's also a cadwork guy. So, when we're in production on the light-framed panels, we'll be basically working, he'll have his piece and we'll have our piece and we can update and exchange things. There's all different types of sections that were given to us by Tom Baughman, who's going to talk in a few minutes, and the structural engineering stuff that came from Madden & Baughman was just awesome. Most structural engineers don't hand me an IFC file with all their members. That doesn't usually happen. Second of all, if it does happen, it's almost never sized correctly. So what was awesome is these things were all sized accurately and I just had to nudge them into the right alignment location, but it was really, really good.
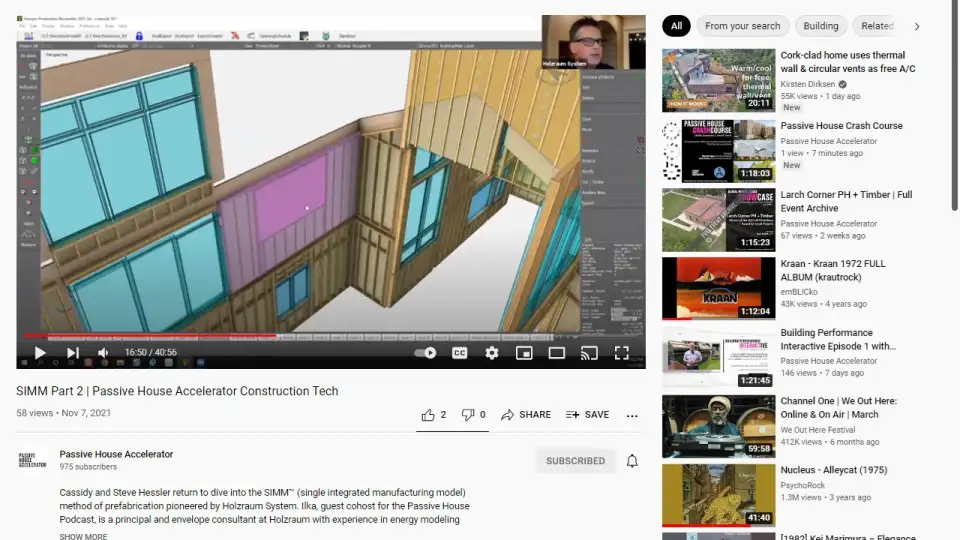
So we had a lot of back and forth, and then we were able to work through connections together a little bit but those guys mostly handled most of the connections here, which we're going to get into a little bit more. Then we have exterior walls and these all are panelized right now. You can basically pull these apart but they're not in their final panel configuration yet because we're about two or three weeks away from handing off for production. Then interior walls, and this is the CLT floor panels. So they're all 180 millimeter and about seven and a quarter inch CLT panels. With all the penetrations there can be pre cut if it makes sense so we work with the MEP on that and then the roof system.
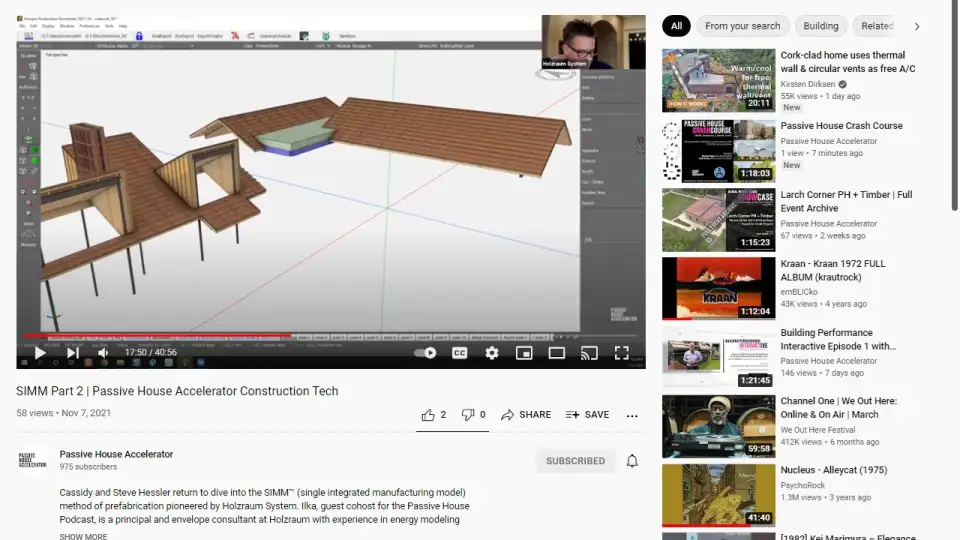
Now, I'm going to peel this roof system apart. I really am very excited about this roof system, but before I do this, I do want to see if Tom could just talk a little bit about their company and what this was like for him, too. Maybe I'll just leave the screen up Tom and then you could just go ahead and unmute and tell us a little bit about yourself and about how this worked out.
Tom Baughman:
Yeah, sure thing. Hi, everybody. I'm really happy to be invited and I'm excited to talk about this program today. My name is Tom Baughman. I'm a structural engineer in Portland, Oregon. I've been practicing for about 25 years in this company Madden & Baughman. I think we're in our 16th year together. We work on a pretty wide variety of projects, including commercial and residential and everything from custom homes like this to some fairly good sized multifamily projects. Like a lot of people in the area, we feel like we're pretty tuned in with wood construction, but there's a lot of really exciting advances that just like all of our competitors, we've been very interested in getting into them and we're pleased to see some of the mass timber approaches, for example, becoming more cost effective as we all get better at doing it and as there's more and more supply in the market.
We probably had a common experience where it was hard to get some traction with these types of systems because they were expensive and they were hard to source, but this project is a very exciting one for us and it's been actually quite unusual for us, but that's primarily because of Steve's input on this project. These cadwork models, I think, are amazing and have been incredibly instructive to help us see the building and understand how these parts all go together early on. I think that what we're most used to is a traditional design approach where we go through and we're working in our own silo, probably communicating mostly with the architects and we do our best to design and detail these systems.
Holzraum and Steve introduced this design process that was very unfamiliar to us. The SIMM process meant for us that we were having weekly meetings, lots of discussions, both with the builder and with the other members of the design team, and it was really unlike anything we've done on a project before. We were solving problems and doing the coordination in a really, really constructive way throughout the process instead of as a way of recovering from the whatever things weren't coordinated in the design, and when we first put it out. So Steve and I were talking earlier about when Revit and 3D modeling generally that was first discussed. I can remember people from Autodesk coming to us back in 2006 or 2007 and talking about what the dream of this of software was, and that was that we would have these integrated designs and everybody would effectively work together.
Frankly, I don't think that's ever really happened for us, except on this project, so it's very exciting for us and I think this model as a way to approach a project seems like it's something that we'd want to do again and again. For us, we're very, very confident that things are thought out; that we think construction is going to go really smoothly; and I just think Steve has just been the hub of that effort and really we're looking at him like he's the star player on this whole process. One of the things that's happened over and over again is that instead of us just taking a stab and doing what we think makes sense, everything—literally down to the design of specific connections—has ended up being a collaboration. So we just have a really, really high degree of confidence in this model, and we have a high degree of confidence that the build is going to go really smoothly and this is going to go together quite well.
Steve:
That's that's awesome, Tom. Thank you and I swear to God, I didn't pay him for any of that. You can just take my word for that. The beers are in the mail, Tom.
Tom:
All right.
Steve:
It's really true that the collaboration has been just insane and it's a bummer that Erik Renna from the MEP company couldn't be here because Tom and Eric and Matt Schaefer...I don't know if Matt's in the audience...Matt's Tom's engineer, the project engineer. It's just been awesome because there's sweat equity in this, you know what I mean? Like Tom, and Eric, and we always do, but they're putting a lot of time upfront and it's a weird thing. I mean, Tom probably was like, "Wow, this is a lot of time we're spending," but he also realized early on, that it's way better to put this time upfront. Sometimes some really scary shit can happen if you don't think it all through.
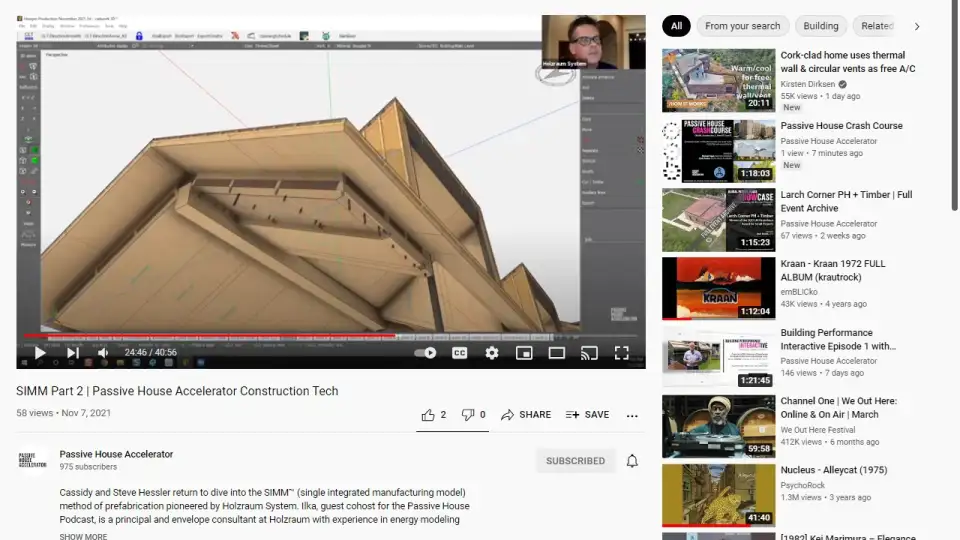
Anyway, I'm going to just show you an example of one of the collaborations that Tom and I and Matt worked on. So this roof is cool. This is a thermally decoupled three-foot overhang and the snow loads for this building are 160 pounds per square foot. So just take that for a second. Think about the last time you designed a three foot overhang for 160 pounds per square foot and the entire overhang is actually happening with this panel right here. This is what we call a static panel, but the static panel will be a tremendous thermal bridge if we didn't decouple it. So, Pat Clark actually led the way on how he's doing this for a while and then we took it up another notch but basically, if I peel this thing apart, we've got on the top we've got 5/8s red zip. Take the red zip off, there's two layers of battens. The first layer is 2 x 4 flat and then there's a 1x on top of that cross ventilated. Then I take the battens off and these are the static panels. So, all the static panels are here for the building. So they're handling all of the overhangs, but what's nice is they work out level and flush with this top layer of STEICO installation. So next layer down, you can start to take the static panels off. This is the buildup, so this material is just like KVH material. It's awesome. It's going to come from Hasslacher; everything is going to come from Hasslacher except for the insulation in this view. But this whole system of battens is going to be pre cut in a numbered part kit, and I'll get down where I can show you the part that is really exciting. This installation right here this is STEICO Universal Dry. This is what Ilka and I use on our light frame panels out here and this is also what Collective Carpentry and Bensonwood and New Energy Works uses. We're all drinking the Kool-Aid on this amazing exterior insulation. You can walk on it and it's waterproof, but it doesn't have quite the same R-value.
So what Pat has taught me is that you use that on the outside, and then you use this stuff on the inside. So this is like a 3.7 per inch and it's cheaper, but it's not tongue and groove. So it's excellent behind the other installation. We basically design the spacing to handle structure, like all the spacing of this KVH built out that's thermally to couple it's all spaced on European delivered sizes. So this panel is basically going to be cut into out of the container and Collective Carpentry is going to basically pre-prep these. So there's going to be a shop drawing for the installation that way when they come they can just pretty much pressure fit drop in place. So if we could keep going down here and we start taking out some of the insulation then you can see these new cross, basically this cross of KVH.
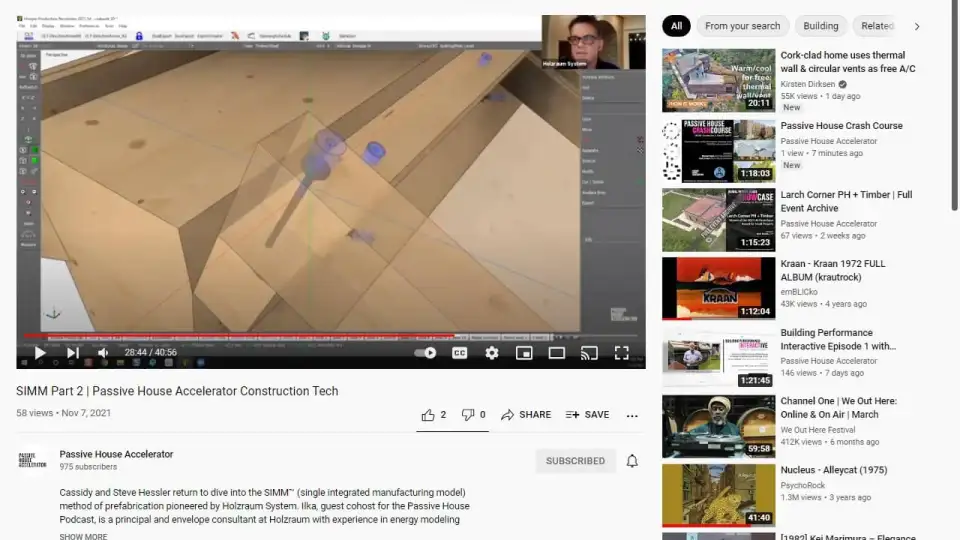
The KVH material by the way it's cool, it's like a glue joined, it's almost like if you had a piece of glue joint trim but it's super straight and it's just as strong as solid and it's actually, when we like build into this whole Hasslacher package it's actually cheaper than sell timber. So it's crazy. It's kiln dried, dead straight and cheap. You figure it out. So then we go little further down now and now what I did is I wanted to show you how cool the level of fabrication that Hasslacher is going to do. So what we did is, if I make this guy. I'm going to just make him like a little bit transparent. You see the fasteners. So these are all roadblocks fasteners, and with Tom's help and Pat's help and fire tower, we're basically finding the most cost effective optimal fastener through the massive roadblocks catalog. Then there's actually, so attached to the fastener there is a pilot hole. You see this little guy right here, the cyan guy that actually is the guy that has the name and the product info on it.
This fastener, the grey one, is just a design fastener. It's just there for us to communicate. For Tom and I and Matt to put it on drawings and just understand what we're looking at, to have the parts in our hands, but this little guy right here takes up way less memory, and he's got data attached. So right now if I look at the data, I could fill every single one of these attributes if I wanted to, but the main things I have are that this is for the sequence root system. It will be installed by Collective Carpentry; it is a Rothoblaas part; and then this is a TBS 10 millimeter by 360 millimeter. Basically that one part carries all that data and what's cool is when it gets to Hasslacher, they're going to do for us is they're going, you see the little blue one is a counter sink. It's only half inch deep. So the counter sink is going to get milled and that little tiny part that's only two inches long is a tracking pilot hole. So that means that when the guys are on site, they're not thinking at all about drilling holes. They're just sticking screws into pilot holes and it'll track perfectly because the angle has to be dead perfect.
So like this fastener is designed, see that, if you poked through and if they went the wrong direction, and they put a hole in the bottom of this very, very visible CLT roof that is their living room, we're screwed. So we can't have the screws screw us. So that means that we're relying on the manufacturer to basically just make it easy, but also dead nail every placement of every screw. The cool thing is that because we have it in SIMM model we have, every time we put a part in a model, it's a basically a little bank for data. So it's just like this whole thing it's just a ridiculous visual databank. So that's going on and then what was the other thing I want to show you? This is cool. So this is all part related. This is Tom's connection. I love this. We were going to do this crazy ass like steel connector. We spent a week designing the wrong thing that Pat and I started on and then Tom's like, "Why can't we just do a haunch like a timber frame?" I'm like, "Oh my God, I love a haunch."
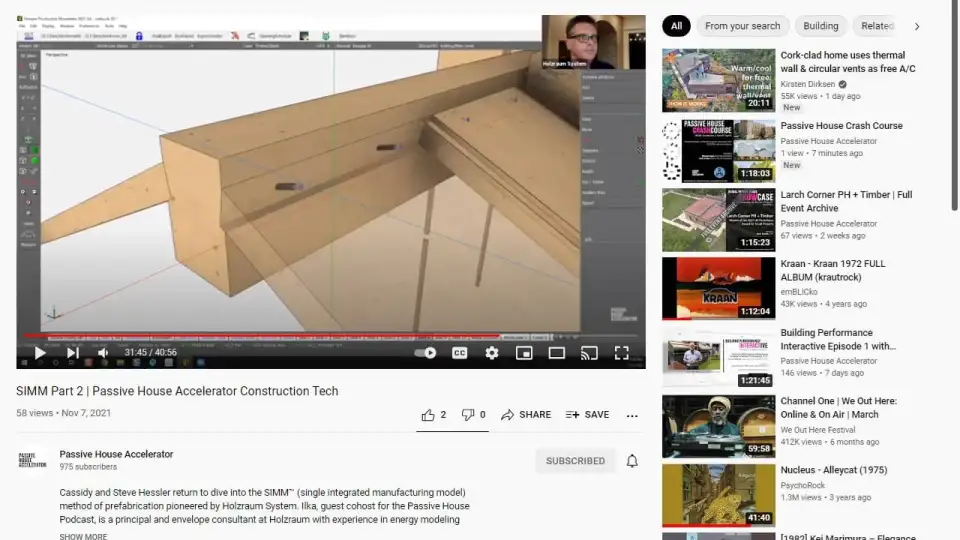
So that's basically what, so what Tom did, then Tom went and looked at the fasteners and found one that we didn't even know exists and he cut the fastener frequency in half. He saved us money on fabrication on the hangers. He saved us money on installation on the hangers and this screws aren't cheap either. So what this thing looks like with these haunches, so that little tiny thing is an inch deep that's carrying the entire CLT roof with the right fastener. It's crazy and what it looks like when you take all of the parts out is this. So this is what will get machined. So these ridges have these pockets and these are not just structure but these are literally, that is the visible joint right there. So it has to be tight and clean and perfect but we feel really confident that that's what will happen. So then just the other couple things. This shows that the CLT structural members, really pretty simple stuff. I mean, it's all just roadblocks fasteners. We're trying to keep things as simple as we can as far as connections.
Sometimes the connections have to get a little wacky, but a lot of the CLT stuff is pretty straightforward as long as you've engineered it out. So that's the roof stuff and now I'm just going to show you a couple other little things about the model. I'm now going to peel it back. I'm going to build it back up. So foundation detail, it's like treated sill plate. We went back and forth a lot between the architect and Tom and Matt and I because there's a lot of steps and things in here. Then this is all Tom's load path, Tom and Mat's load path. So there's very tight tolerances, because what's going to happen here is, collective carpenter's coming from British Columbia.
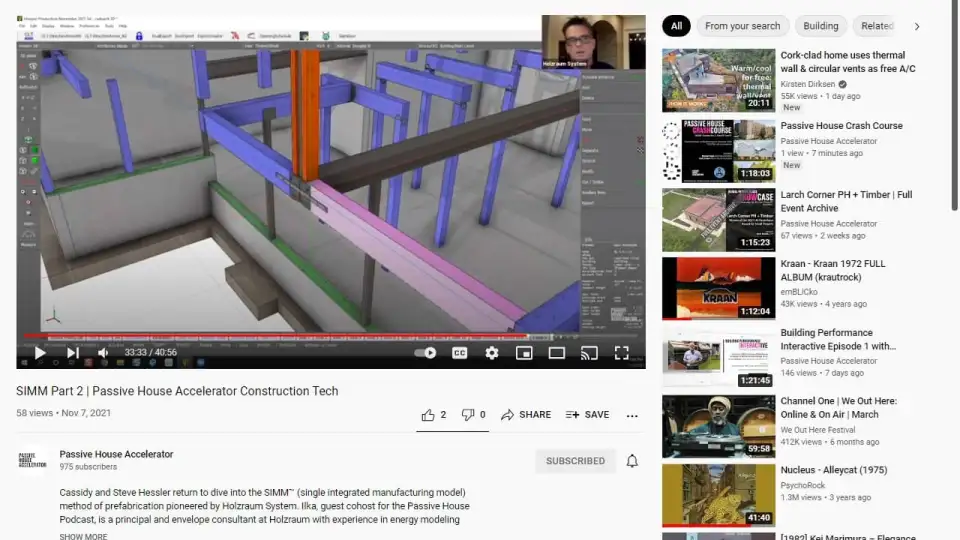
They're going to be down on this site in Montana, with CLT from Austria, and they're going to provide these glulam with the joinery and the holes for three quarter bolts. So the coordination between this and a structural steel has to be pretty damn good. You can always say, "Well, I'm going to drill those when I'm getting down there," but it's a time suck to do that and it really can burn your budget. So we're going to try to do as much prefabrication as we feel safe about.
Let's see. So we go now, this is the load path with now the CLT floors, so you can see what that looks like. Now I'm bringing in some interior walls, all the light frame and this is all panelized as well and you can see these weird rough openings. you're going to see, that's all MEP so the there's rough openings for doors but there's tons of rough openings for ductwork. So that's why I was just like Tom and I had to really rely on EriK Renna to keep updating the MEP model which he did a brilliant job with and you can see how that works.
So, basically all the framing, I don't actually even know how you frame these walls and put the MEP system manually because when I was a carpenter, we didn't have MEP though. But I don't really know how you, I honestly don't really know how you do this like cost effectively. I don't know how that happens actually, this is the first project where, usually our MVP coordination is through floors and roofs but this is the first one where the walls was so intensive MEP coordination on this. So that's going to be nice.
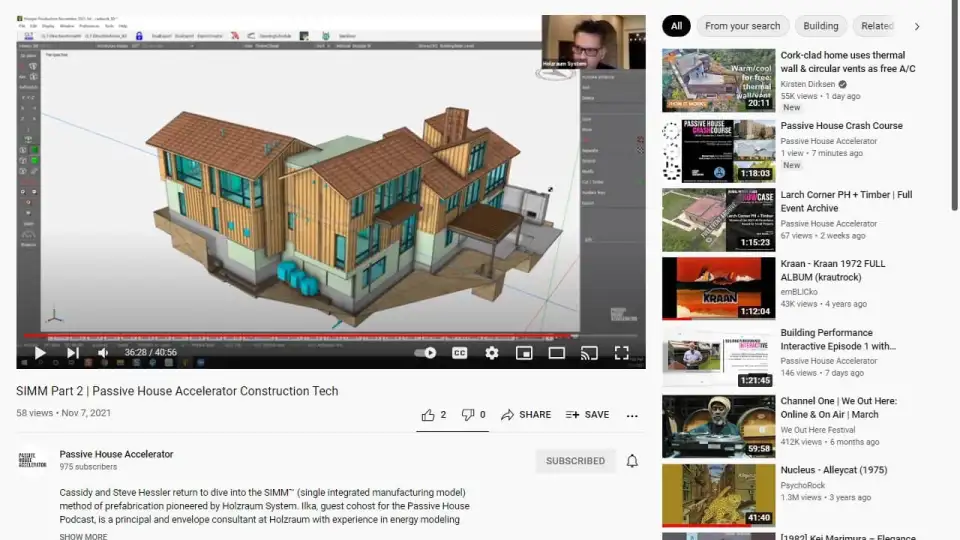
Then bringing in the exterior walls and then the roof panels and that's most of the building. I did this so you can just see. I just cut away the exterior walls a bit so you can just see how having all those parts makes this just really useful in meetings. So we have coordination meetings. We look at the Revit models, but when we want to look at what's really going on in some of these spots, we can just turn on anything we want and get a little better look at things. This is the interior walls. So that's just interior walls. It is really nice to be able to just like turn on certain scopes and perspectives against other scopes and perspectives and really zero in and then bring it all back. that's pretty much it. I don't know if anybody has anything that they want to see in particular before we just start doing question and answer. If anybody has anything they want to look at. I can always bring it back up. Should we just, what do you think? Should we just maybe move into a Q&A?
Shannon:
I think first Steve, we have to pause the game and give you guys an amazing round of applause and a big cheers. Thank you so much.
Mark Wille:
Please unmute everyone and make a lot of noise.
Steve:
Thank you.
Shannon:
I just made a passive house joke for you, Steve. I said what is the SIMM model say to Steve Hessler? You complete me.
Steve:
Nice.
Shannon:
Little Jerry Maguire humor there.
Steve:
So I'm going to, I was just saying I'm going to unshare so I can see everybody's beautiful face and then if anybody wants me to turn it back on, it's very easy to do that. So this our, so we have all this data and we're like, we can export, cadwork's crazy awesome. You can export all these lists but for years and years, it was always challenging because you pump out a list of bolts and you pump out a list of timbers and you pump out lists of sales level and then development level. It's just like lists all over the place and they have these cool tools where you can save list settings but I'm telling you it's a lot to manage and so we needed something that would do it all in one place. So we pumped out a list of three or probably three different stages of the SIMM model development. This one is our first foray into the production model and so Collective Carpentry, Stoltze Timber is already using it for ordering. Hasslacher will use it and then the guys in the field, we'll install it.
So this is Catch, basically, these are different projects we have in here. There's project information, and then there's all these different types of reports. We also upload an IFC file of the projects so if you don't have cadworks, you can get a free BIM viewer and you can see it right here. Every part in the model, it has the production so this is a production number 646 so it matches everything in here. So if I wanted to go look for part 646. It's all in Catch. So if I go to, I can also filter by names. So remember I was looking all those fasteners, those roadblocks fasteners, if I'm in the field or wherever I am, like I'm ordering or I'm in the field or whatever it is and I'm like, I need to know about all the TBSA, this particular fastener. I now have all of those in front of me.
If I want more information, I can turn on different columns. I can move the columns, I can sort right in among any of these. So let's see if I said, let's go back here. So I'm going to go to roof system parts. This has all the parts that are in that root system. So now if I want to see only the stuff that has, I only want to see stuff that it's insulation, so I can filter now and now on the screen it's just insulation.
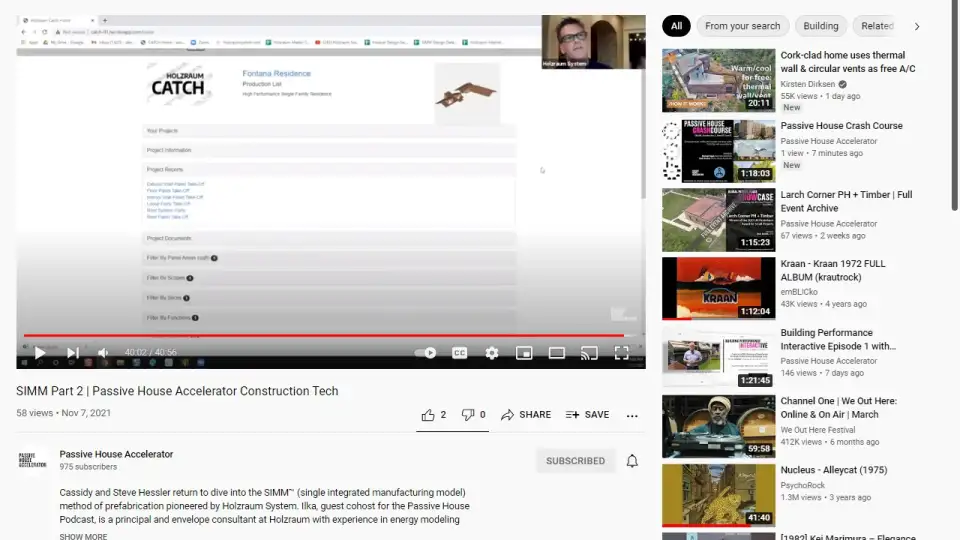
Then I can basically go down here. I can say download and it took a second and a half and now I have a CSV file of that report. So I can make all these different reports whenever I want. I can use this on a laptop or on a phone and that way I can basically just get my hands on that data very, very quickly. David's probably like, "You're not doing a good job of saying all the things it does because it does a lot," but I'm still learning it actually. So anyway, this is the back end of the SIMM model. This is where we're starting to figure out how to access very quickly and let the users, and the users for us are the panel companies, the builders, the installers big time and the designers to some extent. They all basically have a license to get in here and use that data navigation. So I am going to stop sharing.


