Ron Celentano has worked on some of the most high profile Passive House projects in the United States. In this video, he shares the technical, technique, and technology of a creative rooftop solar array in Philadelphia and walks through the orientation, details, and site management of four Passive House buildings by Onion Flats, including Front Flats, Stable Flats, Belfield, and Capital Flats. A PV industry consultant at Celentano Energy Services, Ron began in the solar energy field in the late 1970’s.
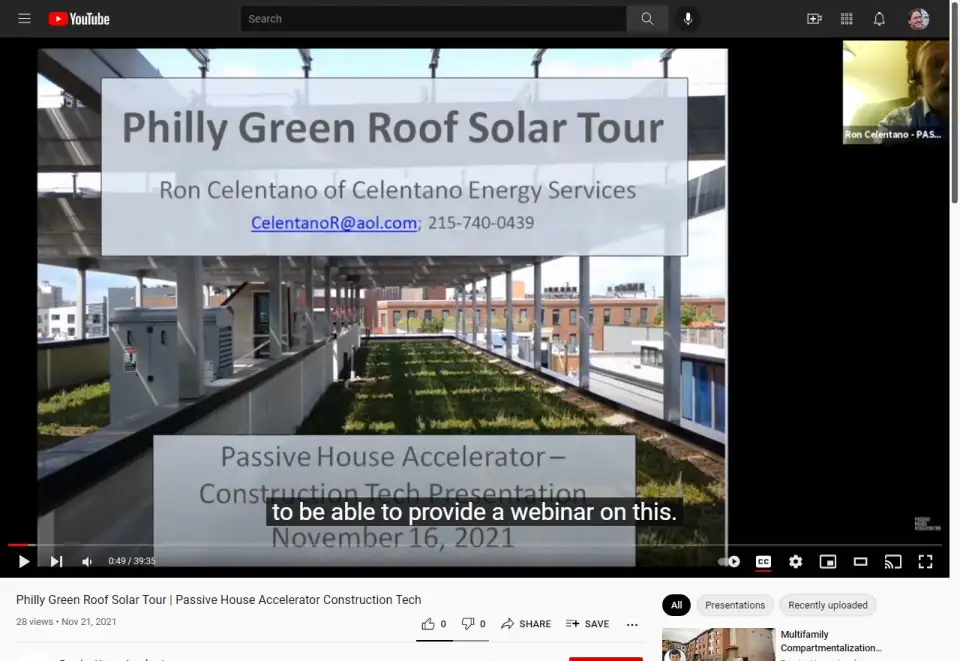
My presentation is titled, The Philly Green Roof Solar Tour. Originally, I was doing this for The American Solar Energy Society, which was virtual. It didn't really quite work very well, having a virtual tour like that, but I was glad I had it kind of in shape to be able to provide a webinar on this. I decided to tweak it up and work it out and it really worked out well.
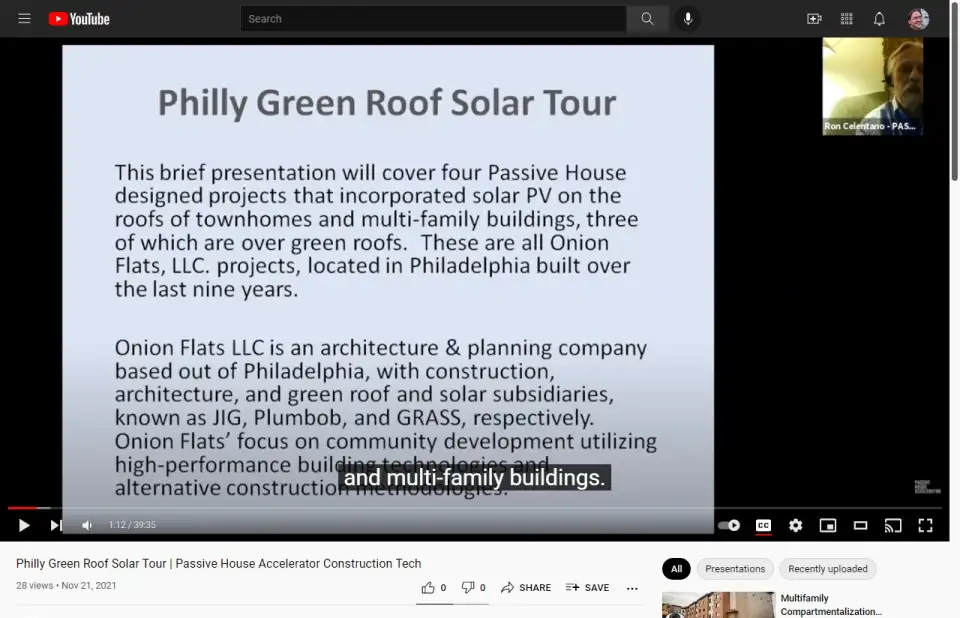
This is going to be a presentation on four Passive House designed projects that were done in Philadelphia, and they're basically a mix of townhomes and multi-family buildings. Three of them are over green roofs. These are all Onion Flats projects. Many of you probably know Onion Flats, a Philadelphia-based company. Onion Flats, I find, has always been very unique where they're not only doing architecture, but they're really getting down into the dirt with their hands and doing the welding themselves. They get really into it, which is fantastic. I've been doing all their solar consultation, design, and oversight, and some even installation aspects for over 10 years. It's been great working Tim McDonald and Patrick McDonald over the years. They're very, very innovative and forthgoing with their ideas.
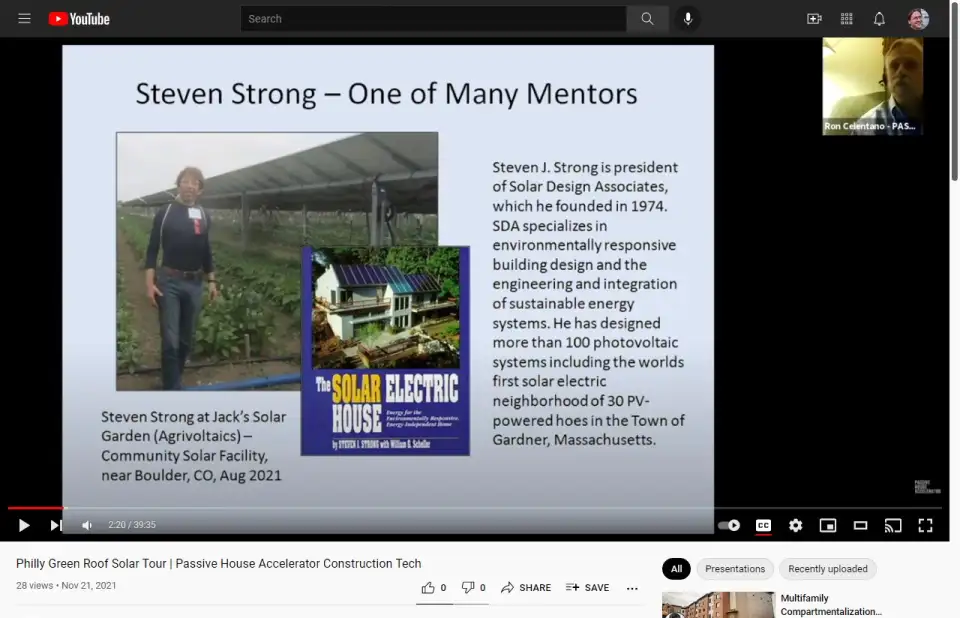
I realize I had to show...I think it was something about me displaying a mentor of mine. I don't know how many of you may have known of this guy, Steven Strong, who goes way back. I've been doing solar for about 40 years. I started doing solar thermal work in the Carter days and over the past 25 years, I've been doing photovoltaics. At that time, however, there was really not anyone really doing any of that work around. I was relying on national folks to get information and learn, but I did a lot. I really learned a lot on my own. I've kind of brought that out to others as well. Steven Strong has been a champion for many, many years. He's an architect and engineer, and he has done a lot of really innovative designs. It was this book that really turned me on. I picked up his book that he put out. This was the first net-metered, net-zero home that was built and designed, which he did back in the early '70s, I think. Oh, no, I'm sorry. I think it was very early '90s. I forget exactly when it was, but this book came out in '94. I read it in '95.
Now, I've met Steven Strong several times over the years. In fact, I just happened to see him this August in Colorado at this Agrivoltaics community solar farm, which is pretty cool. If you don't know what Agrivoltaics is, it's really having a ground-mounted solar facility. It could be several megawatts or whatever, but you're reutilizing the ground as well for planting or grazing animals, so you're multi-purposing the land area, which actually, of course, adds much more value to that.
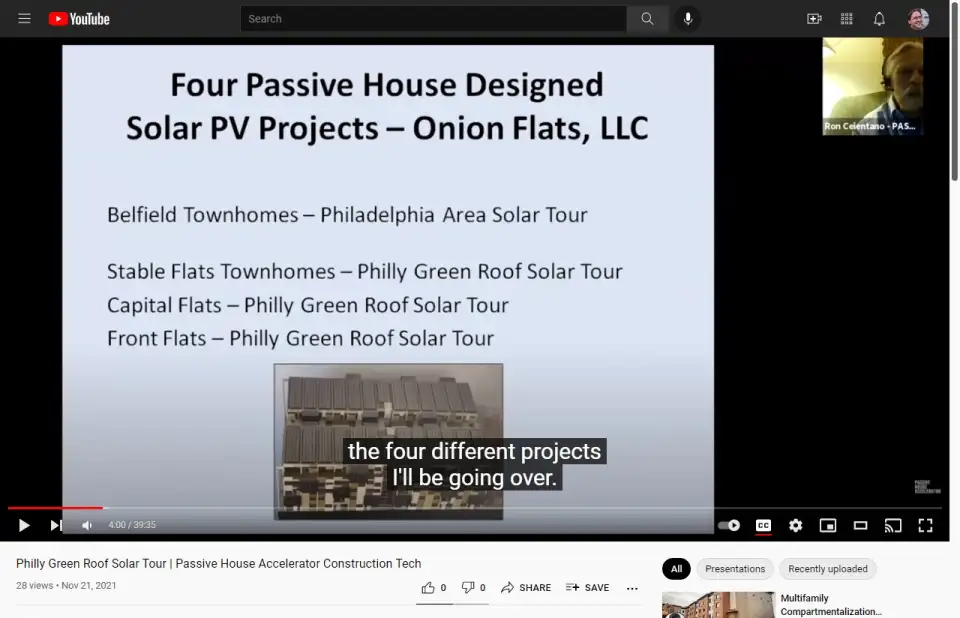
Okay, so I'm going to jump into this now. The four different projects I'll be going over are the Belfield homes, which is not a green roof type of project, but the Stable Flats, Capital Flats and Front Flats are ones. This happens just to be a little model, not that it represents either of these four projects, but Onion Flats, or Tim, or whoever always builds of course these models, I'm sure as many as the architects do. I just thought I'd take a snapshot of that and show this in that view.
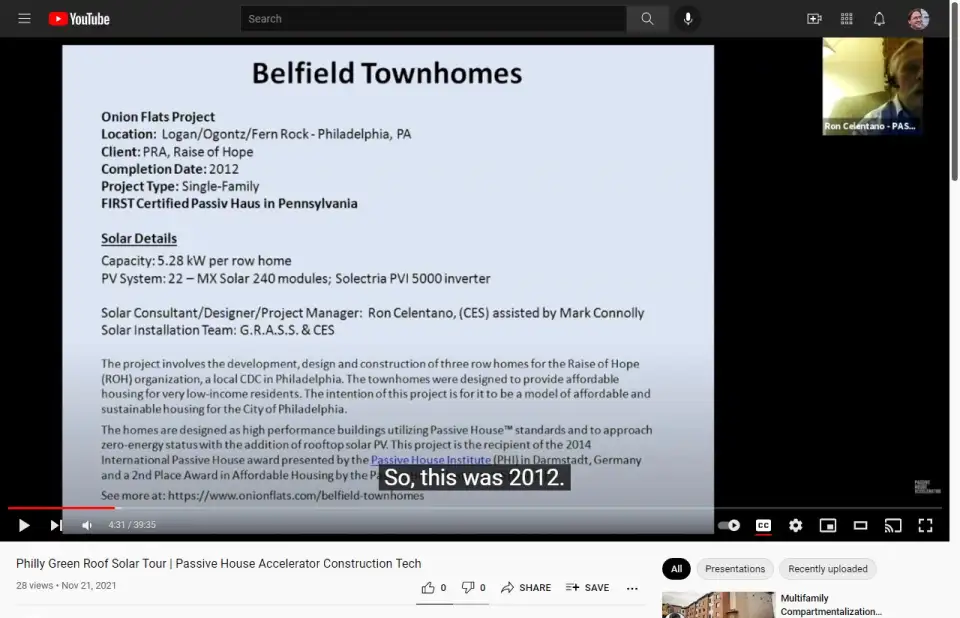
We'll start by talking about the Belfield. This was 2012. This wasn't the first solid project that these guys had done, but this was one that really was one of the earlier Passive House projects that they did. It's basically a row home, three row homes tied together and it was modular built. It was in fact the first certified Passive House in Pennsylvania for row homes, if I got that correctly stated. It was a Section 8 development. I think the intent of what Tim was trying to do was to demonstrate that you can build a Passive House basically without added cost, basically at the rate for your typical Section 8. It's hard to believe that you could do that, and that was successful. We did have a PV on top of that. These are about a little over 5 kW PV. These are horizontally mounted. As far as I know, it's still in operation. This was a modular build, as I was saying, so it was built in a factory and it was carted of course in its compartmentalized sections, crated down into position, taped up, and secured for reducing infiltration.
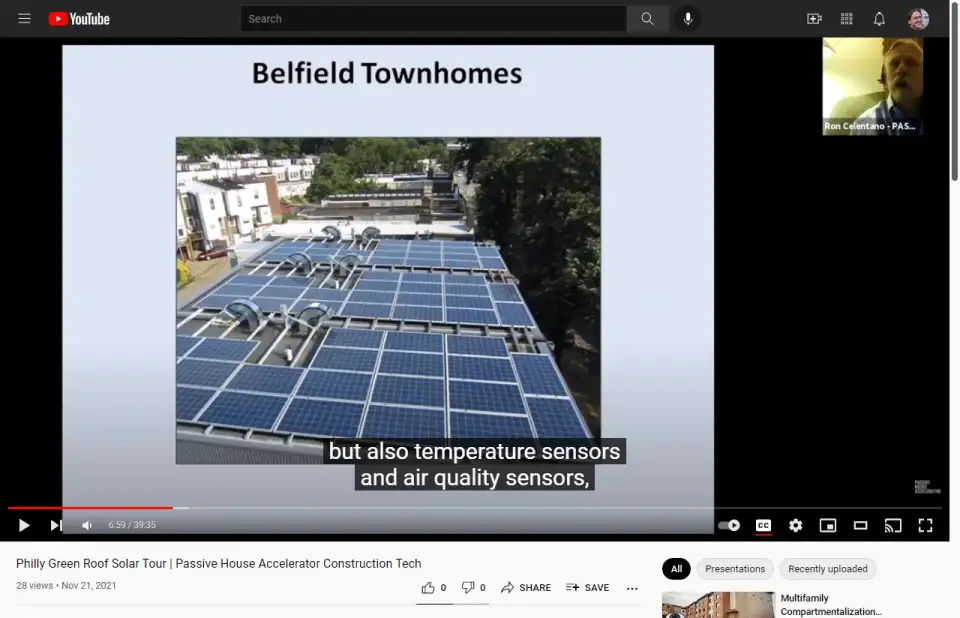
These are of course classic triple glazed windows and everything else. These are completely electric buildings. This is the front of that building with the brickwork that was done afterwards. This is where I come in with doing the installation on the roof. These are Unistruts that are going, they're spanning across the parapets. Everything again is mounted horizontally. Of course, we're trying to minimize shading impacts from these vents, from the ERVs. This is pretty much the completed job there. Now, this is where I started to do some of the monitoring as well. I did the monitoring for all these four projects. This one of course started with the most monitoring. Not only were there CTs for monitoring all kinds of electric usage on every circuit for these three buildings, but also temperature sensors, and air quality sensors everywhere in every room, all over the place.
It was overkill with the data. It was overwhelming. I should just tell you that you got to be careful with monitoring because you get what you ask for, or maybe it's not what you ask for. You're going to get too much data that you don't know what to do with or how to analyze it. That really becomes as a problem sometimes. Unfortunately, we only saw this data for the first period of time when it was first installed, since it's handed off to the owner of this project. I haven't been able to get hold of any of this data since then.
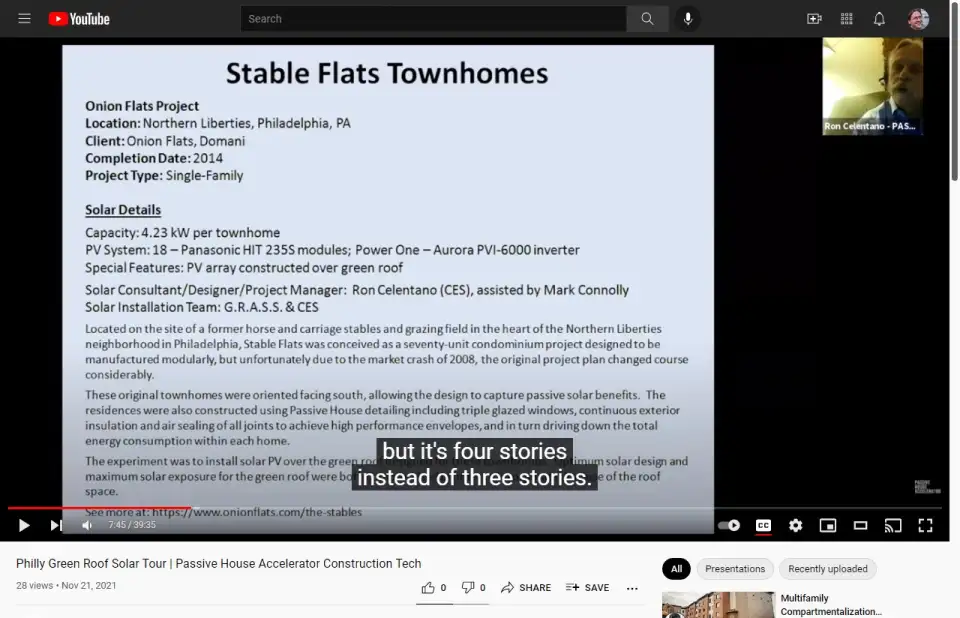
Moving on to Stable Flats. Now, this was also a row home, if you will, in construction, but it's four stories instead of three stories. These were market valued systems, so they were sold to families. These were pretty high-end type of row homes. This was intended to be a 70-unit structure, really development, but unfortunately these three prototypes were done right around that 2008 economic fallout, so everything kind of fell apart at that point, and I think a lot of the designs were sold off to other developers.
At least we have these three buildings put in place. Now, this was the first one where we experimented with having the solar array over a green roof, and it was pretty exciting to be able to do that. These are 4, about little over 4 kW per townhome over that. You can see that the solar is way up on top. Again, flat roof. We did the same thing, Unistrut crossing over the parapets. Okay, so this is a sort of a quick drawing of that. This is, on the left side is facing south, and the north side on the right is where there would be a penthouse, although that actually wasn't built for this project, but you can see how we were trying to compromise with how far apart those rows of solar panels would be placed in their tilt and into row shading, but also allow enough diffuse radiation to come through and to be enough for a green roof to flourish.
This was a few years after that the system was all installed, but at least you could see some green roof is in fact intact there. You could see that the Unistrut is spanning across the parapets. Now, what we had to do here was, we had to really custom a lot of the hardware to be able to mount these solar panels onto this, and then to make sure it's rigid, and really make sure that there was little deflection on the Unistrut. Over here you could see, this is later on when the other developer built these structures. They did in fact put some of those penthouses there, but I'm not sure how close they came to designing and building as close to the Passive House that these were constructed originally. They certainly didn't have solar on them. All this stuff was welded and really assembled that on the spot. It was a very impressive system where after looking at it a couple years after, it was generating as much, if not better, or more than we expected it to do.
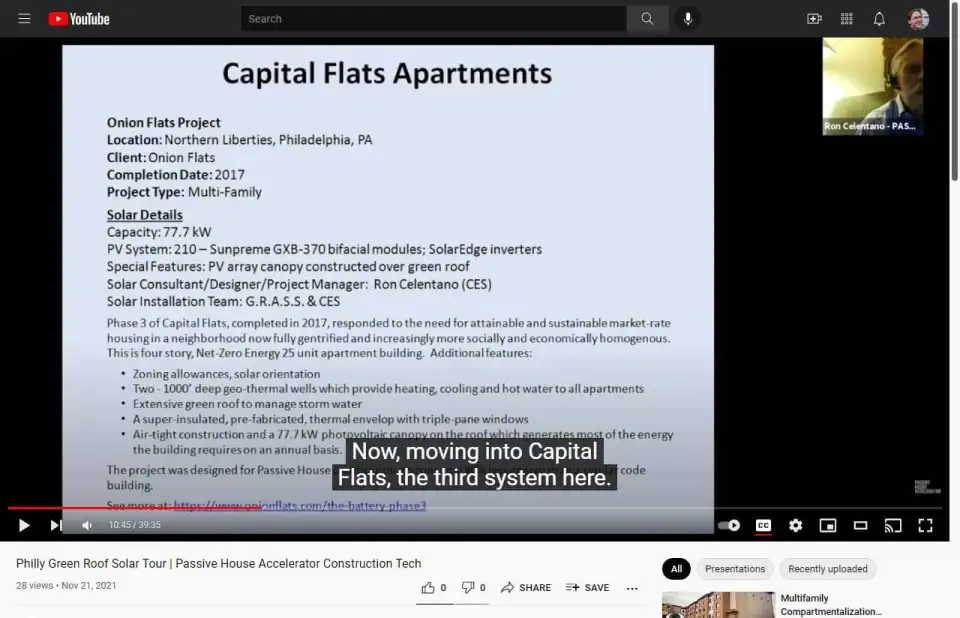
Now moving into Capital Flats, the third system here. This was now a next level or phase where it was a project that Onion Flats was going to own and maintain as landlord for tenants on this project, which is always a good thing when a developer does that, because they're even more assured to make sure that these systems are designed well and operate properly.
Now, this is a pretty unique system. It's a four-story, about 25-unit apartment building. It had ground source or geothermal heat pumps where it was open and went down into the Delaware River to pull up the water from the river for the heat pump HVAC system. That would then circulate into a heat pump water heating system as well for domestic water heating. Any discharged water would go through that first, or water that came up through the river would go through that first. So it was really very efficient for utilizing that heat for hot water. This also had a lot of monitoring all about. In this particular case, we used bifacial modules. Bifacial modules are such that, or they're frameless first off, and they have a solar cell on the backside, as well as the front side.
I've heard and seen different studies that there's maybe another 5% to possibly 10% additional solar gaining coming from diffuse radiation from the back. What happened here was when Tim McDonald wanted to do this project, we were initially planning to have a balanced roof of PV system on top of this flat roof, but I said that there was no way you'd get really much of any generation. I mean, you get a fair amount of generation, but nowhere near what he was hoping to get because of all the setback requirements that you have against the edges of the roof there. I said, "You'll get much more if you could just raise it up off the roof."
He said, "Okay, done." I was like, "Wow." This is after the building was already being constructed. If I recall properly, he changed how the whole top of the roof structure was going to be built. Therefore, it was redesigned to have these columns placed going up about eight foot above, and the entire array was placed on top of that roof structure, which is great. By the way, I want to point out here, I won't talk about it too much, but there are LED lights on all these little white sections. These were used for behavior modification. There would be LED lights that would basically be shining either red, yellow, or green.
It would represent a given apartment, not necessarily the apartment that it was nearby. In fact, it would be an apartment anywhere else. It was basically keeping it anonymous of whose it was, but it would reflect the fact that that particular apartment was either being very energy efficient or not. It was based on how their electric usage was going. We are in the process of finally working on this. This has been several years after the fact, and the LEDs were in fact not wired properly. I have to go back in fact, rewire all of these things. I didn't do the wiring originally, but it turns out that they all have to be rewired and I'm stuck with having to do that. We are going to be using this energy monitoring information to determine what the color lights will be, and the algorithms for doing that.
I wanted to show again these pillars that were kind of constructed here, and how it was structured over here. So here's the bottom of that pillar. It goes all the way down, all four floors. There's no question that it's very stable in terms of its structure. It was a really cool detail I hadn't noticed and got confirmed on how that was done.
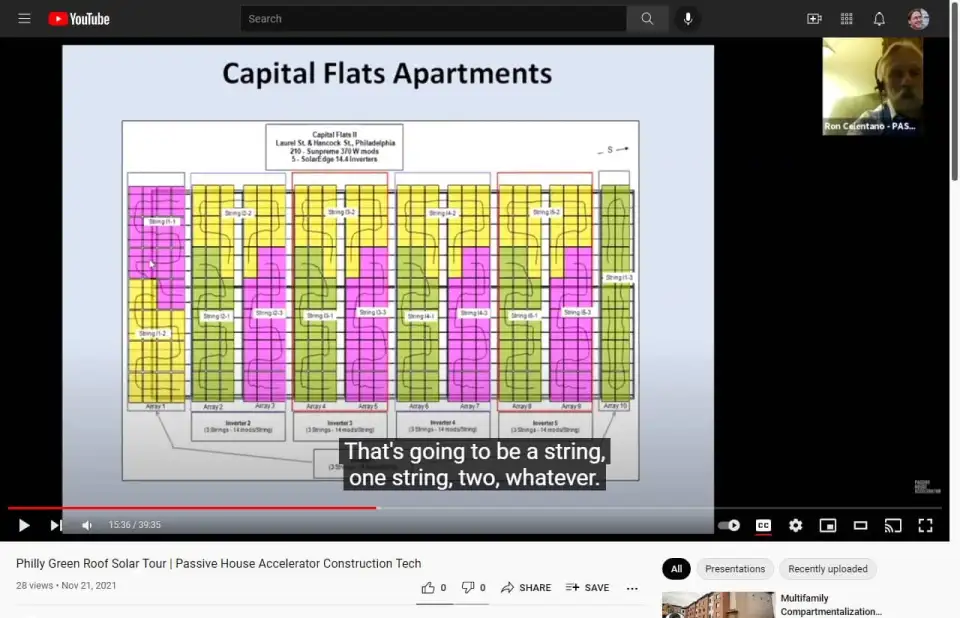
This is what's called the string map. This is for the solar. This is the north side, and this is the south side. Basically, the string is, you can see all these little rectangles here are each of the solar panels, and they're wired in series. I think there's 14 of them in series. That's going to be a string, one string, two, whatever. Each of these inverters are actually mounted over here, but this is for more for the diagram, each inverter, they're all the same size inverters and they each take three strings. It was really just to lay this out and to know how that's all going to be put together. Now, this particular system has a SolarEdge inverter system whereby they use DC optimizers. You may have heard of microinverters that are out there too. Microinverters are such that you can actually have it so that you plug the solar panel into a microinverter right there and you have AC. These generate DC, turns right immediately to AC, and that's already going down into a distribution panel and tying to the grid.
With DC optimizers, it's a similar type of thing, but they tie into the SolarEdge inverter. It's still a very efficient system and each module is really working independently. These shaded ones, or one of the modules, the rest of the string will still operate properly. It's also valuable from executing what's called rapid shutdown as required by National Electric Code, 2017, and as well as 2014 for that matter. If the grid goes down, the high voltage of the solar array will come down to a much down to below risk voltage level. Even if the grid, and normally, if you have a regular string inverter, if the grid goes down, this is still basically hot. If the sun is shining on them, it's high voltage. It could be up to 500, 600, even 700, so it can be of a high risk situation.
These types of DC optimizers and SolarEdge design will shut this down immediately down to a safe voltage level. So here's the roof where we have the solar modules stacked up. You can see their frame lists are all kind of ready to go. Here is the rail that we were starting. We were going to be putting up, and there's a standoff. Here's the tilt. It's about a 40 degree tilt. It's not very much of a tilt there. That's basically the structure. Hopefully we can see a little bit better on how you'll see how the modules are attached to that. You can see over here how these clamps work. We used, in this case, I think we used carriage bolts. You could also use what's called T bolts that will drop into the channel of those rails, and then you tighten this clamp around the glass.
It's really a kind of a pressure way of holding that panel in place. These are not wired yet, but you could see all the loose wires before we started to install the DC optimizers. Here's a closeup of the standoff that's mounted onto the beam, and then it's going down to the next one. There's a lot of open diffuse radiation coming into here that's shining onto the green roof. All the inverters are down at the south end of the roof. As you're walking down, it shows you how those strings were laid out, all these wires are being collected, and they're running down this little trough here, or down towards where the inverters are going.
So as you're going closer and closer to the south, you're accumulating more and more of these wires. This is where the inverters are, in fact, located. There's five of them. There's a distribution panel that has the open, the overcurrent protection devices, or the circuit breakers for each of these inverters. And then this is a zigzag transformer that's used as required for the interconnection for the utility. This is a gross solar generation here showing the gross amount of generation that is provided by the system. Here's finally a little bit more of the green roof. After some time it's been now growing pretty well. These are some ERV, HRV units over here. Yeah, it's a really a pretty nice. When I go there, I'm always into hanging out up there. It's like nobody's ever there so it's a really very tranquil place. You can see a towering over. I don't know how, I'll tell you this, I'm not sure how the city even, they never said though about this. I would think this is kind of a little bit of violation, but who knows? Anyway, it's great that it kind of hangs out a little bit over the area.
This is the parking area. There's 13 slots in this area here. This was after a lot of this stuff was already done. This project is actually called The Battery. I never liked that terminology because there was never any battery storage there, but he did have something in mind about that. These are EV chargers that were installed about a couple years ago. The idea was to have EV cars that would be possibly used for tenants to use, but some of them would be used for basically discharging into the building. So this is maybe, down in the future, if we're going to really get to that point, but at least you've got these charges installed. They got a grant for doing that. We have yet to really figure out how this is all going to be working, but at least we got the chargers in place. This is the monitoring, some of the monitoring stuff that I did. So here down here in the big box is the CTs that are placed for the solar part.
This is where the solar is coming in, and we have the CTs that are connected to that collecting that data. Over here are CTs and the meters collecting that data for the residential apartment units that's over down here below the circuit breakers on the feeders for all those apartment, electric panels for the apartments. And then there's a whole other area for other types of equipment too. This you could see the a massive of all these wiring there as they come together and go into the monitoring system. This is ultimately what came out of that.
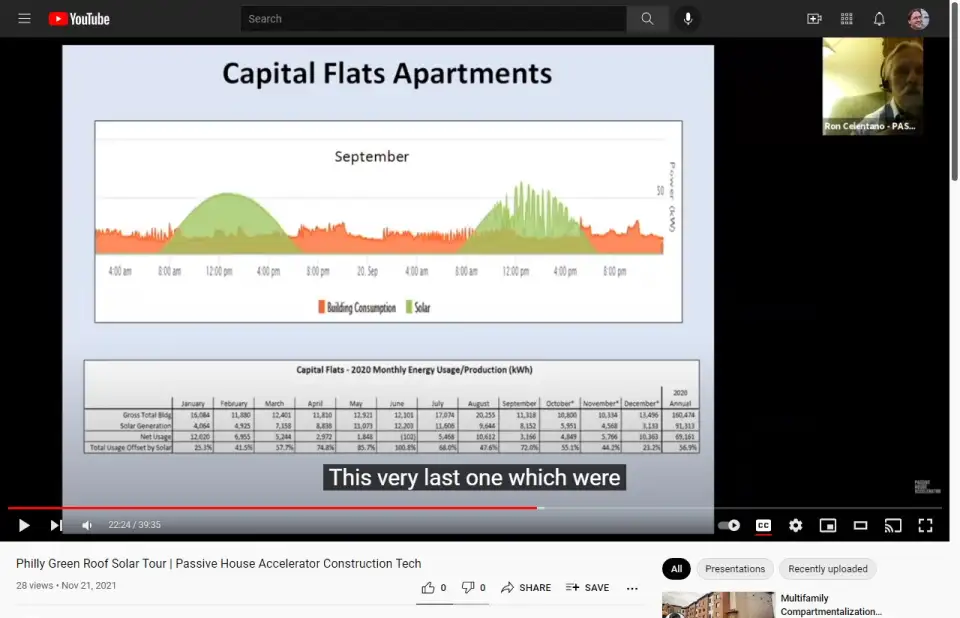
For the first three projects in the monitoring, we used PowerWise. In this very last one which we're about to go into with Front Flats, we ended up using eGauge as a different monitoring system. But this is the kind of thing that we would see. This is kind of showing September. This is the gross usage or power that you can see from the building that's being consumed.
And then of course the solar that's been, we've got a really nice day here. It is always a exportation or exporting of power on these days. This is in PECO territory near Philadelphia. In Philadelphia, they just started Time-Of-Use rate. I'm really very interested to see how this might work with changing this to Time-Of-Use. The Time-Of-Use is different from a flat rate where it's X amount of cents per kWh 24/7. Time-Of-Use rate allows for very high cost, very high rates for peak periods, and then you have an off-peak period at a much lower rate, and then a super off-peak period. I think because this load shape is relatively flat, and because there's a lot of solar that generates during that peak period, this could actually improve the economics of utilizing solar under that kind of rate structure.
I only had 2020 data to really put out here because we are already having some problems with some of the monitoring right now, but here ultimately is coming down to at about 57% of the electric usage is being offset by solar. You can kind of see where like here June, actually, June got 100%. The solar met all of June's electric needs or usage. You can see where on the shoulder months like April, and May, and then in September, you can see that's where you're getting quite a bit of solar because the HVAC system is not being used as much.
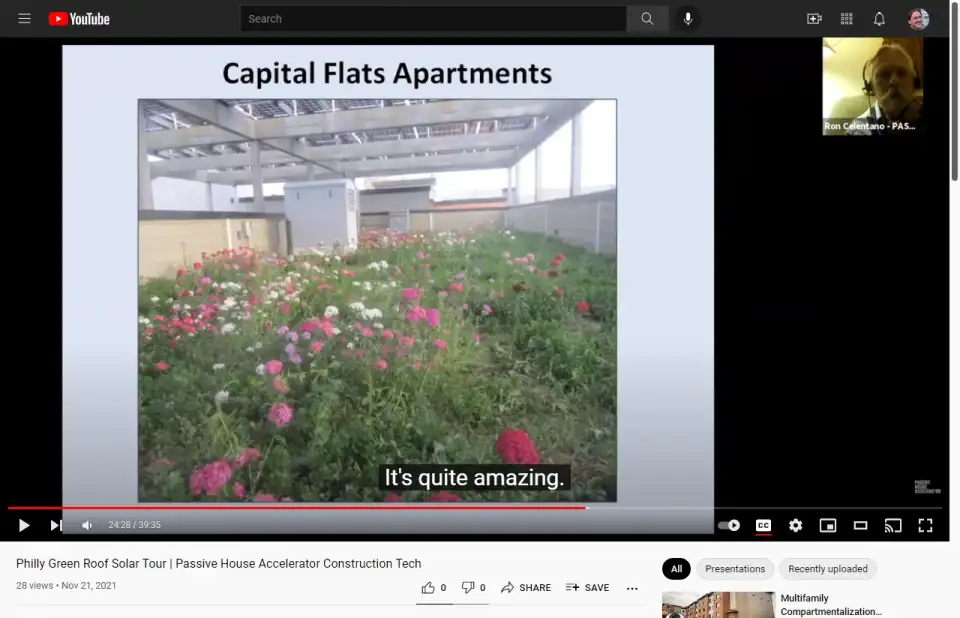
This is sort the last scene of how beautiful this is. It's quite amazing. I've seen lots of mushrooms growing, all kinds of wild stuff growing up here.
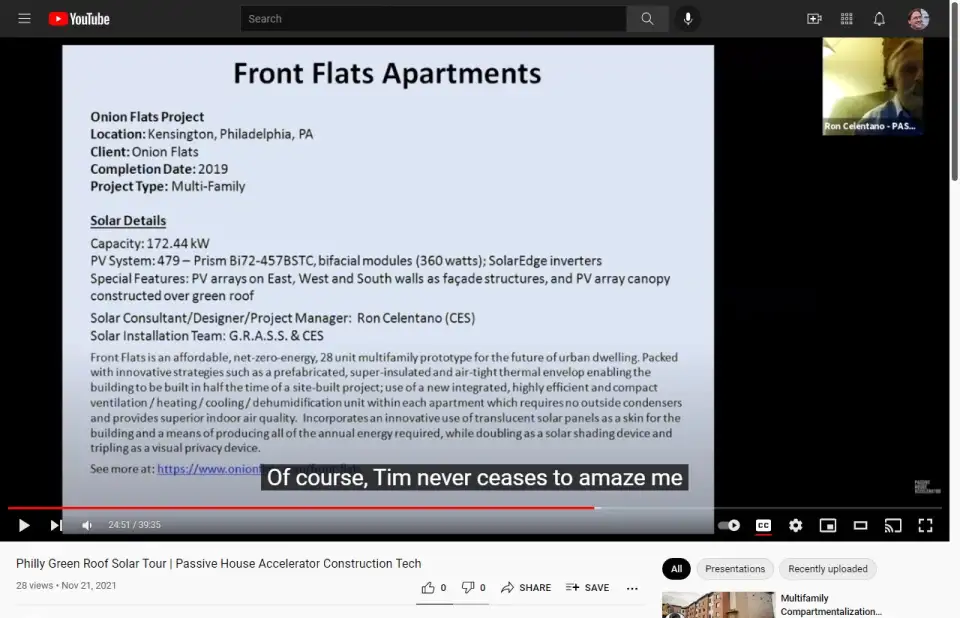
Okay. Front Flats, our last project here, and of course, Tim never ceases to amaze me where he says, "Okay, now I want this." He was very frustrated with the fact that that last project wasn't going to produce enough solar to offset all of the usage of the building, so he said, "Okay, fine. Let's put it on three sides of the building as well as on top of the roof. So the east, west and south walls." Okay, fine. That's what he wanted to do, and that's why I love working with this guy because he's going way beyond. I could never sell this concept to anybody. So when the developer and the architect is asking me to design this stuff for him because he wants that, that's fantastic. Anyway, this happens to be 172 kW system. Same kind of bifacial modules. They're a different manufacturer. SolarEdge inverters again. We're using DC optimizers. It was intended to be net-zero.
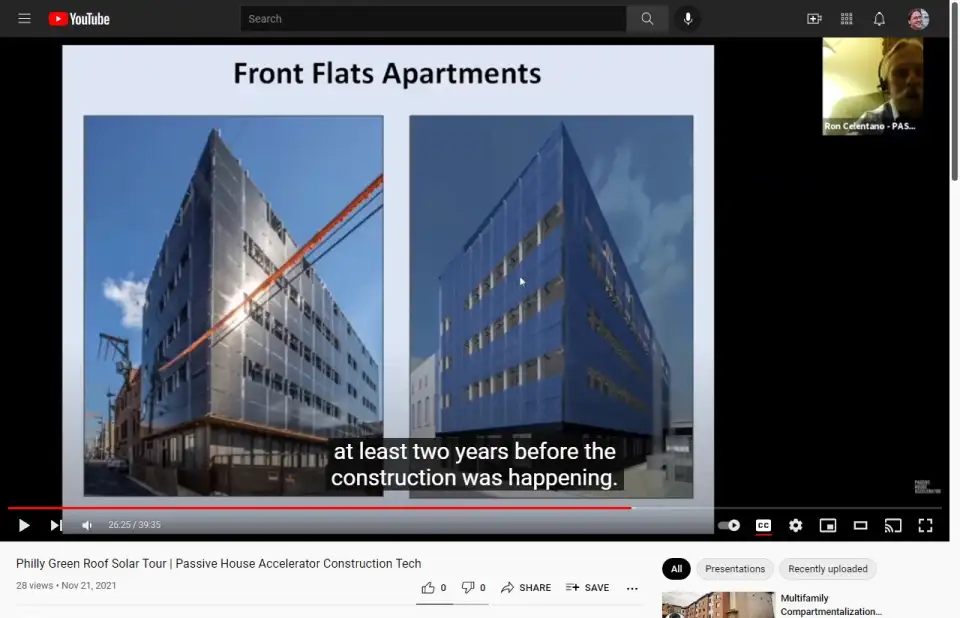
I have to say, unfortunately, we're still having some issues where we didn't quite reach set net-zero level, but it's a 28-unit system. A very efficient HVAC system that's being used in here. Let's see. ERVs, HRVs, the same type of thing that's being used for that too. Now this was pretty cool. The left side of course is the actual project, but I happened to discover this rendering in my files today as I was putting this thing together, and I was like, oh, man, this is so cool. It's like, how could you get so lucky to have something that's so similar. So this was of course the rendering that was done at least two years before the construction was happening. You could see how similar it really came out to looking to the actual construction. It's kind of cool. You can see you don't have as much open air or open space for radiation to come in for that green roof. I have to say, it probably, it will have an effect. It doesn't have as much solar radiation for enough maybe exposure for a green roof to really do well. We have yet to really see how that works out. There's an El that runs by here so it's extremely close to where this is at. You can see how the windows are all kind of, where there are no solar modules, there are windows there, and that was really for exposure. This is the racking of the structures that Tim, and where Onion Flats was developing as the building was being constructed. These are all welded aluminum structures that were going to be mounted onto the walls of the building.
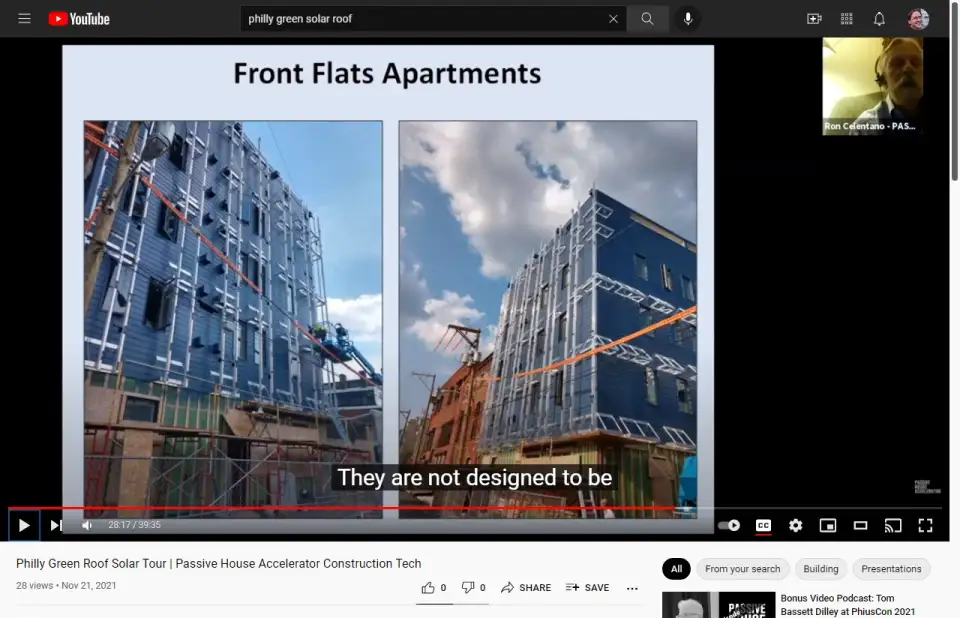
And then the rails were going to be mounted onto these, and then the solar panels are going to be mounted onto those. So here they're all stacked together. This is it being constructed right now. I wish, I have to say, I just wish I could document this stuff in sort of a very progressive time, but you get so swamped in being involved in the project, you forget to bring that camera along. But anyway, you can see how these are being mounted over here. Over here, the rails that've been already mounted onto those support structures. Again, the important thing about this is that these rails are intended for like on a tilt, like a 5, 10, 15, or 25 degree tilt. They are not designed to be vertically positioned to hold solar modules. I'll get into this a little bit more later on, and how this was a concerning thing for me, but we were able to secure it and make it work, but that was how this was kind of put together. Here is looking down the south wall, and you can see how they're mounted right up these amazing, these were amazingly stable. We were walking all inside here and it didn't budge at all. It's very, very secure. Here's the rail coming up. And then this is the intersection of that vertical and horizontal rail going onto the roof, just to show that detail.
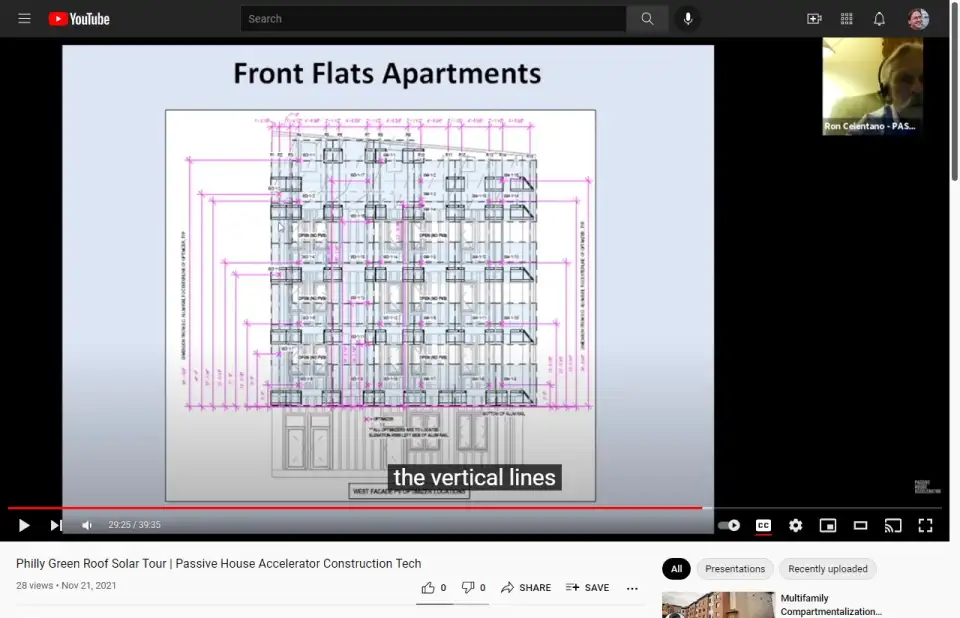
There was a great architect working with Onion Flats that was helping me out with doing all these great drawings for me to then hand over to some of the labor folks in Onion Flats to install all of the different equipment that was needed. In this particular case, this was the west wall and here you could see the rails are shown in here, the vertical lines, and there are also the solar modules, the little rectangular shaped things there. The intent here was to place these DC optimizers, mount them onto the rails before we put the solar modules on because the modules are the last thing to be placed, and those optimizers had to be located properly in order to put the solar panels in. So here are the dimensions of exactly where these things had to go, and they were placed in those exact locations all the time. So these labor guys, they were just amazing. They always did such great work on this.
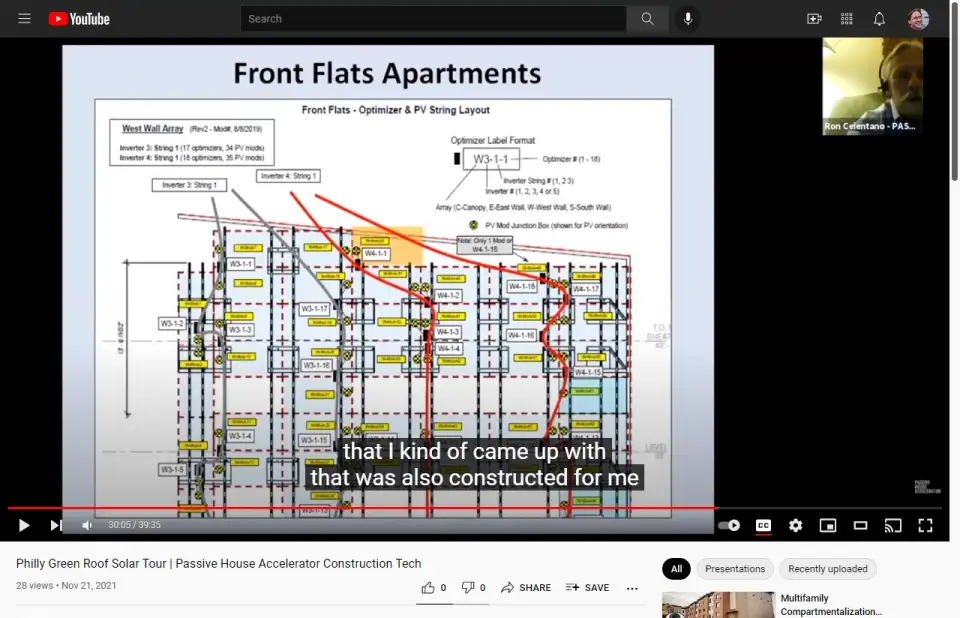
This was a drawing, another drawing that I kind of came up with that was also constructed for me, but it really laid out a much more detailed kind of layout here. This is kind of showing again, here is the solar module, for example, here are the rails. You can see the rails are the vertical. The solar module of course has a junction box which has whips, has two wires about two and a half feet long or so, the plus and the minus. In this case, what they do, they get tied into, they plug into the optimizer. These optimizers, these particular optimizers would take two solar modules each. So instead of it being one-to-one, it was two modules per optimizer. It was very important to position these modules so that they were close to an optimizer. You can see over here, this would be the junction box for this one, and that would go to this optimizer. So it was really important how these things were laid out and how close those optimizers had to be placed on these rails.
And then these are the strings. Now it's the optimizers that are actually tied together. The modules are tied to the optimizers, and then there's wires from the optimizers that go to each optimizer. Here's a string that goes all the way down and back up again, and that's going to be the plus and the minus of that particular string. And then that goes off to the inverter. Each inverter had three strings, and this is kind of like how it's laid out. Here's a code I used for all kind of the structure and how I kind of put this together. I have to say, this all went exactly as planned. It was really pretty phenomenal. A few little glitches, but no problems. We were able to straighten that all the time. I kind of would take those drawings and I'd place them on the wall, so we got the east, the west, the south wall, and the canopy all up in the wall so we can keep track of what was going on at all times.
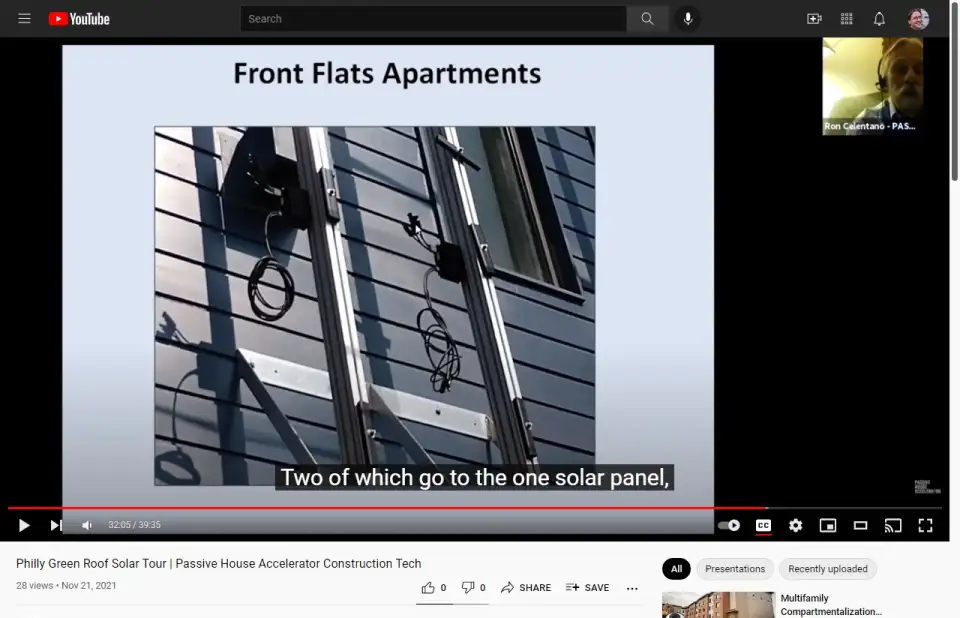
This is the optimizer I was talking about where you can see there's four wires over here. These four wires are two of which go to the one solar panel, two which go to the other solar panel, so you've got a plus a minus from one solar panel going in, plus a minus going from the other solar panel going in. And then this is the wire that comes from the optimizer and connects to another optimizer. So it's the optimizers that are actually really being connected to each other. Now this is where it comes down to my concern about these possibly sliding down. The way this was pressure mounted, holding the modules up against the rail, I was very concerned that there could be over time, some things could loosen up and gravity starts to pull stuff down.
I was able to get around that by using these 2" X 2" square aluminum plates that we were able to mount, and they just perfectly fit right underneath the solar module, which was fantastic. It blew me away that it just perfectly matched. So we screwed those in underneath every single clamp, and that obviously would hold that in place. It would never slide down at all, and you could see that that's where it is over here as well. It's going to position right underneath that clamp. So that was, it made me sleep at night.
Here we start now mounting the solar modules. I have to say, they were mounted and dismounted a couple of times because there was a learning curve. They maybe weren't lining up right to the left and the right, and over time we got it all straightened out. Here's Tim actually out at work. He's not sitting at his desk drawing; he's actually there doing some of that drilling right there. We're mounting up all the solar panels. We're trying to get this corner just right because it all came down to getting everything just perfectly in alignment. Now we're on the roof, and here are the rails going along the roof and these guys are mounting this up here. Again, here are the clamps.
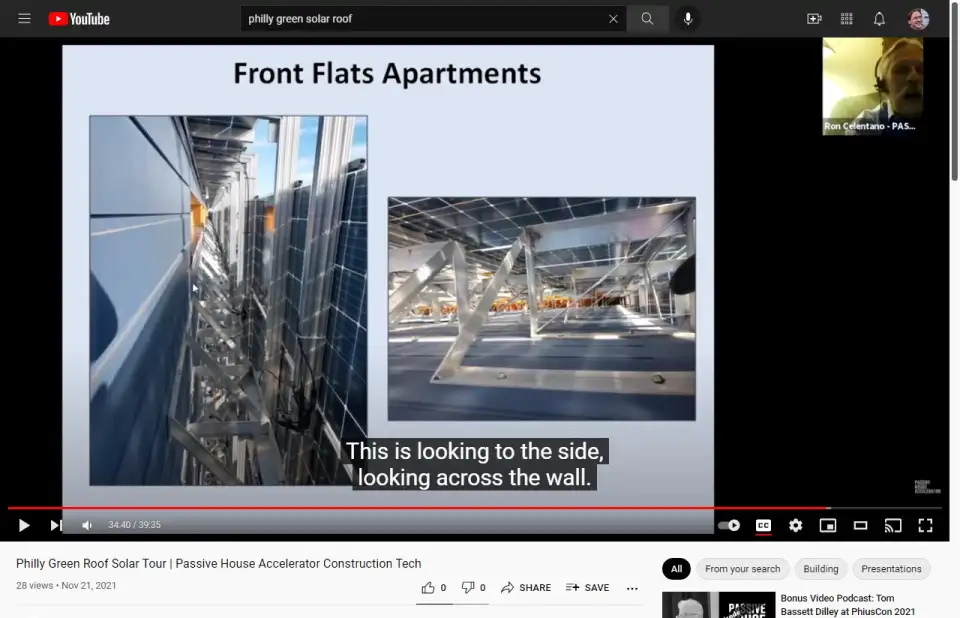
This is the completed south wall at this point. You can see the structure. This is actually showing a little bit more of that structure here, looking down, we're looking down from the fourth floor down. Again, there's actually my foot or maybe it's, yeah, I think it's my foot. You're able to walk in this. It was really awesome to be able to walk in here and feel perfectly safe doing so. This is looking to the side, looking across the wall and you can see how far out the solar modules were, and where that structure is all being connected up against the wall. This is again, the green roof is being prepared. They're doing some of the work and getting it in place. You can see the solar modules here in this location, as well as on the roof.
All the wiring for all those four sides, that's the east, west and south and canopy are all now coming together, converging over here on this left slide here or left picture. These are all the string wires that I was showing you before. Now they're coming into the conduit, and the inverters are in fact right against that wall right there. Here are the inverters, all five of them. Here's the distribution panel where the breakers are for each of these inverters. This is at 480 volts. This now goes down. We're on the roof, of course. At this point, we're going down all the way down to the basement, and here's coming in at this disconnect, a fuse disconnect at 480, goes into a transformer, an isolation transformer, and a step-down transformer down to 208, which is going now into this AC disconnect.
That's finally going into interconnection point on the service. This happens to be that little section I was pointing out before. Here's a little waterfall that's running down here. That was designed and it's working very nicely. Top view, poking my head through to one of the openings on the roof, and seeing some Philadelphia. Here's the monitoring system that was doing here. That is again using eGauge at this point. One of the meters are over here. This is the commercial panel which has some of the hot water, the heat pump water heaters. There's eight heat pump water heaters. Those were to be used, or we were trying to separate the residential from the commercial because what Onion Flats did was design a multi-use building. A part of this building Onion Flats moved into and is now some of their commercial space, so we were trying to separate out the residential versus the commercial part of it. That was done here.
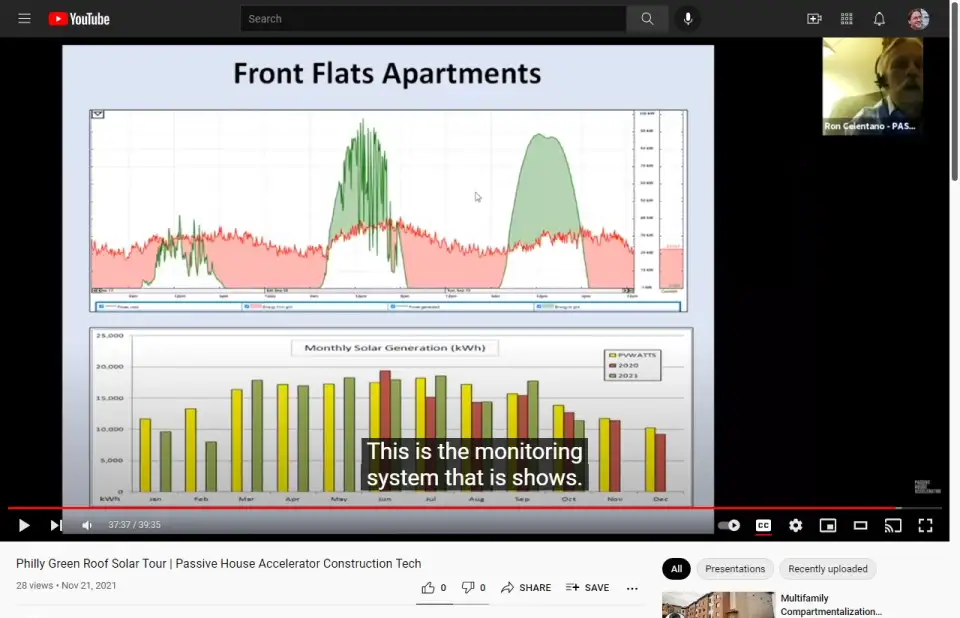
This is part of the residential circuit breakers and the feeders for that. CTs were on that. Same thing over here. More of those apartment buildings with the CTs on all of that. There's another monitoring system there. Here is the monitoring system. This is, again, eGauge and three days that we're showing its generation. Again, a relatively flat load shape, I'd say. On good days, we're doing almost 100 kW, 90 kW. I've seen over 100 kW that's being generated. This is the gross usage. It's not the net. This is demonstrating the amount of monthly solar generation every month. It's being compared to PV watts, what was simulated originally. The yellow is what was simulated basically using 30-year typical weather data, and then next to that is, in fact, what is coming out from 2020 and 2021. Now, with 2020, it was a very bad year for solar. There wasn't as much installation so there wasn't as good performance, but I will say that we are slightly underperforming what we are expecting to do, and I do have to investigate this a little bit more. The problem with data is that there's a lot of work that has to be done to follow up with it.
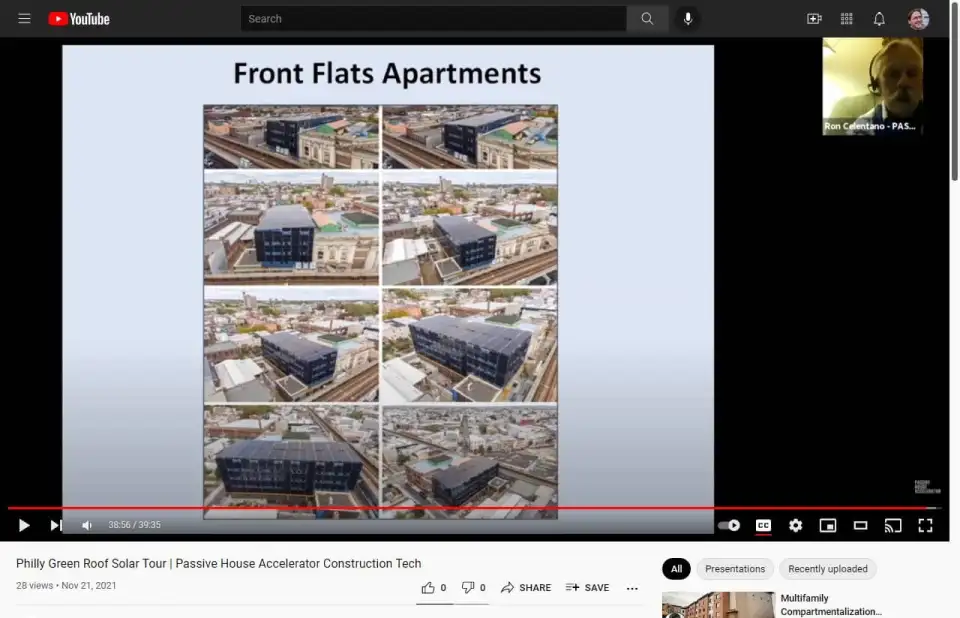
This is a final shot I think of that drone taking a little different views of the Front Flats project. It's Darth Vaderish, isn't it?


